Sharp XG-P610XN XG-P610X Operation Manual - Page 64
Reversing/Inverting, Projected Images, Controlling Multiple, Projectors with the One, Remote Control
 |
View all Sharp XG-P610XN manuals
Add to My Manuals
Save this manual to your list of manuals |
Page 64 highlights
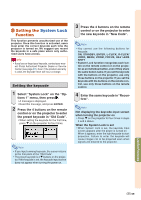
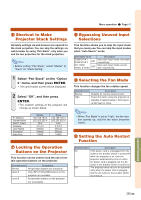
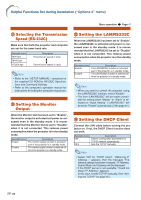
Helpful Functions Set during Installation ("Options 2" menu) Menu operation Page 47 2 Setting the Lamp Mode This function allows you to select the usage of the two lamps installed in the projector. Selectable items Both Lamps Lamp 1 Only Lamp 2 Only Equal Use Description Both lamps are used for greater brightness. The lamp 1 is used. When the lamp 1 burns out, the lamp 2 automatically switches in use. The lamp 2 is used. When the lamp 2 burns out, the lamp 1 automatically switches in use. Both lamps are used alternately for certain periods. 3 Selecting the Lens Type When you change the lens, you need to set the lens type. See the table below to select the lens type. Selectable items Type 1 Type 2 Type 3 Type 4 Type 5 Type 6 Type 7 Attached lens AN-P8EX AN-P12EX AN-P15EZ AN-P18EZ AN-P23EZ AN-P30EZ AN-P45EZ Info • The Lens Shift, Keystone Correction, etc. may not properly function if the correct lens type is not selected. 4 Reversing/Inverting Projected Images This projector is equipped with a reverse/invert image function that allows you to reverse or invert the projected image for various applications. Selectable items Front Ceiling + Front Rear Ceiling + Rear Description Normal image Inverted image Reversed image Reversed and inverted image Note • This function is used for the reversed image and ceiling-mount setups. (See page 23.) 5 Controlling Multiple Projectors with the One Remote Control This function allows you to control multiple projectors with the one remote control during the stack projection or the video wall projection. When using this function, connect the projectors with LAN cables and assign a projector as the master and the other projectors as the slaves. See page 27 for connecting LAN cables. Selectable items Normal Master Slave Description The stack setting is not available. Set the projector as the master. Set the projector as the slave. Note • When "Lens Type" is changed, "GEOMETRIC ADJUSTMENT", "H&V KEYSTONE" and "IMAGE RESIZING" will be reset. -62 Note • When controlling multiple projectors with the one remote control, settings via web browser are required. Refer to the "SETUP MANUAL" contained on the supplied CD-ROM for details. • Only when controlling two projectors with the one remote control, using "Pair Stack" allows you to skip settings via web browser. (See page 63.) • When "Slave" is selected on "Stack Setting", the slave projector cannot be controlled with the remote control. To control the slave projector with the remote control, connect the remote control to the projector. (See page 17.)
-
 1
1 -
2
-
3
-
4
-
5
-
6
-
7
-
8
-
9
-
10
-
11
-
12
-
13
-
14
-
15
-
16
-
17
-
18
-
19
-
20
-
21
-
22
-
23
-
24
-
25
-
26
-
27
-
28
-
29
-
30
-
31
-
32
-
33
-
34
-
35
-
36
-
37
-
38
-
39
-
40
-
41
-
42
-
43
-
44
-
45
-
46
-
47
-
48
-
49
-
50
-
51
-
52
-
53
-
54
-
55
-
56
-
57
-
58
-
 59
59 -
 60
60 -
 61
61 -
 62
62 -
 63
63 -
 64
64 -
 65
65 -
 66
66 -
 67
67 -
 68
68 -
 69
69 -
70
-
71
-
72
-
73
-
74
-
75
-
76
-
77
-
78
-
79
-
80
-
81
-
82
-
83
-
84
-
85
-
86
 |
 |
