Sharp FO IS125N Service Manual - Page 19
IC Protectors Replacement, 5. Power Supply Unit Replacement, 6. Volume Adjustment - drivers
 |
UPC - 074000034372
View all Sharp FO IS125N manuals
Add to My Manuals
Save this manual to your list of manuals |
Page 19 highlights
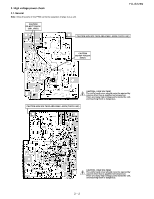
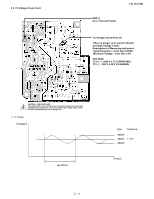
4. IC Protectors Replacement ICPs (IC Protectors) are installed to protect the Optical (LSU) unit, Printer motor drive circuit, Solenoid drive circuit and Scanner motor drive circuit. ICPs protect various ICs and electronic circuits from an overcurrent condition. The location of ICPs are shown below: F300:Top side F500/F501/F600:Bottom side CNPOUT CNTNR CNPN CNPIN CNRTH CNLAN CNSP CNTEL CNCIS CNHV CONTROL PWB(TOP SIDE) CNLSR F300 CNPM F500 CNMM F600 CNTXM F501 CNFM CNSL CNLNJ CNPW 1) F300 (KAB5002 251) is installed in order to protect IC's from an overcurrent generated in the IC302 circuit. If F300 is open, replace it with a new one. 2) F500 (KAB2402 402) is installed in order to protect IC's from an overcurrent generated in the Printer motor drive circuit. If F500 is open, replace it with a new one. 3) F501 (KAB5002 321) is installed in order to protect IC's from an overcurrent generated in the Solenoid driver circuit. If F501 is open, replace it with a new one. 4) F600 (KAB3202 801) is installed in order to protect IC's from an overcurrent generated in the Scanner motor drive circuit. If F5 is open, replace it with a new one. Replacement parts KAB3202 801 (Sharp code: QFS-L1037YCZZ) KAB5002 251 (Sharp code: QFS-L2021XHZZ) KAB2402 402 (Sharp code: QFS-L2025XHZZ) KAB5002 321 (Sharp code: QPRTR2001XHZZ) 5. Power Supply Unit Replacement FO-IS125N [PRIMARY] F2 F1 [SECONDARY] 1 F101 CN3 T1 TRANSFORMER F301 1) F1 (K7135AS007): AC250V/10A is installed in order to protect overcurrent by heater circuit breakdown. 2) F2 (K7144AR005): HTM250V/4A is installed in order to protect overcurrent by primary circuit breakdown. 3) F101 (K7144AR005): HTM250V/4A is installed in order to protect overcurrent by breakdown of +24V line. 4) F301 (K7144AR002): HTM250V/2A is installed in order to protect overcurrent by breakdown of Ach line. Caution: Don't use fuse except for rating above. 6. Volume Adjustment You can adjust the volume of the speaker, handset, and ringer using the up and down arrow keys. 1. Speaker volume SPEAKER 1) Press . 2) Press or to select HIGH, MIDDLE, or LOW. • To turn off the speaker, press again. 2. Handset 1) When talking through the handset, press or to select HIGH, MIDDLE, or LOW. • Note: The volume reverts to MIDDLE each time you replace the handset. 3. Ringer 1) Press or to select HIGH, MIDDLE, LOW or SPEAKER OFF. (Make sure has not been pressed, the handset is not lifted, and a document is not loaded in the feeder.) • The ringer will ring once at the selected level. START 2) If you selected "OFF OK?" to turn off the ringer, press . 2 - 6
-
 1
1 -
2
-
3
-
4
-
5
-
6
-
7
-
8
-
9
-
10
-
11
-
12
-
13
-
 14
14 -
 15
15 -
 16
16 -
 17
17 -
 18
18 -
 19
19 -
 20
20 -
 21
21 -
 22
22 -
 23
23 -
 24
24 -
25
-
26
-
27
-
28
-
29
-
30
-
31
-
32
-
33
-
34
-
35
-
36
-
37
-
38
-
39
-
40
-
41
-
42
-
43
-
44
-
45
-
46
-
47
-
48
-
49
-
50
-
51
-
52
-
53
-
54
-
55
-
56
-
57
-
58
-
59
-
60
-
61
-
62
-
63
-
64
-
65
-
66
-
67
-
68
-
69
-
70
-
71
-
72
-
73
-
74
-
75
-
76
-
77
-
78
-
79
-
80
-
81
-
82
-
83
-
84
-
85
-
86
-
87
-
88
-
89
-
90
-
91
-
92
-
93
-
94
-
95
-
96
-
97
-
98
-
99
-
100
-
101
-
102
-
103
-
104
-
105
-
106
-
107
-
108
-
109
-
110
-
111
-
112
-
113
-
114
-
115
-
116
-
117
-
118
-
119
-
120
-
121
-
122
-
123
-
124
-
125
-
126
-
127
-
128
-
129
-
130
-
131
-
132
-
133
-
134
-
135
-
136
-
137
-
138
-
139
-
140
-
141
-
142
-
143
-
144
-
145
-
146
-
147
-
148
-
149
-
150
-
151
-
152
-
153
-
154
-
155
-
156
-
157
-
158
-
159
-
160
-
161
-
162
-
163
-
164
-
165
-
166
-
167
-
168
-
169
-
170
-
171
-
172
-
173
-
174
-
175
-
176
-
177
-
178
 |
 |
