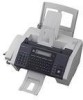
Sharp FO IS125N Service Manual - Page 12
[6] Clearing paper jams, 1. Clearing a jammed document, 2. Clearing jammed printing paper
 |
UPC - 074000034372
View all Sharp FO IS125N manuals
Add to My Manuals
Save this manual to your list of manuals |
Page 12 highlights
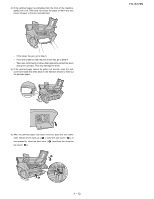
FO-IS125N [6] Clearing paper jams 1. Clearing a jammed document If the original document doesn't feed properly during transmission or copying, or [DOCUMENT JAMMED] appears in the display, first try pressing START . If the document doesn't feed out, remove it as explained below. 1) Open the operation panel. 4) Close the operation panel, pressing down firmly on both sides to make sure it clicks into place. 2. Clearing jammed printing paper 1) Open the top cover of the machine. 2) Rotate the lever so that it points straight up and pull it up ( 1 ). Remove the document ( 2 ). 2 1 1 2 • Caution! The fusing unit inside the print compartment becomes very hot during operation. Do not touch the inside of the print compartment after the machine has been in operation. 2) Press the release ( 1 ) and open the front cover ( 2 ). 3) Make sure the left end of the roller is inserted correctly in its holder ( 1 ), and then push the right end of the roller down ( 2 ) and rotate the lever back down ( 3 ). 1 2 1 3) Push the two heater roller release levers down to release the heater roller. 2 3 1 - 11
-
 1
1 -
2
-
3
-
4
-
5
-
6
-
 7
7 -
 8
8 -
 9
9 -
 10
10 -
 11
11 -
 12
12 -
 13
13 -
 14
14 -
 15
15 -
 16
16 -
 17
17 -
18
-
19
-
20
-
21
-
22
-
23
-
24
-
25
-
26
-
27
-
28
-
29
-
30
-
31
-
32
-
33
-
34
-
35
-
36
-
37
-
38
-
39
-
40
-
41
-
42
-
43
-
44
-
45
-
46
-
47
-
48
-
49
-
50
-
51
-
52
-
53
-
54
-
55
-
56
-
57
-
58
-
59
-
60
-
61
-
62
-
63
-
64
-
65
-
66
-
67
-
68
-
69
-
70
-
71
-
72
-
73
-
74
-
75
-
76
-
77
-
78
-
79
-
80
-
81
-
82
-
83
-
84
-
85
-
86
-
87
-
88
-
89
-
90
-
91
-
92
-
93
-
94
-
95
-
96
-
97
-
98
-
99
-
100
-
101
-
102
-
103
-
104
-
105
-
106
-
107
-
108
-
109
-
110
-
111
-
112
-
113
-
114
-
115
-
116
-
117
-
118
-
119
-
120
-
121
-
122
-
123
-
124
-
125
-
126
-
127
-
128
-
129
-
130
-
131
-
132
-
133
-
134
-
135
-
136
-
137
-
138
-
139
-
140
-
141
-
142
-
143
-
144
-
145
-
146
-
147
-
148
-
149
-
150
-
151
-
152
-
153
-
154
-
155
-
156
-
157
-
158
-
159
-
160
-
161
-
162
-
163
-
164
-
165
-
166
-
167
-
168
-
169
-
170
-
171
-
172
-
173
-
174
-
175
-
176
-
177
-
178
 |
 |
