Rane MP2015 Owners Manual - Page 11
Why add a Submix to a DJ mixer?, Using the Submix, Submix and the External FX Loop
 |
View all Rane MP2015 manuals
Add to My Manuals
Save this manual to your list of manuals |
Page 11 highlights
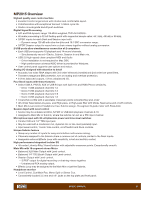
Why add a Submix to a DJ mixer? One huge leap forward in DJ technology is the introduction of auto sync. Using CDJs, Traktor, Virtual DJ, Ableton, or most any DJ software, the sync feature opens the gates to creative multisource mixing. New technology offers new possibilities, and might make you rethink how you mix. A Submix removes the burden of having to simultaneously manage separate gain, EQ, and filter controls for multiple channels when mixing multiple sources. Grouping the tracks together within the Submix allows one simple set of controls to easily control Mix level, EQ and Filter settings for multiple channels, turning one control instead of 2, 3 or 4 all at once. When mixing two sources, you probably won't use the Submix, unless you want to add an external effect to one or both of the channels. The Submix is key for DJs needing to easily and intuitively mix multiple sources at once. Using the Submix Let's look at an example with three sources of audio coming from software: • The main track is on channel 1, a drum loop on channel 2, and a looped sample on channel 3. • There is a breakdown coming up in the main track and you want to filter out the Low/Mid range while turning down the gain of the tracks on channels 2 and 3 going into the breakdown. • Before assigning channels to the Submix, make certain that doing so initially has a neutral affect on what is being played. Turn the Submix Mix control all the way up, set the tone controls at 12 o'clock, and turn off the Filter within the Submix channel. This ensures that the audio sent to the Submix is initially unaffected by the Submix routing. • Press the SUB buttons next to the Source selector on both channels 2 and 3. This sends the audio of both channels to the Submix. • Now you can control both tracks on channels 2 and 3 using the Submix control strip. • As you get closer to the breakdown about to happen on the channel 1 track: • Turn on the Filter within the Submix channel. • Start filtering out the Low and Mid range frequencies with the Filter control. • Turn down the level of both tracks with the MIX knob in the Submix. Mix successfully executed! Without a Submix, you would need to turn on two Filters, adjust two Filter controls and turn down two Mix controls to execute the same mix. Adding more tracks to the mix makes this process even harder to manage and could land in a sea of uncontrolled sound and a confused dance floor. LEFT RIGHT OL +10 +7 +5 +3 +2 +1 0 -1 -2 -3 -5 -7 -10 -15 -24 MAIN FX LOOP SUB FX ON DRY WET | OL +10 OFF +6 +7 HIGH +5 +3 | +2 +1 0 -1 OFF +6 -2 MID -3 -5 | -7 -10 -15 -24 OFF +6 LOW LOW HIGH RESONANCE FILTER Submix and the External FX Loop The Submix features an external effects insert, allowing you to add effects to assigned channels. The external FX controls are located at the top of the Submix channel strip: 456 3 7 2 8 1 9 1. FX ON button: sends and returns audio from an outboard effects processor. 2. MAIN / SUB switch: allows you to choose whether you want to add an effect to audio coming into the Submix or to the Main mix. 0 10 MIX CUE SUBMIX 3. WET / DRY: controls the amount of the effect. You'll find the RCA Send and Return jacks and a level switch on the rear panel. Here's how it works: 1. Connect the MP2015 SEND to the input of your external effects processor. 2. Connect the output of the effects processor to the MP2015 RETURN. a. If you use a consumer-grade effects processor, such as the Korg Kaoss Pad, engage the -10 switch by pressing it in. This matches the I/O level of the external effects processor to the MP2015. 3. Select SUB or MAIN mix as the location for the effects insert: • If you want the effect on everything, select MAIN. • If you want the effect only on the Submix selected intputs, select SUB. a. For the Main mix, set the effects assign toggle to MAIN then simply press the FX ON button to engage the FX Loop and rotate the control toward WET until you hear the desired effect amount. b. To apply an effect to channels assigned to the Submix, set the FX Loop assign to SUB. Send the desired channels to the Submix. Turn the FX ON and adjust WET / DRY as desired. c. To avoid any change in your mix when sending channels to the Submix, make sure the MIX knob in the Submix is turned all the way up, the tone controls are dead center at 12 o'clock, and the FILTER switch is turned off. MP2015 MANUAL 11
-
 1
1 -
2
-
3
-
4
-
5
-
 6
6 -
 7
7 -
 8
8 -
 9
9 -
 10
10 -
 11
11 -
 12
12 -
 13
13 -
 14
14 -
 15
15 -
 16
16 -
17
-
18
-
19
-
20
-
21
-
22
-
23
-
24
-
25
-
26
-
27
-
28
 |
 |
