Pyle PTED06 User Guide - Page 6
Top Panel
 |
View all Pyle PTED06 manuals
Add to My Manuals
Save this manual to your list of manuals |
Page 6 highlights
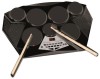
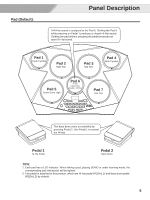
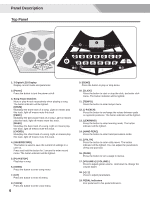
Panel Description Top Panel DRUM PERC SONG KIT VOICE BASS CHORD SAVE/ PLAY/ RECORD STOP SONG KIT VOICE CLICK TEMPO L-R EXCH LEARNING HAND PERC UTILITY PAGE VOLUME PEDAL 1 PEDAL 2 3 DRUM PERC 1 SONG KIT VOICE BASS CHORD SAVE/ PLAY/ RECORD STOP SONG KIT VOICE CLICK 4 5 6 7 8 9 10 VOLUME 2 TEMPO L-R EXCH LEARNING HAND PERC UTILITY PAGE 17 11 12 13 14 15 16 PEDAL 1 19 18 PEDAL 2 19 1. 3-Digital-LED Display Display current mode and parameter. 2. [Power] Press the button to turn the power on/off. 3. Song Track Switches Mute or play 4 track respectively when playing a song. The button indicator will be lighted. [DRUM] Mute/play the drum track of a song. Light on means play this track, light off means mute this track. [PERC] Mute/play the percussion track of a song. Light on means play this track, light off means mute this track. [BASS] Mute/play the bass track of a song. Light on means play this track, light off means mute this track. [CHORD] Mute/play the chord track of a song. Light on means play this track, light off means mute this track. 4. [SAVE/RECORD] This button is used to save the current kit settings in a user kit. Press and hold the button for 1 second to enter record menu. The button indicator will be lighted. 5. [PLAY/STOP] Play/stop a song. 6. [SONG] Press the button to enter song menu. 7. [KIT] Press the button to enter kit menu. 8. [VOICE] Press the button to enter voice menu. 6 9. [DEMO] Press the button to play or stop demo. 10. [CLICK] Press the button to start or stop the click, and enter click menu. The button indicator will be lighted. 11. [TEMPO] Press the button to enter tempo menu. 12. [L-R EXCH] Press the button to exchange the voices between pads on opposite positions. The button indicator will be lighted. 13. [LEARNING] Press the button to enter learning mode. The button indicator will be lighted. 14. [HAND PERC] Press the button to enter hand percussion mode. 15. [UTILITY] Press the button to enter utility menu. The button indicator will be lighted. You can adjust the parameters of EQ and pad start. 16. [PAGE] Press the button to turn a page in menus. 17. [VOLUME+] / [VOLUME-] Press to adjust global volume. Hold down to change the volume faster. 18. [+] / [-] Press to adjust parameters. 19. PEDAL Indicators Kick pedal and hi-hat pedal indicators.
-
 1
1 -
 2
2 -
 3
3 -
 4
4 -
 5
5 -
 6
6 -
 7
7 -
 8
8 -
 9
9 -
 10
10 -
 11
11 -
 12
12 -
13
-
14
-
15
-
16
-
17
-
18
-
19
-
20
-
21
-
22
-
23
-
24
 |
 |
