Panasonic AJ-PX800 Operating Instructions - Page 22
Menu operation and thumbnail operation
 |
View all Panasonic AJ-PX800 manuals
Add to My Manuals
Save this manual to your list of manuals |
Page 22 highlights
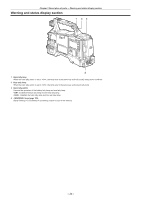
Chapter 2 Description of parts - Menu operation section and thumbnail operation section Menu operation section and thumbnail operation section 12 34567 1 Jog dial button (page 117) ffWhen the setting menu is displayed, navigate through the setting menu pages to select and set items. Turning the jog dial button toward the bottom moves the cursor toward the bottom. Turning it toward the top moves the cursor toward the top. Press the jog dial button to fix the settings. ffWhen the setting menu is not displayed, the following operation allows you to adjust the synchro scan speed. Press the switch from the position towards the side several times to display the shutter speed in highlight and adjust using the jog dial button in synchro scan mode. (page 58) 2 button (page 117) Press this button to display [USER MENU]. Press this button for 3 seconds or more to display the main menu. Press it again to return to the original image. During recording, button operation is disabled. This button functions in the same way as the button. 3 button (page 100) Press the button to display the thumbnail screen on the viewfinder and the monitor screen connected to the camera. Button operations are disabled during recording and playback. 4 / buttons (pages 102, 117) Restore the display to the previous state while the setting menu or property screen is displayed. Press this button while holding down the button to act as the cancel button. This is convenient, for example, for batch-canceling clip selections. 5 Cursor/ button (pages 102, 117) Operate the setting menu and thumbnails. The four triangular buttons are cursor buttons and the square button in the center is the button. 6 button Press this button to display [USER MENU]. Press this button for three seconds or more to display the main menu. Press it again to return to the original image. During recording, button operation is disabled. This button functions in the same way as the button. @@NOTE tt Use the cursor/ button and the / buttons to select thumbnails or operate menus. (page 102) 7 button (pages 102, 117) Use this button while using other buttons at the same time. Operations with the button held down are displayed in orange at the bottom of each button. ffPress the cursor button (`/{) while holding down the button. This moves the cursor to the thumbnail of the clip at the start or the end on the thumbnail screen. ffPress the button while holding down the button This selects all clips from the previously selected clip up to the clip at the cursor position. ffPress the / buttons while holding down the button. This works as the cancelation function. - 22 -
-
 1
1 -
2
-
3
-
4
-
5
-
6
-
7
-
8
-
9
-
10
-
11
-
12
-
13
-
14
-
15
-
16
-
 17
17 -
 18
18 -
 19
19 -
 20
20 -
 21
21 -
 22
22 -
 23
23 -
 24
24 -
 25
25 -
 26
26 -
 27
27 -
28
-
29
-
30
-
31
-
32
-
33
-
34
-
35
-
36
-
37
-
38
-
39
-
40
-
41
-
42
-
43
-
44
-
45
-
46
-
47
-
48
-
49
-
50
-
51
-
52
-
53
-
54
-
55
-
56
-
57
-
58
-
59
-
60
-
61
-
62
-
63
-
64
-
65
-
66
-
67
-
68
-
69
-
70
-
71
-
72
-
73
-
74
-
75
-
76
-
77
-
78
-
79
-
80
-
81
-
82
-
83
-
84
-
85
-
86
-
87
-
88
-
89
-
90
-
91
-
92
-
93
-
94
-
95
-
96
-
97
-
98
-
99
-
100
-
101
-
102
-
103
-
104
-
105
-
106
-
107
-
108
-
109
-
110
-
111
-
112
-
113
-
114
-
115
-
116
-
117
-
118
-
119
-
120
-
121
-
122
-
123
-
124
-
125
-
126
-
127
-
128
-
129
-
130
-
131
-
132
-
133
-
134
-
135
-
136
-
137
-
138
-
139
-
140
-
141
-
142
-
143
-
144
-
145
-
146
-
147
-
148
-
149
-
150
-
151
-
152
-
153
-
154
-
155
-
156
-
157
-
158
-
159
-
160
-
161
-
162
-
163
-
164
-
165
-
166
-
167
-
168
-
169
-
170
-
171
-
172
-
173
-
174
-
175
-
176
-
177
-
178
-
179
-
180
-
181
-
182
-
183
-
184
-
185
-
186
-
187
-
188
-
189
-
190
-
191
-
192
-
193
-
194
-
195
-
196
-
197
-
198
-
199
-
200
-
201
-
202
-
203
-
204
-
205
-
206
-
207
-
208
-
209
-
210
-
211
-
212
 |
 |
