Panasonic AJ-PX380GF Operating Instructions - Page 128
Setting menu display, Setting menu basic operations
 |
View all Panasonic AJ-PX380GF manuals
Add to My Manuals
Save this manual to your list of manuals |
Page 128 highlights
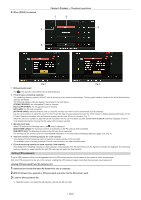
Setting menu display Chapter 6 Menu Operations - Setting menu display Setting menu basic operations You can change camera settings using the setting menu according to the shooting scene and recording details. The menu is divided into the main menu, submenu, and setting item menu. Set data are written and saved in the internal memory of the camera. This section describes main menu operations. Main menu operation is the same as the other menus except when opening the menu screen. ab a: Jog dial button b: button c: / button d: `{YI cursor buttons m button e: button This button functions in the same way as the button. f: button c d ef Fig. 1 Fig. 2 Fig. 3 Fig. 4 Fig. 5 1 Press and hold the button for three seconds or more when not recording. ffThe main menu screen appears on the viewfinder. 2 Use the jog dial button (or the cursor buttons (`/{)) to place the cursor on the corresponding menu item. (Fig. 1) ffPress the cursor buttons (`/{) to move the cursor up or down. ffIf there is a menu in the next level, [w] is displayed in the menu items. Press the jog dial button, the cursor button (I), or the button to open lower-level menus. (Fig. 2) ffPress the cursor button (Y) or the button to return to the upper-level menu. You can go back to the upper levels by using the jog dial button to place the cursor on the topmost line ([EXIT]) then pressing it. - 128 -
-
 1
1 -
2
-
3
-
4
-
5
-
6
-
7
-
8
-
9
-
10
-
11
-
12
-
13
-
14
-
15
-
16
-
17
-
18
-
19
-
20
-
21
-
22
-
23
-
24
-
25
-
26
-
27
-
28
-
29
-
30
-
31
-
32
-
33
-
34
-
35
-
36
-
37
-
38
-
39
-
40
-
41
-
42
-
43
-
44
-
45
-
46
-
47
-
48
-
49
-
50
-
51
-
52
-
53
-
54
-
55
-
56
-
57
-
58
-
59
-
60
-
61
-
62
-
63
-
64
-
65
-
66
-
67
-
68
-
69
-
70
-
71
-
72
-
73
-
74
-
75
-
76
-
77
-
78
-
79
-
80
-
81
-
82
-
83
-
84
-
85
-
86
-
87
-
88
-
89
-
90
-
91
-
92
-
93
-
94
-
95
-
96
-
97
-
98
-
99
-
100
-
101
-
102
-
103
-
104
-
105
-
106
-
107
-
108
-
109
-
110
-
111
-
112
-
113
-
114
-
115
-
116
-
117
-
118
-
119
-
120
-
121
-
122
-
 123
123 -
 124
124 -
 125
125 -
 126
126 -
 127
127 -
 128
128 -
 129
129 -
 130
130 -
 131
131 -
 132
132 -
 133
133 -
134
-
135
-
136
-
137
-
138
-
139
-
140
-
141
-
142
-
143
-
144
-
145
-
146
-
147
-
148
-
149
-
150
-
151
-
152
-
153
-
154
-
155
-
156
-
157
-
158
-
159
-
160
-
161
-
162
-
163
-
164
-
165
-
166
-
167
-
168
-
169
-
170
-
171
-
172
-
173
-
174
-
175
-
176
-
177
-
178
-
179
-
180
-
181
-
182
-
183
-
184
-
185
-
186
-
187
-
188
-
189
-
190
-
191
-
192
-
193
-
194
-
195
-
196
-
197
-
198
-
199
-
200
-
201
-
202
-
203
-
204
-
205
-
206
-
207
-
208
-
209
-
210
-
211
-
212
-
213
-
214
-
215
-
216
-
217
-
218
-
219
-
220
-
221
-
222
-
223
-
224
-
225
-
226
-
227
 |
 |
