Oki ES9465 ES9465/ES9475 MFP Management Guide - Page 111
Setting secure PDF, On the SECURITY screen, press [SECURE PDF].
 |
View all Oki ES9465 manuals
Add to My Manuals
Save this manual to your list of manuals |
Page 111 highlights
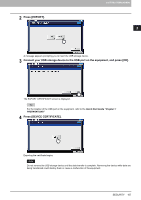
2.SETTING ITEMS (ADMIN) 2 SETTING ITEMS (ADMIN) „ Setting secure PDF You can set the default values for the encryption that will be applied when generating a secure PDF file from data scanned on this equipment. You can also enable or disable the forced encryption mode. This security settings apply to "Scan to File or USB" and "Scan to E-mail" jobs. 1 On the SECURITY screen, press [SECURE PDF]. The SECURE PDF screen is displayed. 2 Specify the default values to apply when generating a secure PDF as required, and press [OK]. Item name USER PASSWORD USE AUTHENTICATION CODE AS PASSWORD MASTER PASSWORD ENCRYPTION LEVEL FORCED ENCRYPTION AUTHORITY Description Press this button to enter the password required to open a secure PDF file. No user password is initially set. y ENABLE - Press this button to use the user authentication user name as user password. y DISABLE - Press this button to use the user password entered in [USER PASSWORD] above instead of the user authentication user name. Press this button to enter the password required to change the security setting of a secure PDF file. No master password is initially set. Select the encryption level for the secure PDF files. y 128bit AES - Press this button to set an encryption level compatible with Acrobat 7.0, PDF V1.6. y 128bit RC4 - Press this button to set an encryption level compatible with Acrobat 5.0, PDF V1.4. y 40bit RC4 - Press this button to set an encryption level compatible with Acrobat 3.0, PDF V1.1. y ENABLE - Press this button to only allow output of data scanned by this equipment as secure PDF files. y DISABLE - Press this button to allow other file formats (such as JPEG and TIFF). Select the authority for a secure PDF file. y PRINT - Press this button to allow printing. y CHANGE - Press this button to allow changing the document. y EXTRACT - Press this button to allow copying and extracting content. y ACCESSIBILITY - Press this button to allow Content Extraction for Accessibility. When you press [USER PASSWORD] or [MASTER PASSWORD], the on-screen keyboard is displayed. For details of the on-screen keyboard, see the following page: P.154 "On-screen keyboard" SECURITY 109
-
 1
1 -
2
-
3
-
4
-
5
-
6
-
7
-
8
-
9
-
10
-
11
-
12
-
13
-
14
-
15
-
16
-
17
-
18
-
19
-
20
-
21
-
22
-
23
-
24
-
25
-
26
-
27
-
28
-
29
-
30
-
31
-
32
-
33
-
34
-
35
-
36
-
37
-
38
-
39
-
40
-
41
-
42
-
43
-
44
-
45
-
46
-
47
-
48
-
49
-
50
-
51
-
52
-
53
-
54
-
55
-
56
-
57
-
58
-
59
-
60
-
61
-
62
-
63
-
64
-
65
-
66
-
67
-
68
-
69
-
70
-
71
-
72
-
73
-
74
-
75
-
76
-
77
-
78
-
79
-
80
-
81
-
82
-
83
-
84
-
85
-
86
-
87
-
88
-
89
-
90
-
91
-
92
-
93
-
94
-
95
-
96
-
97
-
98
-
99
-
100
-
101
-
102
-
103
-
104
-
105
-
 106
106 -
 107
107 -
 108
108 -
 109
109 -
 110
110 -
 111
111 -
 112
112 -
 113
113 -
 114
114 -
 115
115 -
 116
116 -
117
-
118
-
119
-
120
-
121
-
122
-
123
-
124
-
125
-
126
-
127
-
128
-
129
-
130
-
131
-
132
-
133
-
134
-
135
-
136
-
137
-
138
-
139
-
140
-
141
-
142
-
143
-
144
-
145
-
146
-
147
-
148
-
149
-
150
-
151
-
152
-
153
-
154
-
155
-
156
-
157
-
158
-
159
-
160
-
161
-
162
-
163
-
164
-
165
-
166
-
167
-
168
-
169
-
170
-
171
-
172
-
173
-
174
-
175
-
176
-
177
-
178
-
179
-
180
-
181
-
182
-
183
-
184
-
185
-
186
-
187
-
188
-
189
-
190
 |
 |
