NordicTrack Rw600 Instruction Manual
NordicTrack Rw600 Manual
 |
View all NordicTrack Rw600 manuals
Add to My Manuals
Save this manual to your list of manuals |
NordicTrack Rw600 manual content summary:
- NordicTrack Rw600 | Instruction Manual - Page 1
serial number in the space above for reference. Serial Number Decal (under frame) CUSTOMER SERVICE UNITED KINGDOM Call: 0330 123 1045 From Ireland: 053 92 36102 Website: iconsupport.eu 2153 AUSTRALIA CAUTION Read all precautions and instructions in this manual before using this equipment. Keep this - NordicTrack Rw600 | Instruction Manual - Page 2
OF CONTENTS WARNING DECAL PLACEMENT 2 IMPORTANT PRECAUTIONS 3 BEFORE YOU BEGIN 4 PART IDENTIFICATION CHART 5 ASSEMBLY 6 HOW TO USE THE ROWER 11 HOW TO USE THE CONSOLE 14 MAINTENANCE AND TROUBLESHOOTING 24 EXERCISE GUIDELINES 26 PART LIST 28 EXPLODED DRAWING 30 ORDERING REPLACEMENT PARTS - NordicTrack Rw600 | Instruction Manual - Page 3
and instructions in this manual and all warnings on the rower before using the rower. ICON or persons with pre-existing health problems. 3. The rower is not intended for use by back straight while using the rower; do not arch your back. 13. Do not release the row bar while the strap is extended - NordicTrack Rw600 | Instruction Manual - Page 4
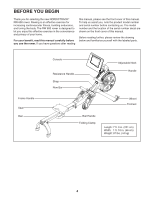
BEFORE YOU BEGIN Thank you for selecting the new NORDICTRACK® RW 600 rower. Rowing is an effective exercise for increasing cardiovascular fitness, building endurance, and toning the body. The RW 600 rower is designed to let you enjoy this effective exercise in the convenience and privacy of your - NordicTrack Rw600 | Instruction Manual - Page 5
parentheses below each drawing is the key number of the part, from the PART LIST near the end of this manual. The number following the key number is the quantity needed for assembly. Note: If a part is not in the hardware kit, check to see if it has been preassembled. Extra parts - NordicTrack Rw600 | Instruction Manual - Page 6
wrench Assembly may be easier if you have a set of wrenches. To avoid damaging parts, do not use power tools. 1. To register your product and activate your warranty in the UK, go to iconsupport.eu. If 1 you do not have internet access, call Customer Service (see the front cover of this manual - NordicTrack Rw600 | Instruction Manual - Page 7
3. Have a second person hold the Rail (2) during this step. 3 Attach the Stabilizer (3) to the Frame (1) with two M10 x 20mm Screws (61). Then, hold the Rail Handle (34), pull the Rail (2) outward, and rest the Rail on the floor (see the drawing in step 4). 2 34 1 3 61 4. Orient the Seat (23) - NordicTrack Rw600 | Instruction Manual - Page 8
5. Slide the Seat (23) to the front of the Rail (2). Next, attach a Stop (32) to each side of the Rail (2) with an M4 x 19mm Screw (69). Then, attach the Rail Cap (38) to the Rail (2) with two M4 x 19mm Screws (69). 5 69 32 23 2 69 69 38 32 69 6. While a second person holds the Upright (77) - NordicTrack Rw600 | Instruction Manual - Page 9
7. Loosen and remove the Handle (78) from the Upright (77). Note: The Handle functions like a 7 ratchet. Turn the Handle in the desired direction, pull it outward, turn it in the opposite direction, push it inward, and then turn it in the desired direction again. Repeat this process as many - NordicTrack Rw600 | Instruction Manual - Page 10
) into the receptacle on the front of the rower. 9 Note: To plug the Power Adapter (107) into an outlet, see HOW TO PLUG IN THE POWER ADAPTER on page 11. 107 10. Make sure that all parts are properly tightened before you use the rower. Extra parts may be included. Place a mat - NordicTrack Rw600 | Instruction Manual - Page 11
adapter (A) into the receptacle on A the front of the rower. Insert the appropriate plug adapter into the power adapter if necessary resistance that you feel when you pull the row bar. You can adjust the resistance both digitally and manually. First, adjust the resistance digitally, by - NordicTrack Rw600 | Instruction Manual - Page 12
inward until the folding clamp (O) engages the bar on the stabilizer (P). J I K L, M O P J H I N Q P Q K Next, hold and lift the frame handle (J) and the rail handle (K), and tip the rower forward onto the shields (L, M) and the storage feet (N) (see the drawing at the right). To unfold the - NordicTrack Rw600 | Instruction Manual - Page 13
not hold or pull on the console when moving the rower. HOW TO ROW ON THE ROWER Sit on the seat, place your feet in the footrests, and adjust the straps to fit your feet. Then, hold the row bar with an overhand grip. Correct rowing form consists of three phases: 1. The first phase is - NordicTrack Rw600 | Instruction Manual - Page 14
other features. When you use the manual mode of the console, you can change the resistance of the row bar with the touch of a button featured workouts. Each workout automatically controls the resistance of the row bar as it guides you through an effective exercise session. To activate the console - NordicTrack Rw600 | Instruction Manual - Page 15
OFF THE CONSOLE When you are finished exercising, unplug the power adapter. IMPORTANT: If you do not do this, the electrical components on the rower may wear prematurely. HOW TO USE THE TOUCH SCREEN The console features a tablet with a full-color touch screen. The following information will help - NordicTrack Rw600 | Instruction Manual - Page 16
you use the rower for the first time The first time you use the console, a tour presentation will guide you through the features of the console. 5. Check for firmware the workouts and other features that the console offers. To use the manual mode, see page 17. To use a featured workout, see page - NordicTrack Rw600 | Instruction Manual - Page 17
row bar both digitally and manually. First, adjust the resistance digitally by pressing the Silent Magnetic Resistance adjustment buttons on the console. The selected resistance level will appear on the screen. Note: After you touch a button, it will take a moment for the rower all Bluetooth® Smart - NordicTrack Rw600 | Instruction Manual - Page 18
function in the same way as the manual mode (see page 17). During some workouts, an iFit coach will guide you through a video workout. Touch the To pause the workout, simply touch the screen or stop rowing. To continue the workout, simply resume rowing. To end the workout, touch the screen to pause - NordicTrack Rw600 | Instruction Manual - Page 19
5. Follow your progress. See step 4 on page 17. 6. Wear a heart rate monitor and measure your heart rate if desired. See step 5 on page 17. 7. When you are finished exercising, unplug the power adapter. See HOW TO TURN OFF THE CONSOLE on page 15. or by sliding your fingers on the screen. Touch the - NordicTrack Rw600 | Instruction Manual - Page 20
HOW TO USE AN IFIT WORKOUT To use an iFit workout, the console must be connected to a wireless network (see HOW TO CONNECT TO A WIRELESS NETWORK on page 22). An iFit account is also required. Manage Accounts. If more than one user is associated with the account, a list of users will appear. Touch - NordicTrack Rw600 | Instruction Manual - Page 21
touch the close button (x symbol) to return to the main menu. 5. View machine information or console app information. Touch Equipment Info, and then touch Machine Info or App Info to view information about your rower or about the console app. 6. Update the console firmware. Then, touch the menu - NordicTrack Rw600 | Instruction Manual - Page 22
problems connecting to an encrypted network, make sure that your password is correct. Note: Passwords are case-sensitive. Note: The console supports to appear. Note: If you have questions after following these instructions, go to support.iFit.com for assistance. 5. Exit the wireless network menu. - NordicTrack Rw600 | Instruction Manual - Page 23
your personal fitness goals. To purchase a chest heart rate monitor, please see the front cover of this manual. Note: The console is compatible with all Bluetooth Smart heart rate monitors. If you need to erase all the Bluetooth-compatible devices saved in the console memory, press and hold the - NordicTrack Rw600 | Instruction Manual - Page 24
rollers daily. CONSOLE TROUBLESHOOTING If the console does not turn on, make sure that the power adapter is fully plugged in. If you are having problems connecting the console to a wireless network, or if you are having problems with your iFit account or iFit workouts, go to support.iFit.com. If - NordicTrack Rw600 | Instruction Manual - Page 25
HOW TO ADJUST THE REED SWITCH If the console does not display correct feedback, the reed switch should be adjusted. To adjust the reed switch, first unplug the power adapter. Then, remove the parts described below. Next, locate the Reed Switch (47). Turn the Left Fan (4) until a Magnet (85) is - NordicTrack Rw600 | Instruction Manual - Page 26
key to achieving results. You can use your heart rate as a guide to find the proper intensity level. The chart below shows recommended heart rates the flexibility of your muscles and helps to prevent post-exercise problems. EXERCISE FREQUENCY To maintain or improve your condition, complete three - NordicTrack Rw600 | Instruction Manual - Page 27
SUGGESTED STRETCHES The correct form for several basic stretches is shown at the right. Move slowly as you stretch; never bounce. 1. Toe Touch Stretch Stand with your knees bent slightly and slowly bend forward from 1 your hips. Allow your back and shoulders to relax as you reach down toward - NordicTrack Rw600 | Instruction Manual - Page 28
Ring Bushing Bearing B 15mm Wave Washer Pulley Assembly Axle Pivot Bushing Stop Bumper Rail Handle Folding 92 1 93 1 94 2 95 1 96 1 97 1 98 1 99 8 100 1 Description Row Bar Rest Frame Handle Pivot Axle Deflector Bracket Pulley Bracket 6mm Washer M6 Locknut M8 Washer M8 x 12mm - NordicTrack Rw600 | Instruction Manual - Page 29
Wire Power Adapter 108 1 109 2 110 1 111 1 112 1 * - * - Console Bracket Pivot Disc M8 x 80mm Bolt M6 Shoulder Screw Neck Wire User's Manual Assembly Tool Note: Specifications are subject to change without notice. For information about ordering replacement parts, see the back cover of this - NordicTrack Rw600 | Instruction Manual - Page 30
EXPLODED DRAWING A 110 30 108 68 109 66 85 75 68 4 97 96 58 101 76 27 71 103 102 98 90 91 92 57 109 111 86 79 69 52 18 59 25 101 89 99 94 56 68 15 82 71 88 25 28 100 48 50 69 64 30 51 17 19 63 57 13 62 46 57 105 45 56 104 47 81 49 86 14 1 77 65 44 20 55 - NordicTrack Rw600 | Instruction Manual - Page 31
31 68 6 12 68 69 8 69 31 2 23 69 63 62 40 67 5 39 38 36 35 65 65 62 63 69 37 56 57 32 69 69 70 54 54 87 54 87 54 9 87 54 87 54 54 10 87 32 54 7 32 69 31 33 69 34 11 70 68 68 68 68 6 Model No. NTRW10121-INT.0 R0121A EXPLODED DRAWING B - NordicTrack Rw600 | Instruction Manual - Page 32
) • the key number and description of the replacement part(s) (see the PART LIST and the EXPLODED DRAWING near the end of this manual) RECYCLING INFORMATION This electronic product must not be disposed of in municipal waste. To preserve the environment, this product must be recycled after its useful
-
 1
1 -
 2
2 -
 3
3 -
 4
4 -
 5
5 -
 6
6 -
 7
7 -
8
-
9
-
10
-
11
-
12
-
13
-
14
-
15
-
16
-
17
-
18
-
19
-
20
-
21
-
22
-
23
-
24
-
25
-
26
-
27
-
28
-
29
-
30
-
31
-
32
 |
 |
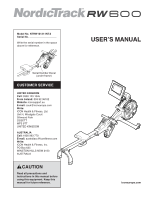
Serial Number Decal
(under frame)
USER’S MANUAL
Model No. NTRW10121-INT.0
Serial No.
Write the serial number in the space
above for reference.
iconeurope.com
CAUTION
Read all precautions and
instructions in this manual before
using this equipment. Keep this
manual for future reference.
CUSTOMER SERVICE
UNITED KINGDOM
Call:
0330 123 1045
From Ireland:
053 92 36102
Website:
iconsupport.eu
E-mail:
Write:
ICON Health & Fitness, Ltd.
Unit 4, Westgate Court
Silkwood Park
OSSETT
WF5 9TT
UNITED KINGDOM
AUSTRALIA
Call:
1800 993 770
E-mail:
Write:
ICON Health & Fitness, Inc.
PO Box 635
WINSTON HILLS NSW 2153
AUSTRALIA