Magic Chef MCSRG24S User Manual 1 - Page 11
Installation Instructions
 |
View all Magic Chef MCSRG24S manuals
Add to My Manuals
Save this manual to your list of manuals |
Page 11 highlights
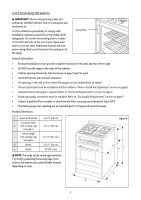
INSTALLATION INSTRUCTIONS important: This appliance shall be installed only by qualified technician and in accordance with the manufacturer's installation instructions, local gas fitting regulations, municipal building codes, electrical wiring regulations, local water supply regulations. Removing Packaging Materials warning: Excessive Weight Hazard • Use two or more people to move and install range. • Failure to do so can result in back or other injury. 1. Remove all packaging materials, tape, and film from the range. Keep cardboard bottom under range. Do not dispose of anything until the range installation is complete. 2. Remove all oven racks and parts packaged from the range. 3. To remove the cardboard bottom. a. Take 4 cardboard corners from the carton. b. Stack one cardboard corner on top of another. Repeat with the other 2 corners. c. Place the stacked corners lengthwise on the floor behind the range to support the range when is laid on its back. 4. Using two or more people, firmly grasp the range and gently lay it on its back on the cardboard corners. 5. Remove cardboard bottom. note: It is recommended to adjust leveling legs while the range is on its back. note: To place range back up into standing position • Place a sheet of cardboard or hardboard on the floor in front of range to protect the flooring. • Using two or more people, stand the range back up onto the cardboard or hardboard. How to Install Backsplash note: For proper ventilation and to protect your wall from splatter, install the backsplash to the rear edge of the cooktop to which extends past the back of the oven. note: 4 Screws are provided with the range. 1. Align the holes in the backsplash with the holes in the back edge of the cooktop. 2. While one person is holding the backsplash in the correct place, have the second person insert screws through the bottom of the cooktop into the bottom of the backsplash. 3. Tighten completely. How to Install Anti-Tip Bracket note: An anti-tip bracket kit is provided with the range. warning: Tip Over Hazard • A child or adult can tip the range and be killed. • Connect anti-tip bracket to rear range foot. • Reconnect the anti-tip bracket, if the range is moved. 11
-
 1
1 -
2
-
3
-
4
-
5
-
 6
6 -
 7
7 -
 8
8 -
 9
9 -
 10
10 -
 11
11 -
 12
12 -
 13
13 -
 14
14 -
 15
15 -
 16
16 -
17
-
18
-
19
-
20
-
21
-
22
-
23
-
24
-
25
-
26
-
27
-
28
-
29
-
30
-
31
-
32
-
33
-
34
-
35
-
36
-
37
-
38
-
39
-
40
 |
 |
