LiftMaster LJ8900W LJ8900W Manual English French - Page 8
Position and Mount the Door Operator - adjustment
 |
View all LiftMaster LJ8900W manuals
Add to My Manuals
Save this manual to your list of manuals |
Page 8 highlights
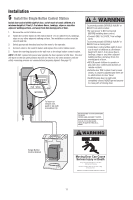
Installation 1 Position and Mount the Door Operator NOTE: For additional mounting options refer to the accessories page. 1. Close the door completely. 2. Slide the door operator onto the end of the torsion bar. If the torsion bar is too long or damaged, you may need to cut the torsion bar. Ensure the collar does NOT touch the bearing. 3. Use a level to position and vertically align the door operator. Verify the mounting bracket is located on a solid surface such as wood, concrete or door/flag bracket. If installing on drywall, the mounting bracket MUST be attached to a stud. 4. When the door operator is properly aligned, mark the mounting bracket holes. If necessary, tighten collar screws on the torsion bar to hold door operator in place while marking holes. NOTE: The door operator does not have to be flush to wall. 5. Remove the door operator from torsion bar. Drill 3/16" pilot holes at the marked locations. Drill through metal door rail plates if necessary. 6. Slide the door operator back onto the torsion bar until pilot holes align with bracket. 7. Tighten the 2 square head set screws on the torsion bar. For a hollow torsion bar, tighten screws 3/4 - 1 full turn after making contact with the bar. For a solid shaft torsion bar, tighten screws 1/4 - no more than 1/2 turn after making contact with the shaft. If installing on a keyed torsion bar, DO NOT tighten the screws into the keyway. 8. Secure the mounting bracket to the wall and to the door operator. Use the 14-10x2" screws to secure the mounting bracket to the wall. To prevent possible SERIOUS INJURY or DEATH: • Concrete anchors MUST be used if mounting bracket into masonry. • NEVER try to loosen, move or adjust door, springs, cables, pulleys, brackets or their hardware, ALL of which are under EXTREME tension. • ALWAYS call a trained door systems technician if door binds, sticks or is out of balance. An unbalanced door might NOT reverse when required. • Operator MUST be mounted at a right angle to the torsion bar to avoid premature wear on the collar. HARDWARE Screw 14-10 x 2" (2) Shaft Collar .25" (.6 cm) min. space between bearing and shaft collar Bearing Plate Torsion Bar Set screws (Torsion bar) Screws 14-10 x 2" Mounting Bracket 8
-
 1
1 -
2
-
 3
3 -
 4
4 -
 5
5 -
 6
6 -
 7
7 -
 8
8 -
 9
9 -
 10
10 -
 11
11 -
 12
12 -
 13
13 -
14
-
15
-
16
-
17
-
18
-
19
-
20
-
21
-
22
-
23
-
24
-
25
-
26
-
27
-
28
-
29
-
30
-
31
-
32
-
33
-
34
-
35
-
36
-
37
-
38
-
39
-
40
-
41
-
42
-
43
-
44
-
45
-
46
-
47
-
48
-
49
-
50
-
51
-
52
-
53
-
54
-
55
-
56
-
57
-
58
-
59
-
60
 |
 |
