LiftMaster EL25 EL25 - QUICK START KEYPAD PROGRAMMING Manual - Page 11
EL25 SetUp “Your Settings”, Getting Started
 |
View all LiftMaster EL25 manuals
Add to My Manuals
Save this manual to your list of manuals |
Page 11 highlights
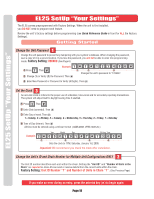
EL25 SetUp "Your Settings" EL25 SetUp "Your Settings" EL25 SetUp "Your Settings" The EL25 comes preprogrammed with Factory Settings. When the unit is first installed, you DO NOT need to program each feature. Review the unit's factory settings before programming (see Quick Reference Guide in front for ALL the Factory Settings). Getting Started Change the Unit Password 1 Change the unit password to prevent any tampering with your system's database. When changing the password, save a copy of it in a secure location. If you lose the password, you will not be able to enter into programming mode. Factory Setting: 000000 (See Page 6) Example: 1 Press Then 1 2 3 Changes the unit's password to "123456". 2 Change (1) or Verify (2) the Password. Then (#) 3 Enter New Password or Password to Verify (6 Digits). Then (#) Set the Clock 3 An accurate clock is critical to the proper use of schedules, time zones and for accurately reporting transactions. The system will adjust itself to daylight saving time if enabled. 1 Press Then 2 Enter Date (yymmdd). Then (#) 3 Enter Day of week. Then (#) 1 = Sunday, 2 = Monday, 3 = Tuesday, 4 = Wednesday, 5 = Thursday, 6 = Friday, 7 = Saturday 4 Time of Day (hhmm). Then (#) All time must be entered using a 24-hour format (8AM=0800, 3PM=1500 etc.) Example: Year Month Day 24-Hour Time 1 2 3 4 Sets the clock to 1PM, Saturday, January 1st, 2005. Important: We recommend you check the clock after installation. Change the Unit's ID and Chain Number for Multiple Unit Configurations ONLY 2 The Unit ID number identifies each unit within the chain. Setting the "Unit ID" and "Number of Units in the Chain" are required so Versa XS can send or receive data to/from the correct units within the chain. Factory Setting: Unit ID Number "1" and Number of Units in Chain "1". (See Previous Page) * If you make an error during an entry, press the asterisk key ( ) to begin again. Page 10
-
 1
1 -
2
-
3
-
4
-
5
-
 6
6 -
 7
7 -
 8
8 -
 9
9 -
 10
10 -
 11
11 -
 12
12 -
 13
13 -
 14
14 -
 15
15 -
 16
16 -
17
-
18
-
19
-
20
-
21
-
22
-
23
-
24
-
25
-
26
 |
 |
