Epson SureColor T2170 Users Guide - Page 163
Warning, Caution, Parent topic, Related concepts, Discharging Ink, Maintenance and Transportation
 |
View all Epson SureColor T2170 manuals
Add to My Manuals
Save this manual to your list of manuals |
Page 163 highlights
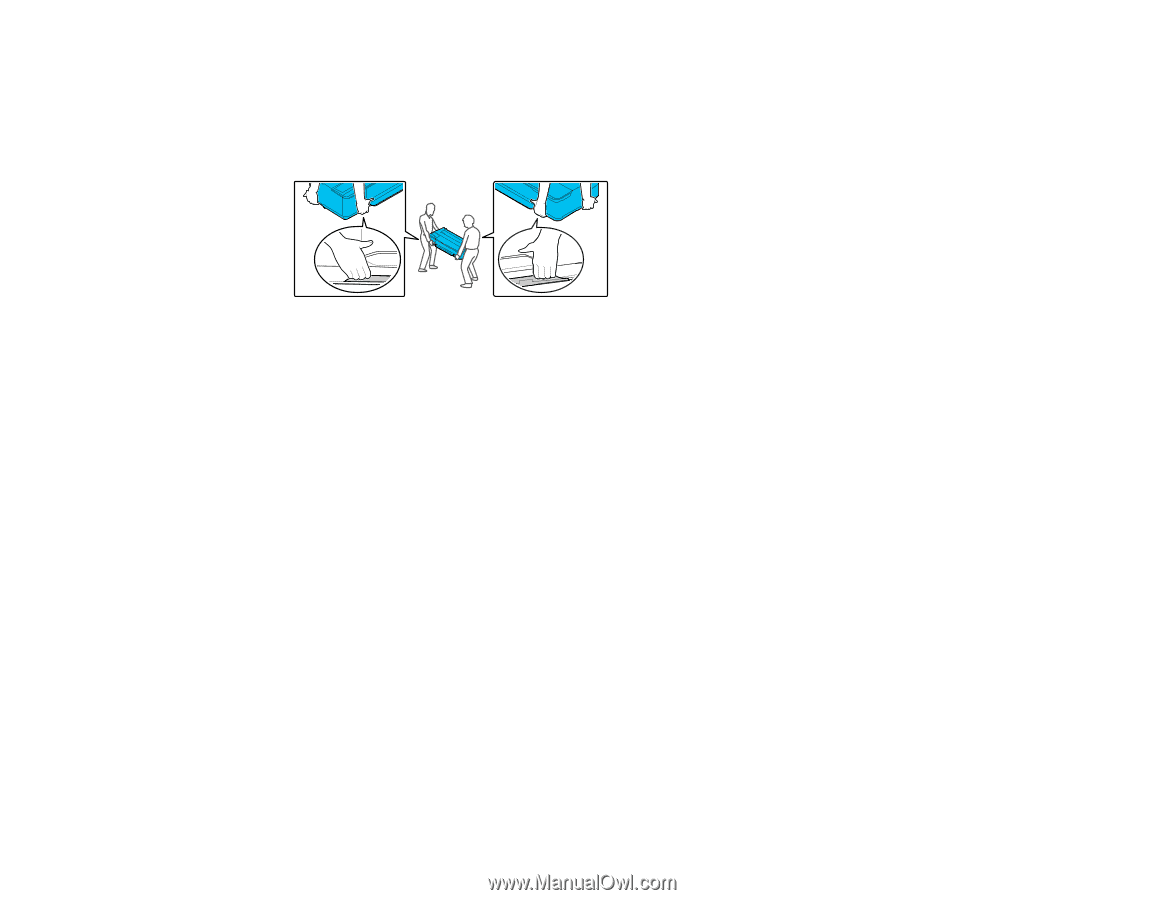
5. Remove the output tray, if necessary. 6. Close all covers on the product. 7. For a product without a stand, have at least two people lift the product using the indented areas as shown. Warning: The product is heavy and requires two or more people to move it. 8. For a product with a stand, do the following: • Close the paper basket. • Release the caster locks. • Move the product on an even floor surface. • Lock the casters after the product has been moved. Caution: Do not move the product with locked casters. Avoid areas with steps or uneven flooring. Note: If you are transporting or storing the product below 14°F (-10°C), you must discharge the ink. See the link below for instructions. 9. Place the product in its original packing materials, if possible, or use equivalent materials with cushioning around the product. 10. After the printer is moved, connect the power cable and turn on the printer. 11. Run a print head nozzle check and clean the print head, if necessary. Discharging Ink Parent topic: Maintenance and Transportation Related concepts Print Head Nozzle Check 163
-
 1
1 -
2
-
3
-
4
-
5
-
6
-
7
-
8
-
9
-
10
-
11
-
12
-
13
-
14
-
15
-
16
-
17
-
18
-
19
-
20
-
21
-
22
-
23
-
24
-
25
-
26
-
27
-
28
-
29
-
30
-
31
-
32
-
33
-
34
-
35
-
36
-
37
-
38
-
39
-
40
-
41
-
42
-
43
-
44
-
45
-
46
-
47
-
48
-
49
-
50
-
51
-
52
-
53
-
54
-
55
-
56
-
57
-
58
-
59
-
60
-
61
-
62
-
63
-
64
-
65
-
66
-
67
-
68
-
69
-
70
-
71
-
72
-
73
-
74
-
75
-
76
-
77
-
78
-
79
-
80
-
81
-
82
-
83
-
84
-
85
-
86
-
87
-
88
-
89
-
90
-
91
-
92
-
93
-
94
-
95
-
96
-
97
-
98
-
99
-
100
-
101
-
102
-
103
-
104
-
105
-
106
-
107
-
108
-
109
-
110
-
111
-
112
-
113
-
114
-
115
-
116
-
117
-
118
-
119
-
120
-
121
-
122
-
123
-
124
-
125
-
126
-
127
-
128
-
129
-
130
-
131
-
132
-
133
-
134
-
135
-
136
-
137
-
138
-
139
-
140
-
141
-
142
-
143
-
144
-
145
-
146
-
147
-
148
-
149
-
150
-
151
-
152
-
153
-
154
-
155
-
156
-
157
-
 158
158 -
 159
159 -
 160
160 -
 161
161 -
 162
162 -
 163
163 -
 164
164 -
 165
165 -
 166
166 -
 167
167 -
 168
168 -
169
-
170
-
171
-
172
-
173
-
174
-
175
-
176
-
177
-
178
-
179
-
180
-
181
-
182
-
183
-
184
-
185
-
186
-
187
-
188
-
189
-
190
-
191
-
192
-
193
-
194
-
195
-
196
-
197
-
198
-
199
-
200
-
201
-
202
-
203
-
204
-
205
-
206
-
207
-
208
 |
 |