Epson SureColor F6470 Users Guide - Page 46
Adjustment Procedure, Print Adjustments
 |
View all Epson SureColor F6470 manuals
Add to My Manuals
Save this manual to your list of manuals |
Page 46 highlights
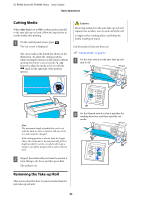
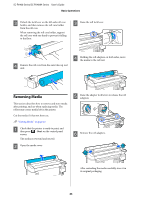
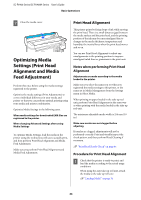
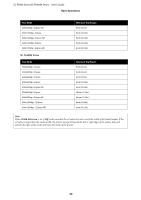
SC-F6400 Series/SC-F6400H Series User's Guide Basic Operations ❏ When banding can be seen in the print results even after performing adjustments for Manual(Standard) ❏ When it is difficult to check the patterns for Manual(Standard) due to bleeding ink and so on ❏ When you want to print with accurate length D Check the printed adjustment pattern. When Manual(Standard) is selected Two groups of adjustment patterns, A and B, are printed. Select the pattern with the least amount of overlapping or gaps for each group. Select "0.0%" in the cases shown below. The approximate length of the media required to print the test pattern is given below. When performing Manual(Standard): Approx. 190 mm (7.48 in.) When performing Manual(Measurement): Approx. 1090 mm (42.9 in.) Adjustment Procedure A Check that the printer is ready to print, and load the media according to the actual usage conditions. When using the auto take-up reel unit, attach the media to the take-up roll core. U "Loading Media" on page 36 U "Using the Auto Take-up Reel Unit (An Optional Item for the SC-F6400/SC-F6430/ SC-F6440/SC-F6460)" on page 37 B Press (menu), and then press Media Settings - Print Adjustments - Media Feed Adjustment - Manual(Standard) or Manual(Measurement). C Press Start. An adjustment pattern is printed. Wait until printing is complete. If there are patterns with the same overlapping or gaps, enter the middle value in step 6. Enter "-0.05%" in the cases shown below. If all of the adjustment patterns contain overlapping or gaps, select the pattern with the least overlaps or gaps. Perform steps 2 to 4 again, and repeat them until a pattern with no overlapping lines or gaps is printed. If the pattern is difficult to check, such as if the ink bleeds, input "0.0%" one time. In this situation, the media feed is not adjusted. Perform the following steps to complete Manual(Standard), and then perform Manual(Measurement) again. When Manual(Measurement) is selected Adjustment patterns #1 and #2 are printed. Cut after the adjustment pattern, spread it out on a flat surface, and then measure it using a scale. 46
-
 1
1 -
2
-
3
-
4
-
5
-
6
-
7
-
8
-
9
-
10
-
11
-
12
-
13
-
14
-
15
-
16
-
17
-
18
-
19
-
20
-
21
-
22
-
23
-
24
-
25
-
26
-
27
-
28
-
29
-
30
-
31
-
32
-
33
-
34
-
35
-
36
-
37
-
38
-
39
-
40
-
 41
41 -
 42
42 -
 43
43 -
 44
44 -
 45
45 -
 46
46 -
 47
47 -
 48
48 -
 49
49 -
 50
50 -
 51
51 -
52
-
53
-
54
-
55
-
56
-
57
-
58
-
59
-
60
-
61
-
62
-
63
-
64
-
65
-
66
-
67
-
68
-
69
-
70
-
71
-
72
-
73
-
74
-
75
-
76
-
77
-
78
-
79
-
80
-
81
-
82
-
83
-
84
-
85
-
86
-
87
-
88
-
89
-
90
-
91
-
92
-
93
-
94
-
95
-
96
-
97
-
98
-
99
-
100
-
101
-
102
-
103
-
104
-
105
 |
 |
