Epson SureColor F6470 Users Guide - Page 32
Receiving Update Notifications, Using Web Config, Starting Procedure
 |
View all Epson SureColor F6470 manuals
Add to My Manuals
Save this manual to your list of manuals |
Page 32 highlights
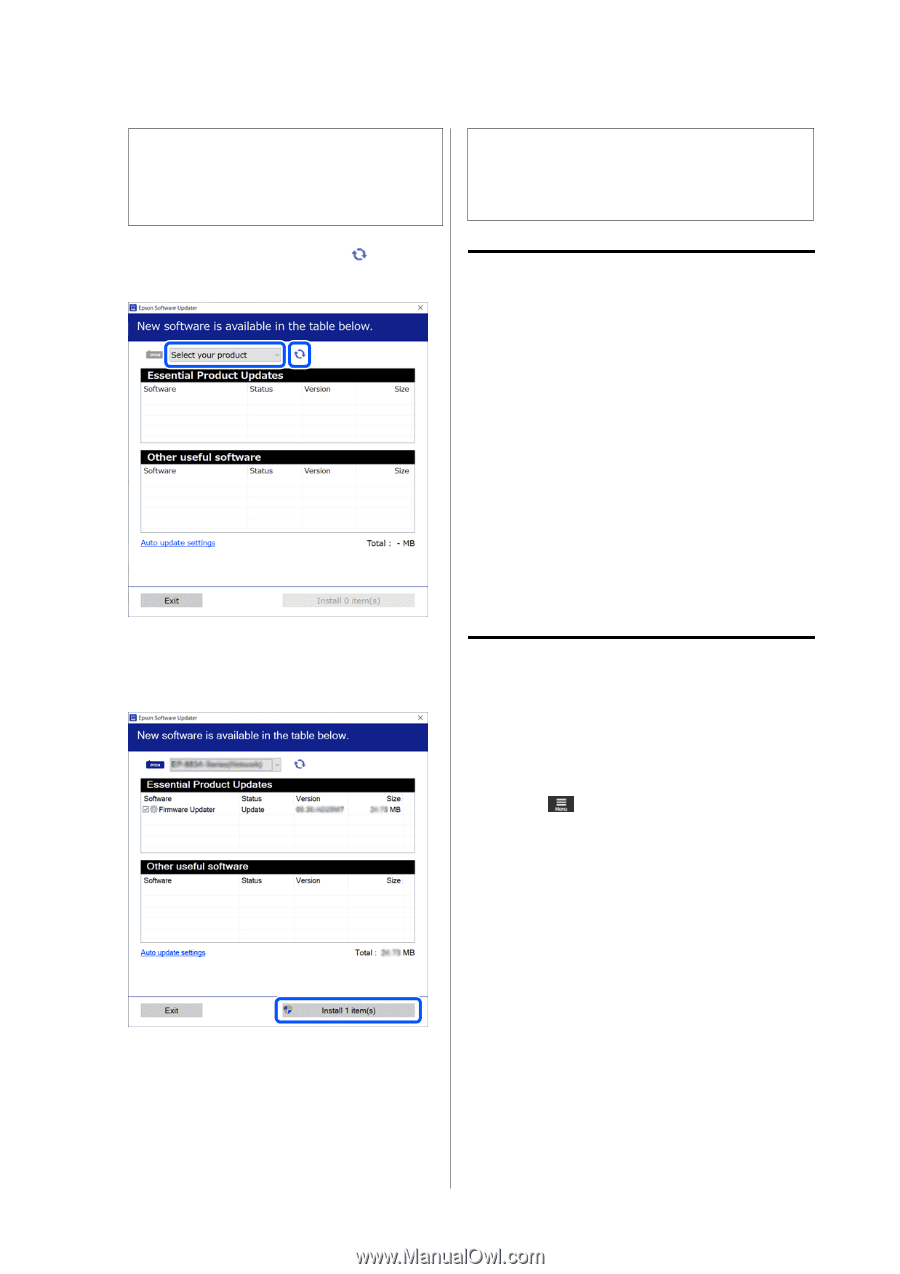
SC-F6400 Series/SC-F6400H Series User's Guide Introduction Note: You can also start by clicking the printer icon on the desktop taskbar and selecting Software Update. c Important: Do not turn off the computer or printer while updating. C Select your printer, and then click for the latest software. to check Receiving Update Notifications A Start EPSON Software Updater. B Click Auto update settings. C Select an interval for checking for updates on the printer's Interval to Check box, and then click OK. Using Web Config D Select the software and manuals you want to update, and then click the Install button to start the installation. When Firmware Updater is displayed, the latest firmware is available. Select Firmware Updater and click the Install button to automatically start Firmware Updater and update the printer firmware. Follow the on-screen instructions. Provides an overview of starting the software and the functions provided. Starting Procedure Start the software on a computer that is connected to the same network as the printer. A Check the printer's IP address. Confirm that the printer is ready to print. Press (menu), and then select General Settings - Network Settings - Wired LAN Status. B Start a Web browser on the computer that is connected to the printer over the network. C Enter the IP address of the printer in the address bar of the Web browser and press the Enter or Return key. Format: IPv4: http://IP address of printer/ IPv6: http://[IP address of printer]/ Example: IPv4: http://192.168.100.201/ IPv6: http://[2001:db8::1000:1]/ 32
-
 1
1 -
2
-
3
-
4
-
5
-
6
-
7
-
8
-
9
-
10
-
11
-
12
-
13
-
14
-
15
-
16
-
17
-
18
-
19
-
20
-
21
-
22
-
23
-
24
-
25
-
26
-
 27
27 -
 28
28 -
 29
29 -
 30
30 -
 31
31 -
 32
32 -
 33
33 -
 34
34 -
 35
35 -
 36
36 -
 37
37 -
38
-
39
-
40
-
41
-
42
-
43
-
44
-
45
-
46
-
47
-
48
-
49
-
50
-
51
-
52
-
53
-
54
-
55
-
56
-
57
-
58
-
59
-
60
-
61
-
62
-
63
-
64
-
65
-
66
-
67
-
68
-
69
-
70
-
71
-
72
-
73
-
74
-
75
-
76
-
77
-
78
-
79
-
80
-
81
-
82
-
83
-
84
-
85
-
86
-
87
-
88
-
89
-
90
-
91
-
92
-
93
-
94
-
95
-
96
-
97
-
98
-
99
-
100
-
101
-
102
-
103
-
104
-
105
 |
 |