Epson DS-C330 Users Guide - Page 130
Scan Settings, SCAN double-sided, Complete, View and edit the scanned s as necessary and click
 |
View all Epson DS-C330 manuals
Add to My Manuals
Save this manual to your list of manuals |
Page 130 highlights
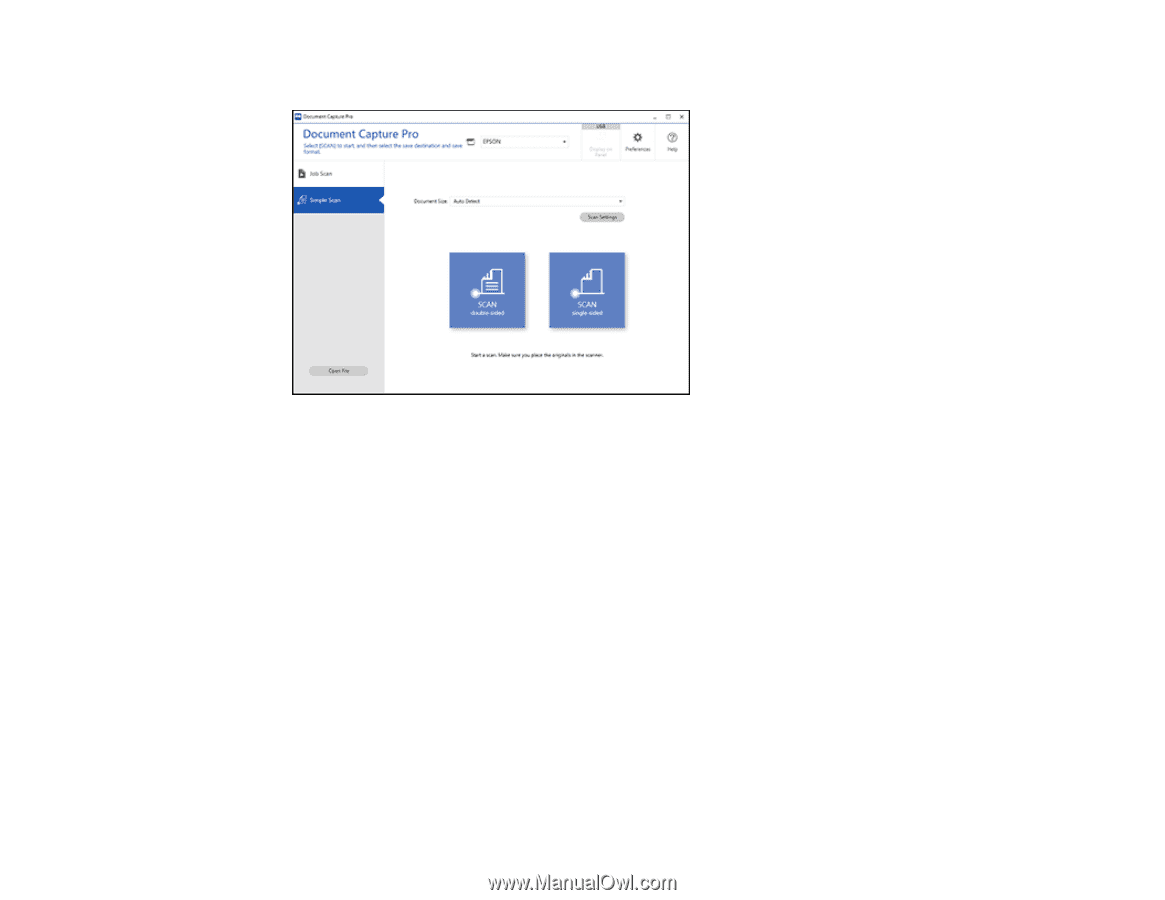
You see a window like this: 4. If you want to select specific scan settings for the scan, click the Scan Settings button, select any displayed settings you want to use, and click OK. Note: See the help information in Document Capture Pro for details. 5. Do one of the following: • To scan both sides of an original,select SCAN double-sided. • To scan the front side of an original, select SCAN single-sided. Your product starts scanning and you see the Edit Scanned Results window. 6. View and edit the scanned pages as necessary and click Complete when you are finished. Note: See the help information in Document Capture Pro for details. 7. Click one of the cloud server or service destination icons. You see the settings window. 8. Enter any required information to set up the destination. You may need to log in to your cloud service to authenticate the connection and allow Document Capture Pro to access the cloud service. 130
-
 1
1 -
2
-
3
-
4
-
5
-
6
-
7
-
8
-
9
-
10
-
11
-
12
-
13
-
14
-
15
-
16
-
17
-
18
-
19
-
20
-
21
-
22
-
23
-
24
-
25
-
26
-
27
-
28
-
29
-
30
-
31
-
32
-
33
-
34
-
35
-
36
-
37
-
38
-
39
-
40
-
41
-
42
-
43
-
44
-
45
-
46
-
47
-
48
-
49
-
50
-
51
-
52
-
53
-
54
-
55
-
56
-
57
-
58
-
59
-
60
-
61
-
62
-
63
-
64
-
65
-
66
-
67
-
68
-
69
-
70
-
71
-
72
-
73
-
74
-
75
-
76
-
77
-
78
-
79
-
80
-
81
-
82
-
83
-
84
-
85
-
86
-
87
-
88
-
89
-
90
-
91
-
92
-
93
-
94
-
95
-
96
-
97
-
98
-
99
-
100
-
101
-
102
-
103
-
104
-
105
-
106
-
107
-
108
-
109
-
110
-
111
-
112
-
113
-
114
-
115
-
116
-
117
-
118
-
119
-
120
-
121
-
122
-
123
-
124
-
 125
125 -
 126
126 -
 127
127 -
 128
128 -
 129
129 -
 130
130 -
 131
131 -
 132
132 -
 133
133 -
 134
134 -
 135
135 -
136
-
137
-
138
-
139
-
140
-
141
-
142
-
143
-
144
-
145
-
146
-
147
-
148
-
149
-
150
-
151
-
152
-
153
-
154
-
155
-
156
-
157
-
158
-
159
-
160
-
161
-
162
-
163
-
164
-
165
-
166
-
167
-
168
-
169
-
170
-
171
-
172
-
173
-
174
-
175
-
176
-
177
-
178
-
179
-
180
-
181
-
182
-
183
-
184
-
185
-
186
-
187
-
188
-
189
-
190
-
191
-
192
-
193
-
194
-
195
-
196
-
197
-
198
-
199
-
200
-
201
-
202
 |
 |