Epson C42UX User Manual - Page 10
for loading instructions., Load the right paper for your document. See
 |
View all Epson C42UX manuals
Add to My Manuals
Save this manual to your list of manuals |
Page 10 highlights
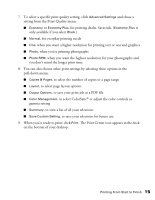
You see your printer Properties (or Preferences) window. 2 Choose your paper type . . . 3 and paper size 1 Choose your document type 4 Click here 4. Select the type of document you're printing: I Draft: For rough drafts on plain paper. Saves ink. I Text: For text-only documents, like letters or reports. Delivers high-quality text printing. I Text & Image: For documents that have both text and images, like newsletters. I Photo: For photos and graphics, when you want good quality with faster printing. I Photo RPM: For photos or graphics, when you need highest quality printing. Because this setting increases resolution, it also increases print time. 5. Load the right paper for your document. See page 8 for loading instructions. 6. If you loaded special paper, choose the correct paper type (click the arrow to scroll through the Type list). If you're not sure which setting to select, see page 22. 7. Select your paper size (click on the arrow to scroll through the Size list). Printing From Start to Finish 10
-
 1
1 -
2
-
3
-
4
-
 5
5 -
 6
6 -
 7
7 -
 8
8 -
 9
9 -
 10
10 -
 11
11 -
 12
12 -
 13
13 -
 14
14 -
 15
15 -
16
-
17
-
18
-
19
-
20
-
21
-
22
-
23
-
24
-
25
-
26
-
27
-
28
-
29
-
30
-
31
-
32
-
33
-
34
-
35
-
36
-
37
-
38
-
39
-
40
-
41
-
42
-
43
-
44
-
45
-
46
-
47
-
48
-
49
-
50
-
51
-
52
-
53
 |
 |
