Dynex DX-LDVD22-10A User Manual (English) - Page 10
Using the remote control, Installing remote control batteries - tv
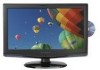 |
UPC - 600603122385
View all Dynex DX-LDVD22-10A manuals
Add to My Manuals
Save this manual to your list of manuals |
Page 10 highlights
6 Using the remote control # Button 7 CH+/CH- VOL+/VOL- 8 ENTER 9 MENU 10 CH.LIST 11 FAVORITE 12 TITLE 13 DISPLAY 14 REV 15 FWD 16 MENU 17 PLAY/ENTER 18 , , , and Arrow keys 19 ANGLE 20 AUDIO 21 PROGRAM 22 OPEN/CLOSE 23 DVD 24 PICTURE 25 SLEEP 26 • (Dot) 27 GUIDE 28 MUTE 29 INFO 30 EXIT 31 ZOOM 32 SUBTITLE Description Press CH+ or CH- to go to the next or previous channel in the channel list. For more information, see "Selecting a channel" on page 11. Press VOL+ or VOL- to increase or decrease the volume. Press to confirm selections in an on-screen menu or to open a submenu. Press to open the on-screen menu. Press to open the channel list. For more information, see "Selecting a channel" on page 11. Press to display the favorite channel list. For more information, see "Setting up a favorite channel list" on page 15. Press to display the DVD title menu (when available). Press to cycle through information about the DVD, including Time Elapsed, Time Remaining, Chapter Elapsed, Chapter Remaining, and Display off. Press to fast reverse a DVD. Press to fast forward a DVD. Press to go to the root menu on a DVD. Press to play a DVD. Press to navigate in the on-screen DVD menus. Press to change the viewing angle of a DVD (when available). Press to select the audio track of a DVD. Press to program DVD playback. Press to eject the DVD. Press to go to DVD mode. Press to select the picture mode. You can select Vivid, Standard, Energy Savings, Theater, Sports, or Custom. For more information, see "Adjusting the picture" on page 12. Press to set the sleep timer. For more information, see "Setting the sleep timer" on page 21. Press to enter a digital sub-channel. Press to display EPG OSD of the channel, including program name. channel number, program description, channel label and program show time. Press to turn off the sound. Press again to turn on the sound. Does not affect headphones. Press to display information about the current program. For more information, see "Displaying additional information" on page 12. Press to close the on-screen menu. Press to select the aspect ratio of the picture. You can select Normal, Zoom, Wide, Cinema, or Auto Zoom. For more information, see "Adjusting the TV picture" on page 12. Press to turn on DVD sub-titles and select the subtitle language. # Button 33 SETUP 34 NEXT 35 PREV 36 PAUSE 37 STOP 38 SLOW 39 T.SEARCH 40 ZOOM 41 A-B 42 REPEAT 43 DVD 10+ Description Press to open the DVD General Setup Page. Press twice to open the DVD Preference Page. Press to go to the next chapter on a DVD. Press to go to the previous chapter on a DVD. Press to pause DVD playback. Press to stop DVD playback. Press to play a DVD in slow motion. Each time this button is pressed, the setting changes. Press to display the DVD search menu. Press to zoom in on the DVD picture. Press to replay a selected portion of the DVD. Press to repeat a DVD chapter. Press again to repeat a DVD title. Press again to repeat the entire DVD. Press again to cancel. If a chapter or track number is over 10, press this button, then press the number for last digit in the chapter or track number. Using the remote control Installing remote control batteries To install remote control batteries: 1 Open the battery compartment cover by pressing the release button. 2 Insert two AA batteries into the battery compartment. Make sure that the + and - symbols on the batteries match the + and - symbols in the battery compartment. 3 Replace the cover. Notes: Do not mix different types of batteries. Do not mix old and new batteries. Remove batteries when they no longer have a charge. Chemicals may leak into the battery compartment. Battery chemicals can cause a rash. If chemicals leak, clean the battery compartment with a cloth. Remove the batteries if you do not intend to use the remote control for an extended amount of time. Do not dispose of batteries in a fire. Dispose of them as hazardous waste.
-
 1
1 -
2
-
3
-
4
-
 5
5 -
 6
6 -
 7
7 -
 8
8 -
 9
9 -
 10
10 -
 11
11 -
 12
12 -
 13
13 -
 14
14 -
 15
15 -
16
-
17
-
18
-
19
-
20
-
21
-
22
-
23
-
24
-
25
-
26
-
27
-
28
-
29
-
30
-
31
-
32
 |
 |
