Dell DL1000 Appliance Users Guide - Page 66
Virtual Machine Name, Virtual Machines Options
 |
View all Dell DL1000 manuals
Add to My Manuals
Save this manual to your list of manuals |
Page 66 highlights
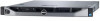
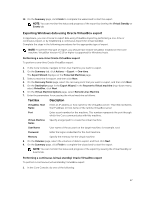
To perform a continuous (virtual standby) Hyper-V export: 1. In the Core Console, on the Virtual Standby tab, click Add to launch the Export Wizard. On the Protected Machines page of the Export Wizard. 2. Select the machine you want to export and then click Next. 3. On the Summary tab, click Export → Virtual Standby. 4. From the Hyper-V dialog box, click Use local machine to perform the Hyper-V export to a local machine with the Hyper-V role assigned. 5. Click the Remote host option to indicate that the Hyper-V server is located on a remote machine. If you selected the Remote host option, enter the parameters for the remote host described as follows: Text Box Description Host Name Enter an IP address or host name for the Hyper-V server. It represents the IP address or host name of the remote Hyper-V server. Port User Name Enter a port number for the machine. It represents the port through which the Core communicates with this machine. Enter the user name for the user with administrative privileges for the workstation with the Hyper-V server. It is used to specify the logon credentials for the virtual machine. Password Enter the password for the user account with administrative privileges on the workstation with Hyper-V server. It is used to specify the logon credentials for the virtual machine. 6. On the Virtual Machines Options page in the VM Machine Location text box, enter the path or location for the virtual machine. For example, D:\export. The VM location must have sufficient space to hold the VM metadata and virtual drives needed for the virtual machine. 7. Enter the name for the virtual machine in the Virtual Machine Name text box. The name that you enter appears in the list of virtual machines in the Hyper-V Manager console. 8. Click one of the following: • Use the same amount of RAM as the source machine to identify that the RAM use is identical between the virtual and source machines. • Use a specific amount of RAM to specify how much memory the virtual machine has after the export; for example, 4096 MB (recommended). 9. To specify the Generation, click one of the following: • Generation 1 (recommended) • Generation 2 10. To specify the disk format, next to Disk Format, click one of the following: • VHDX (Default) • VHD NOTE: Hyper-V Export supports VHDX disk formats if the target machine is running Windows 8 (Windows Server 2012) or higher. If the VHDX is not supported for your environment, the option is disabled. On the Network Adapters page, select the virtual adapter to be connected to a switch. 11. On the Volumes page, select the volume(s) to export. For the virtual machine to be an effective backup of the protected machine include the protected machine's boot drive. Example, C:\. Your selected volumes should be no larger than 2040 GB for VHD. If the selected volumes are larger than 2040 GB, and the VHD format is selected, you will receive an error. 66
-
 1
1 -
2
-
3
-
4
-
5
-
6
-
7
-
8
-
9
-
10
-
11
-
12
-
13
-
14
-
15
-
16
-
17
-
18
-
19
-
20
-
21
-
22
-
23
-
24
-
25
-
26
-
27
-
28
-
29
-
30
-
31
-
32
-
33
-
34
-
35
-
36
-
37
-
38
-
39
-
40
-
41
-
42
-
43
-
44
-
45
-
46
-
47
-
48
-
49
-
50
-
51
-
52
-
53
-
54
-
55
-
56
-
57
-
58
-
59
-
60
-
 61
61 -
 62
62 -
 63
63 -
 64
64 -
 65
65 -
 66
66 -
 67
67 -
 68
68 -
 69
69 -
 70
70 -
 71
71 -
72
-
73
-
74
-
75
-
76
-
77
-
78
-
79
-
80
-
81
-
82
-
83
-
84
-
85
-
86
-
87
-
88
-
89
-
90
-
91
-
92
-
93
-
94
-
95
-
96
-
97
-
98
 |
 |
