D-Link DVC-1100 Product Manual - Page 43
Main Screen > Settings > Network > Wireless Site Survey >, Wireless Settings continued
 |
UPC - 790069263941
View all D-Link DVC-1100 manuals
Add to My Manuals
Save this manual to your list of manuals |
Page 43 highlights
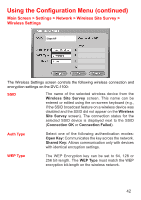
Using the Configuration Menu (continued) Main Screen > Settings > Network > Wireless Site Survey > Wireless Settings (continued) Key ID Selects which of the four keys, listed to the right on the screen, is the active encryption key. You can enter up to four encryption keys that are used to encrypt data passed wirelessly over the network. Only one of the keys are used for encryption. You can enter a key for use, and then enter up to three other keys for later use. You can also easily change from one key to another, by changing the Key ID that controls which key is in use. Keys The four numbered boxes are used to enter from one to four encryption keys. To connect to an encrypted wireless device, the key you enter in the DVC-1100 must match the key of the wireless device. Details on Entering Encryption Keys Keys are entered in hexadecimal format, meaning you can use the numbers 0 through 9 and the letters A through F. The key must be entered as a specific number of characters to be accepted as a valid key. See page 13 for additional details on entering encryption keys. Only one key needs to be entered. Press the down arrow after entering the first key to continue to the next box. When you have entered all the keys desired, press the down arrow and press the Apply button. The DVC-1100 will attempt to connect to the selected SSID, using the settings on the Wireless Settings screen. If the connection fails (probably due to a wireless network settings incompatibility), the message Connection Failed appears. You will need to determine what wireless network settings are causing the failed wireless connection. See the Troubleshooting section on page 54 for help. If the Connection OK message appears, the DVC-1100 has successfully connected to the selected SSID. Press the OK button to save any changes and return to the Wireless Site Survey screen (see page 41). 43
-
 1
1 -
2
-
3
-
4
-
5
-
6
-
7
-
8
-
9
-
10
-
11
-
12
-
13
-
14
-
15
-
16
-
17
-
18
-
19
-
20
-
21
-
22
-
23
-
24
-
25
-
26
-
27
-
28
-
29
-
30
-
31
-
32
-
33
-
34
-
35
-
36
-
37
-
 38
38 -
 39
39 -
 40
40 -
 41
41 -
 42
42 -
 43
43 -
 44
44 -
 45
45 -
 46
46 -
 47
47 -
 48
48 -
49
-
50
-
51
-
52
-
53
-
54
-
55
-
56
-
57
-
58
-
59
-
60
-
61
-
62
-
63
-
64
-
65
-
66
-
67
-
68
-
69
-
70
-
71
-
72
-
73
-
74
-
75
-
76
-
77
-
78
 |
 |
