BenQ W1210ST User Manual
BenQ W1210ST Manual
 |
View all BenQ W1210ST manuals
Add to My Manuals
Save this manual to your list of manuals |
BenQ W1210ST manual content summary:
- BenQ W1210ST | User Manual - Page 1
W1210ST/HT2150ST Digital Projector Home Cinema Series User Manual V 1.01 - BenQ W1210ST | User Manual - Page 2
Table of contents Important safety instructions.......3 Overview 6 Projector features 6 Shipping contents 7 Standard accessories 7 Lamp information 45 Getting to know the lamp hour 45 Extending lamp life 45 Timing of replacing the lamp 46 Replacing the lamp 47 Indicators 49 Troubleshooting - BenQ W1210ST | User Manual - Page 3
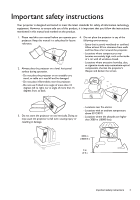
to ensure safe use of this product, it is important that you follow the instructions mentioned in this manual and marked on the product. 1. Please read this user manual before you operate your projector. Keep this manual in a safe place for future reference. 2. Always place the projector on a level - BenQ W1210ST | User Manual - Page 4
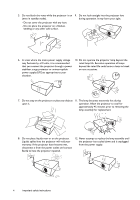
not operate the projector lamp beyond the rated lamp life. Excessive operation of lamps beyond the rated life could cause a lamp to break on rare occasions the power outlet and contact BenQ to have the projector repaired. 12. Never attempt to replace the lamp assembly until the projector has - BenQ W1210ST | User Manual - Page 5
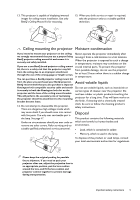
. in temperature, moisture may condense on the If you use a non-BenQ brand projector ceiling mount crucial internal parts. To prevent the projector kit, safety instructions. may cause death if you should come into contact Disposal with live parts. The only user serviceable part is the lamp. See - BenQ W1210ST | User Manual - Page 6
Wide variety of inputs and video formats The projector supports a wide variety of inputs for connection to its OSD menus, which requires professional calibration service from authorized ISF installers. • 3D . • SmartEco SmartEco™ technology saves lamp power consumption up to 70% depending on - BenQ W1210ST | User Manual - Page 7
accessories Some of the accessories may vary from region to region. Projector Remote control Batteries Power cable Warranty card* User manual CD Quick start guide Carry bag * The warranty card is only supplied in some specific regions. Please consult your dealer for detailed information - BenQ W1210ST | User Manual - Page 8
23 21 24 25 25 25 1. Control panel (See Control panel for details.) 2. Lamp cover 3. Vent (heated air exhaust) 4. Quick-release button 5. Lens cap 6. Lens Wireless FHD Kit (optional accessory). 15. USB Mini-B port Used for service. 16. RGB (PC)/Component video (YPbPr/ YCbCr) signal input jack - BenQ W1210ST | User Manual - Page 9
back to the previous OSD menu, exits and saves menu settings. 9. LAMP indicator light Indicates the status of the lamp. Lights up or flashes when the lamp has developed a problem. 10. Keystone/Arrow keys ( / , / ) Manually corrects distorted images resulting from an angled projection. When the On - BenQ W1210ST | User Manual - Page 10
: Decreases the projector audio volume. 4 • : Increases the projector audio volume. 5 8. KEYSTONE 6 13 Launches the Keystone window. Use or to 7 manually correct distorted images resulting from 17 an angled projection. 8 9. MODE 9 14 Selects an available picture mode. 15 10. LIGHT - BenQ W1210ST | User Manual - Page 11
used batteries according to the manufacturer's instructions and local environment regulations for your region. • Never throw the batteries into a fire. to the projector's IR remote control sensor(s) to function correctly. The distance between the remote control and the sensor(s) should not exceed 8 - BenQ W1210ST | User Manual - Page 12
and position of your screen • Electrical outlet location • Location and distance between the projector and the rest of your equipment You can or System Setup : Basic > Projector Position > Front Ceiling Purchase the BenQ Projector Ceiling Mount Kit from your dealer to mount your projector on the - BenQ W1210ST | User Manual - Page 13
1494 140 3556 1743 160 4064 1992 180 4572 2241 W (mm) 1328 1550 1771 1992 2214 2435 2657 3099 3542 3985 Projection distance (mm) Min. distance Max. distance Average (max. zoom) (min. zoom) 917 1009 1102 1069 1178 1286 1222 1346 1470 1375 1514 1654 1528 1682 1837 1680 - BenQ W1210ST | User Manual - Page 14
(see Shipping contents). They are commercially available from electronics stores. Connecting HDMI devices HDMI (High-Definition Multimedia Interface) supports uncompressed video data transmission between compatible devices like DTV tuners, DVD players, Blu-ray players and displays over a single - BenQ W1210ST | User Manual - Page 15
• Using an HDMI to Micro USB cable 1. Connect one end of the HDMI to Micro USB cable to the HDMI input connector on the projector. 2. Connect the other end of the HDMI to Micro USB cable to the Micro USB output socket on your smart device. • Using an HDMI to Micro USB adaptor and an HDMI cable 1. - BenQ W1210ST | User Manual - Page 16
or on the remote control to start the projector. As soon as the lamp lights up, a Power On Tone will be heard. The POWER indicator If this is the first time you turn on the projector, the setup wizard appears to guide you through setting up the projector. If you have already done this, skip this step - BenQ W1210ST | User Manual - Page 17
Step 3: Specify Keystone. For more information about keystone, see Correcting keystone. Step 4: Specify Auto Source. Select On if you want the projector to always search for available signals automatically when the projector is turned on. Step 5: Specify Menu Type. For more information about menu - BenQ W1210ST | User Manual - Page 18
power cable from the power outlet. Avoid turning on the projector immediately after turning it off as excessive heat may shorten lamp life. The actual lamp life may vary due to different environmental conditions and usage. Securing the projector Using a security cable lock The projector has to be - BenQ W1210ST | User Manual - Page 19
a coded number on the screen. • Under the Advanced OSD menu • Under the Basic OSD menu Recall Password Please write down the recall code, and contact BenQ Customer Center. Recall code: XXX XXX XXX XXX Recall Password Please write down the recall code, and contact - BenQ W1210ST | User Manual - Page 20
2. Write down the number and turn off the projector. 3. Seek help from the local BenQ service center to decode the number. You may be required to provide proof of purchase documentation to verify that you are an authorized user of the - BenQ W1210ST | User Manual - Page 21
Selecting an input source The projector can be connected to multiple equipment at the same time. However, it only displays one full screen at a time. When starting up, the projector automatically searches for the available signals. If you want the projector to always automatically search for the - BenQ W1210ST | User Manual - Page 22
projected image becomes vertical trapezoidal. To correct this, see Correcting keystone for details. Do not look into the lens while the lamp is on. The strong light from the lamp may cause damage to your eyes. Be careful when you press the quick-release button as it is close to the exhaust - BenQ W1210ST | User Manual - Page 23
occurs when the projector is not perpendicular to the screen. To correct this, besides adjusting the height of the projector, you may correct this manually in ONE of these ways: • Use the remote control Press KEYSTONE to display the Keystone window. • Using the projector Press / or / to display the - BenQ W1210ST | User Manual - Page 24
10 Mute Off Fast Mode Off 3D Mode 3D Off 3D Sync Invert Press OK Settings Press OK Wall Color Off Auto Source Off Reset Lamp Timer Projector Position Front Menu Type Basic Reset All Settings Test Pattern Off HDMI Range Auto Information 24 Menu Functions - BenQ W1210ST | User Manual - Page 25
Contrast 50 Color 50 Tint 50 Sharpness 7 Color Temperature Lamp Power Advanced... Reset Current Picture Mode PC Vivid Normal Exit wish to switch from the Advanced OSD menu to the Basic OSD menu, follow the instructions below: i. Go to the System Setup : Basic > Menu Settings > Menu Type - BenQ W1210ST | User Manual - Page 26
Using the Basic OSD menu Depending on whether or not any video signal is connected to the projector, the Basic OSD menu offers different available functions. Check the following links to learn more. • Basic OSD menu - with input signals connected • Basic OSD menu - without input signals connected ( - BenQ W1210ST | User Manual - Page 27
during operation. This projector supports playing three-dimensional (3D video devices to the projector, wear the BenQ 3D glasses and make sure the power or discomfort. • keep a distance from the screen of about three to light, heart problems, or any other the 3D format, manually choose a 3D mode - BenQ W1210ST | User Manual - Page 28
color range for the incoming HDMI signal. • Full: Utilizes the Full range RGB 0-255. • Limited: Utilizes the Limited range RGB 16-235. • Reset Lamp Timer • Reset All Settings • Information HDMI Range is only available when the HDMI signal is selected. Activate this function only after a new - BenQ W1210ST | User Manual - Page 29
OSD menu to the Advanced OSD menu, see page 25. Menu Wall Color Projector Position Test Pattern Auto Source Menu Type HDMI Range Reset Lamp Timer Reset All Settings Information Submenus and Descriptions Activate to help correct the projected picture's color when the projection surface is not white - BenQ W1210ST | User Manual - Page 30
Selection bar Picture Mode Vivid User Mode Management Brightness 50 Contrast 50 Submenu Color 50 Tint 50 Status Sharpness 7 Color Temperature Normal Lamp Power Advanced... Reset Current Picture Mode Press BACK to go back to Current input source PC Exit the previous window or to - BenQ W1210ST | User Manual - Page 31
is accessible through the remote control. The functions are only available when Picture Mode is set to User. • Load Settings From Allows you to manually adjust a preset picture mode and make it an available option on the picture mode list. User Mode Management 1. Go to the Picture > Picture Mode - BenQ W1210ST | User Manual - Page 32
through the remote control. The options available for color temperature* settings vary according to the connected input signal. • Lamp Native: With the lamp's original color temperature and higher brightness. This setting is suitable for environments where high brightness is required, such as - BenQ W1210ST | User Manual - Page 33
Lamp Power for details. • Gamma Selection Gamma refers to the relationship between input source and picture brightness. • 1.6/1.8/2.0/2.1/BenQ: access at the same time. • Color Temperature Fine Tuning Allows you to manually adjust the pre-defined color temperature modes: 1. Press OK to display - BenQ W1210ST | User Manual - Page 34
Advanced... (Continued) • Color Management In most installation situations, color management is not necessary, such as in classroom, meeting room, or lounge room situations where lights remain on, or where building external windows allow daylight into the room. Only in permanent installations with - BenQ W1210ST | User Manual - Page 35
Cinema, Music, Sport, Game, and User. The User mode allows you to personalize the sound settings. When selecting the User mode, you may make manual adjustments with the User EQ function. If the Mute function is activated, adjusting Sound Mode will turn off the Mute function. • User EQ Select desired - BenQ W1210ST | User Manual - Page 36
Display menu Submenu Functions and Descriptions The native display resolution of this projector is in a 16:9 aspect ratio. However, you may use this function to display projected picture in a different aspect ratio. In the following illustrations, the black portions are inactive areas and the - BenQ W1210ST | User Manual - Page 37
. This projector supports playing three-dimensional video devices to the projector, wear the BenQ 3D glasses and make sure the power is fatigue or discomfort. • keep a distance from the screen of about three to light, heart problems, or any other recognize the 3D format, manually choose a 3D mode - BenQ W1210ST | User Manual - Page 38
color when there is no signal to the projector. Allows you to select which logo screen is displayed during projector start-up. You can choose BenQ logo screen, Blue screen, or Black screen. The projector can be installed on a ceiling or behind a screen, or with one or more mirrors. See Choosing - BenQ W1210ST | User Manual - Page 39
lamp time has been reset to "0". • Lamp Timer Select to learn the duration (in hours) of lamp usage which is automatically calculated by the built-in timer. Total (equivalent) lamp 's firmware. This function is intended for qualified service personnel. Enable this function to display the grid - BenQ W1210ST | User Manual - Page 40
to remind you that a problem may occur. See also Lamp Timer, Test Pattern, High Altitude Mode, Password, Key Lock, and ISF. The ISF calibration menu is password protected and only accessible by authorized ISF calibrators BenQ video display devices. Accordingly, we recommend that setup and calibration - BenQ W1210ST | User Manual - Page 41
under the Picture menu. Resolution Displays the native resolution of the input source. Color System Displays input system format. Lamp Usage Time Displays the number of hours the lamp has been used. 3D Format Displays the current 3D mode. Only available when 3D Mode is enabled. Firmware - BenQ W1210ST | User Manual - Page 42
Night/ISF Day Load Settings From Rename User Mode 0-100 0-100 0-100 0-100 0-15 Normal/Cool/Lamp Native/Warm Normal/Economic/SmartEco Gamma Selection 1.6/1.8/2.0/2.1/2.2/2.3/2.4/2.6/2.8/BenQ Brilliant Color On/Off Color Temperature Fine Red Gain/Green Gain/Blue Gain/Red Offset/ Tuning - BenQ W1210ST | User Manual - Page 43
High Altitude Mode Password Information Key Lock LED Indicator Reset All Settings ISF Source Picture Mode Resolution Color System Lamp Usage Time 3D Format Firmware Version Black/Blue/Purple BenQ/Black/Blue Front/Front Ceiling/Rear/Rear Ceiling Disable/5 min/10 min/15 min/20 min/25 min/ 30 - BenQ W1210ST | User Manual - Page 44
thing you have to do on a regular basis is keep the lens clean. Never remove any parts of the projector except the lamp. Contact your dealer or local customer service center if the projector fails to operate as expected. Cleaning the lens Clean the lens whenever you notice dirt or dust on - BenQ W1210ST | User Manual - Page 45
Power Setting the projector in Economic or SmartEco mode extends the lamp life. Lamp mode Normal Economic SmartEco Description 100% lamp brightness Saves 30% lamp power consumption Saves up to 70% lamp power consumption depending on the content brightness level Using Economic mode reduces system - BenQ W1210ST | User Manual - Page 46
MUST be replaced before the projector will operate normally. Press OK to dismiss the message. Out of Lamp Usage Time Replace lamp (Refer to user manual) Then reset lamp timer Order a new lamp at www.benq.com OK The "XXXX" shown in the above messages are numbers that vary depending on different - BenQ W1210ST | User Manual - Page 47
and/or compromising image quality by touching the lens, do not touch the empty lamp compartment when the lamp is removed. • This lamp contains mercury. Consult your local hazardous waste regulations to dispose of this lamp in a proper manner. • To assure optimal performance from the projector, it is - BenQ W1210ST | User Manual - Page 48
where water might splash on it, children can reach it, or near flammable materials. • Do not insert your hands into the projector after the lamp is removed. If you touch the optical components inside, it could cause color unevenness and distortion of the projected images. 9. As shown in the - BenQ W1210ST | User Manual - Page 49
Off Green Red Red Flashing Off Off Off Off Downloading CW start fail Scaler reset fail Burn-in ON Burn-in OFF Lamp events Lamp1 error in normal operation Lamp is not lit up Thermal events Fan 1 error (the actual fan speed is ±25% outside the desired speed) Fan 2 error (the actual - BenQ W1210ST | User Manual - Page 50
Red Flashing Red Flashing Red Flashing Red Flashing Green Green Green Green Green Flashing Green Flashing Green Flashing Green Flashing Red Red Flashing Green Green Flashing Red Red Flashing Green Green Flashing Red Red Flashing Green Green Flashing Fan 5 error (the actual fan speed is ±25% - BenQ W1210ST | User Manual - Page 51
Troubleshooting Problem Cause Remedy The projector does not turn on. There is no that it is switched on. Wait until the cooling down process has completed. The lamp cover is not securely attached. Correctly attach the lamp cover. The video source is not turned on or Turn the video source on - BenQ W1210ST | User Manual - Page 52
. Optical Resolution 1920 (H) x 1080 (V) Display system Single-chip DLP™ system Lens F/Number F = 2.6 to 2.78, f = 10.2 to 12.24 mm Lamp 240 W lamp Electrical Power supply AC100-240V, 4.0 A, 50-60 Hz (Automatic) Power consumption 375 W (Max); < 0.5 W (Standby) Mechanical Weight 3.6 Kg (7.94 lbs - BenQ W1210ST | User Manual - Page 53
Dimensions 380.5 mm x 277 mm x 121.7 mm (W x D x H) 277 121.7 380.5 Ceiling mount installation Ceiling mount screws: M4 (Max. L = 25 mm; Min. L= 20 mm) Unit: mm 46/1135 132.9 122.14 47 160 53.9 630.44 577.7 537.9 113.37 285.96 142.1 172.23 380.49 Unit: mm Maintenance 53 - BenQ W1210ST | User Manual - Page 54
Timing chart Supported timing for PC input Format Resolution Refresh rate (Hz) 720 x 400 640 x 480 Reduce Blanking) XGA_60* XGA_70 XGA_75 XGA_85 XGA_120** (Reduce Blanking) 1152 x 864_75 BenQ Notebook Timing BenQ Notebook Timing 1280 x 720_60* 1280 x 768_60* WXGA_60* WXGA_75 WXGA_85 WXGA_120** - BenQ W1210ST | User Manual - Page 55
60.241 80.000 1152 x 870@75Hz MAC21 75.06 68.68 100.00 *Supported timing for 3D signal with Frame Sequential, Top-Bottom and Side-by-Side format. **Supported timing for 3D signal with Frame Sequential format. ***Supported timing for 3D signal with Top-Bottom and Side-by-Side format. The - BenQ W1210ST | User Manual - Page 56
Supported timing for HDMI (HDCP) input Format Resolution Refresh rate (Hz) H. Frequency (KHz) 640 x 480 Blanking) XGA_60* XGA_70 XGA_75 XGA_85 XGA_120** (Reduce Blanking) 1152 x 864_75 BenQ Notebook Timing BenQ Notebook Timing 1280 x 720_60* 1280 x 768_60* WXGA_60* WXGA_75 WXGA_85 WXGA_120** - BenQ W1210ST | User Manual - Page 57
1200@60Hz 1920 x 1200_60 (Reduce Blanking) 59.95 74.038 154 *Supported timing for 3D signal with Frame Sequential, Top-Bottom and Side-by-Side format. **Supported timing for 3D signal with Frame Sequential format. ***Supported timing for 3D signal with Top-Bottom and Side-by-Side format. The - BenQ W1210ST | User Manual - Page 58
HDMI/DVI HDMI/DVI HDMI/DVI HDMI/DVI HDMI/DVI HDMI/DVI HDMI/DVI HDMI/DVI HDMI/DVI *Supported timing for 3D signal with Frame Packing, Top-Bottom format, Side-by-Side, and Frame Sequential format. **Supported timing for 3D signal with Frame Packing, Top-Bottom format, and Side-by-Side format - BenQ W1210ST | User Manual - Page 59
service, immediately notify the dealer from which you purchased the product of any defects. Important: The above warranty shall be void if the customer fails to operate the product in accordance with BenQ's written instructions manual or otherwise, without the prior written permission of BenQ
-
 1
1 -
 2
2 -
 3
3 -
 4
4 -
 5
5 -
 6
6 -
 7
7 -
8
-
9
-
10
-
11
-
12
-
13
-
14
-
15
-
16
-
17
-
18
-
19
-
20
-
21
-
22
-
23
-
24
-
25
-
26
-
27
-
28
-
29
-
30
-
31
-
32
-
33
-
34
-
35
-
36
-
37
-
38
-
39
-
40
-
41
-
42
-
43
-
44
-
45
-
46
-
47
-
48
-
49
-
50
-
51
-
52
-
53
-
54
-
55
-
56
-
57
-
58
-
59
 |
 |

W1210ST/HT2150ST
Digital Projector
Home Cinema Series
User Manual
V 1.01