BenQ EX2780Q User Manual
BenQ EX2780Q Manual
 |
View all BenQ EX2780Q manuals
Add to My Manuals
Save this manual to your list of manuals |
BenQ EX2780Q manual content summary:
- BenQ EX2780Q | User Manual - Page 1
LCD Monitor User Manual Gaming Monitor | EX Series - BenQ EX2780Q | User Manual - Page 2
optical, chemical, manual or otherwise, without the prior written permission of BenQ Corporation. Disclaimer BenQ Corporation makes no BenQ Corporation reserves the right to revise this publication and to make changes from time to time in the contents hereof without obligation of BenQ - BenQ EX2780Q | User Manual - Page 3
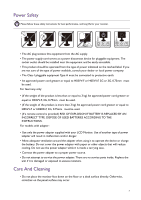
Power Safety Please follow these safety instructions for best performance, and long life for your monitor. 0~40 C 10~90 the power adapter to a proper power source. • Do not attempt to service the power adapter. There are no service parts inside. Replace the unit if it is damaged or exposed to excess - BenQ EX2780Q | User Manual - Page 4
personnel for servicing. • Contact your place of purchase or visit the local website from www.BenQ.com for more support. Caution • The monitor should be 50 ~ 70 cm (20 ~ 28 inches) away from your eyes. • Looking at the screen for an extended period of time causes eye fatigue and may deteriorate - BenQ EX2780Q | User Manual - Page 5
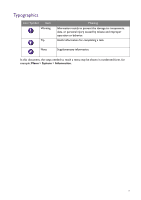
Typographics Icon / Symbol Item Warning Tip Meaning Information mainly to prevent the damage to components, data, or personal injury caused by misuse and improper operation or behavior. Useful information for completing a task. Note Supplementary information. In this document, the steps needed - BenQ EX2780Q | User Manual - Page 6
mounting holes 21 Getting the most from your BenQ monitor 22 How to install the monitor on system 26 How to install on Windows 7 system 27 How to adjust your monitor 28 The remote control... Activating FreeSync...37 Working with Video Format Support technology 37 Navigating the main menu - BenQ EX2780Q | User Manual - Page 7
Eye Care menu ...47 Custom Key menu ...49 System menu ...50 Troubleshooting ...53 Frequently asked questions (FAQ)...53 Need more help? ...56 7/12/19 - BenQ EX2780Q | User Manual - Page 8
unpacking please check you have the following items. If any are missing or damaged, please contact the place of purchase for a replacement. BenQ LCD Monitor Monitor Stand Monitor Base Quick Start Guide CD-ROM Power Cord (Picture may differ from product supplied for your region.) 8 Getting started - BenQ EX2780Q | User Manual - Page 9
Remote Control (RC-0011, with one CR2032 battery) Remote Control Holder Video Cable: HDMI Video Cable: DP (Optional accessory) Video Cable: DP to mini DP (Optional accessory) Video Cable: USB-C™ The length of USB-C™ cable should be less than 1 meter to make the connection easy. Audio Cable (Optional - BenQ EX2780Q | User Manual - Page 10
Getting to know your monitor Front view 1. Volume knob 2. Speakers 3. Light sensor / proximity sensor / IR receiver (for remote control) 4. Power indicator 1 2 3 2 4 Back view 5 6 5. Speakers 6. Control buttons 7. Power button 8. Headphone jack 9. HDMI socket x 2 10. DisplayPort socket 11. - BenQ EX2780Q | User Manual - Page 11
Connections The following connection illustrations are for your reference only. For cables that are not supplied with your product, you can purchase them separately. For detailed connection methods, see page 18. Headphone PC / Notebook Getting to know your monitor 11 - BenQ EX2780Q | User Manual - Page 12
Getting to know your remote control Front view 1 9 2 3 4 10 5 11 6 7 12 8 No. Name 1 Power key Key Description Turns the power on or off. 2 OK key 3 Navigation keys • Enters sub menu. • Confirms the selection. • Goes to the previous menu item. • For up / increase adjustment Enters - BenQ EX2780Q | User Manual - Page 13
No. Name 9 Input source key 10 Menu key 11 Audio Scenario key 12 Volume up key Key Description Accesses a list of available input sources. Press repeatedly to cycle through these options. • Activates OSD main menu. • (When the hotkey menu has been activated) Closes the hotkey menu. Accesses - BenQ EX2780Q | User Manual - Page 14
cause severe internal burns in just 2 hours and can lead to death. • If the remote control will not be used for an extended period of time, remove the battery. 14 Getting to know your remote control - BenQ EX2780Q | User Manual - Page 15
the computer is turned on you must turn it off before continuing. Do not plug-in or turn-on the power to the monitor until instructed to do so. • The following illustrations are for your reference only. Available input and output jacks may vary depending on the purchased model. • Avoid finger - BenQ EX2780Q | User Manual - Page 16
Orient and align the stand arm with the monitor, then push them together until they click and lock into place. Tighten the screws that fix the stand to the monitor. To secure or release a screw, a flat-head screwdriver or a coin is required. Depending on the monitor size, there may be more than one - BenQ EX2780Q | User Manual - Page 17
2. Remove the cover of the cable management system. The stand arm also works as a cable management system that helps keep the cables neat and clean. Slide the cable cover up to align the marking on the cable 1 cover with the unlock icon on the stand arm. Remove the cover as illustrated. You can - BenQ EX2780Q | User Manual - Page 18
allows signal, audio, and data transmission from the laptop to the monitor. The USB-C™ port on the monitor transfers data only and does not support power delivery to the laptop. Additional power supply to the connected laptop is required. 5. Connect the audio cable. You may connect headphones to the - BenQ EX2780Q | User Manual - Page 19
icons vary depending on the available video inputs of the purchased model. Follow the instructions in Getting the most from your BenQ monitor on page 22 to install the monitor software. To extend the service life of the product, we recommend that you use your computer's power management function - BenQ EX2780Q | User Manual - Page 20
How to detach the stand and the base 1. Prepare the monitor and area. Turn off the monitor and the power before unplugging the power cable. Turn off the computer before unplugging the monitor signal cable. Protect the monitor and screen by clearing a flat open area on your desk and placing a soft - BenQ EX2780Q | User Manual - Page 21
support instruction manuals of the wall mount bracket you purchased to complete the installation. Use four M4 x 10 mm screws to fix a VESA standard wall mount bracket to the monitor. Make sure that all screws are tightened and secured properly. Consult a professional technician or BenQ service - BenQ EX2780Q | User Manual - Page 22
Follow the wizard instructions until it asks you to select a monitor model. At that point, click the Have Disk button, insert the BenQ LCD Monitor CD- monitor driver software. Furthermore, if your computer is connected to a network which has security access requirements, network policy settings may - BenQ EX2780Q | User Manual - Page 23
How to install the monitor on a new computer This instruction details the procedure for selecting and installing the BenQ LCD Monitor driver software on a new computer which has never had a monitor driver installed before. This instruction is only suitable for a computer which has never been used - BenQ EX2780Q | User Manual - Page 24
computer This instruction details the procedure for manually updating the existing monitor driver software on your Microsoft Windows computer. It is currently tested as compatible for Windows 10, Windows 8 (8.1), and Windows 7 Operating System (OS). The BenQ LCD Monitor driver for your model - BenQ EX2780Q | User Manual - Page 25
, Settings, Devices, Devices and Printers and right-click the name of your monitor from the menu. 2. Select Properties from the menu. 3. Click the Hardware tab. 4. Click Generic PnP Monitor, and then the Properties button. 5. Click the Driver tab and the Update Driver button. 6. Insert the BenQ LCD - BenQ EX2780Q | User Manual - Page 26
C buttons on the keyboard to bring up the Charm bar. Go to Settings, Control Panel, Devices and Printers and right-click the name of your monitor , and then the Properties button. 5. Click the Driver tab and the Update Driver button. 6. Insert the BenQ LCD Monitor CD-ROM into a CD drive on the - BenQ EX2780Q | User Manual - Page 27
and then the Properties button. 5. Click the Driver tab and the Update Driver button. 6. Insert the BenQ LCD Monitor CD-ROM into a CD drive on the name of your monitor from provided driver list, and click Next. This will copy and install the appropriate monitor driver files to your computer. 10. - BenQ EX2780Q | User Manual - Page 28
How to adjust your monitor The remote control 1. Follow the instructions in Installing the battery on page 13 to get the remote control ready. 2. Aim the remote control at the monitor. The IR remote control sensor - BenQ EX2780Q | User Manual - Page 29
screen, right next to each key. See Working with the hot keys on page 32 for more information. Accesses the functions or menu items as instructed by the on-screen icons. See 5-way controller and basic menu operations on page 30 for more information. Turns the power on or off. How - BenQ EX2780Q | User Manual - Page 30
The 5-way controller is located at the rear of the monitor. While sitting in front of the monitor, move the controller to the directions instructed by the on-screen icons for menu navigation and operations. Up Left Right Down OSD icon 5-way controller operation Function (When no menu has - BenQ EX2780Q | User Manual - Page 31
can be accessed by the control keys. You can use the OSD menu to adjust all the settings on your monitor. Available menu options may vary depending on the input sources, functions and settings. 1 2 4 3 1. Press the 5-way controller. 2. The hot key menu is displayed. The top and down icons are - BenQ EX2780Q | User Manual - Page 32
The custom keys (located above the 5-way controller) perform as hot keys to provide direct access to pre-defined functions. You can change the default setting and designate different functions for these keys. Accessing the hot key functions 1. Press any of the custom keys on the rear of the monitor - BenQ EX2780Q | User Manual - Page 33
HDR content to keep all image details. You are provided with a HDR Mode key ( ) on the remote control to switch to a preferred HDR setting easily. 1. Make sure HDR content is available. See Working with HDR technology on page 34 for more information. HDR function is enabled automatically once HDR - BenQ EX2780Q | User Manual - Page 34
content in this document is most up-to-date at the time of publication. For the latest information, contact your device manufacturer a FHD/4K HDR player is ready. Players with the following names and resolutions are supported. Note that the 4K content on a FHD monitor get resized and is displayed at - BenQ EX2780Q | User Manual - Page 35
If the instructions in HDR content. Press on the remote control to bring up the HRD settings and select from the list. Alternatively, go to Color > HDR Mode to the color mode recently chosen for non-HDR content. You can manually enable HDR-emulated mode by selecting Game HDRi, Cinema HDRi or - BenQ EX2780Q | User Manual - Page 36
menu, and press access the main menu. (Menu) to 2. Go to Picture > Advanced > Display Mode. 3. Select an appropriate display mode. The setting will take effect immediately. Choosing an appropriate picture mode Your monitor provides various picture modes that are suitable for different types of - BenQ EX2780Q | User Manual - Page 37
FreeSync will eliminate screen tearing, stuttering, and juddering during gaming. 1. Use a compatible graphics processing units (GPU) with the forthcoming driver. Confirm supported technologies please visit www.AMD.com. 2. Ensure to connect with DisplayPort or HDMI. See Connect the PC video cable. on - BenQ EX2780Q | User Manual - Page 38
menu options may vary depending on the input sources, functions and settings. Menu options that are not available will become grayed out. And supplied to your region, see Language on page 51 under System and OSD Settings for more details. For more information on each menu, please refer to the - BenQ EX2780Q | User Manual - Page 39
grayed out. And keys that are not available will be disabled and the corresponding OSD icons will disappear. For models without certain functions, their settings and related items will not appear on the menu. Mode: Standard Input Picture Color Audio Eye Care Custom Key System DP USB-C HDMI1 HDMI2 - BenQ EX2780Q | User Manual - Page 40
And keys that are not available will be disabled and the corresponding OSD icons will disappear. For models without certain functions, their settings and related items will not appear on the menu. Mode: Standard Input Brightness 30 Picture Contrast Color Sharpness Audio Advanced Eye Care - BenQ EX2780Q | User Manual - Page 41
be different depending on the input signal sources. Overscan Depending on your selection of Color Mode, different Display Mode option is pre-set. Change the setting if needed. Full Scales the input image to fill the screen. Ideal for 16:9 aspect images. Aspect The input image is displayed - BenQ EX2780Q | User Manual - Page 42
OSD icons will disappear. For models without certain functions, their settings and related items will not appear on the menu. Mode menu item. to make selection. Item Color Mode Function Select a color mode that best suits the type of images shown on the screen. Low Blue Light Decreases the blue - BenQ EX2780Q | User Manual - Page 43
games. User Applies a combination of picture settings defined by users. Select an HDR mode that best suits the images displayed in the surrounding light condition. Game HDRi Enables HDR and B.I.+ functions at the same time while the - BenQ EX2780Q | User Manual - Page 44
to the factory defaults. • YES • NO AMA RGB PC Range Improves the gray level response time of the LCD panel. Determines the range of color scales. Select an option that matches the RGB range setting on the connected device. • OFF • High • Premium • Auto Detect • RGB (0~255) • RGB (16~235 - BenQ EX2780Q | User Manual - Page 45
icons will disappear. For models without certain functions, their settings and related items will not appear on the menu. Mode to make selection. Item Scenario Function Selects one of the equalizers to obtain the best audio effect in certain scenarios. Live / Pop Keeps the music and the vocal - BenQ EX2780Q | User Manual - Page 46
Item Volume Mute Function Range Rock / Party Enables 3D surrounding effect and beat booster. Adjusts the audio volume. 0 ~ 50 Mutes the audio input. • ON • OFF 46 Navigating the main menu - BenQ EX2780Q | User Manual - Page 47
grayed out. And keys that are not available will be disabled and the corresponding OSD icons will disappear. For models without certain functions, their settings and related items will not appear on the menu. Mode: Low Blue Light Input Picture Color Audio Eye Care Custom Key System B.I.+ Adjust - BenQ EX2780Q | User Manual - Page 48
cm. If the sensor • 30 min detects your presence for more than the set period of time, the monitor displays a pop-up message that reminds you to • 45 min light reduced in each low blue light mode varies and has been set particularly for the specified scenario. Choose one mode to suit your needs - BenQ EX2780Q | User Manual - Page 49
grayed out. And keys that are not available will be disabled and the corresponding OSD icons will disappear. For models without certain functions, their settings and related items will not appear on the menu. Mode: Standard Input Picture Color Audio Eye Care Custom Key System Custom Key 1 Custom - BenQ EX2780Q | User Manual - Page 50
on the menu. Mode: Standard Input Picture Color Audio Eye Care Custom Key System OSD Settings DDC/CI Input Auto Switch Auto Power Off LED Indicator Resolution Notice Information Reset All Language Display Time OSD Lock 3 Sec. 5 Sec. 10 Sec. 15 Sec. 20 Sec. Back Move Confirm 1. Select (Menu - BenQ EX2780Q | User Manual - Page 51
Español • Polski • Česky • Magyar • Română • Nederlands Svenska • Português Adjusts the display time of the OSD menu. • 3 sec. • 5 sec. • 10 sec. • 15 sec. • 20 sec. Prevents all the monitor settings from being accidentally changed. When this function is activated, the OSD controls and hotkey - BenQ EX2780Q | User Manual - Page 52
Item Function Auto Power Sets the time to power off the monitor automatically in Off power saving mode. LED Indicator Switches the power key's LED indicator on or off. Resolution Notice Sets whether to display the resolution notice of the recommended resolution when a new input source is - BenQ EX2780Q | User Manual - Page 53
reset the color settings to the support. The image is distorted, flashes or flickers. Read the instructions instructions on the link "Adjusting the Screen Resolution" on the CD, and then select the correct resolution, refresh rate and make adjustments based on these instructions. Troubleshooting - BenQ EX2780Q | User Manual - Page 54
screen, this means you are using a display mode that this monitor does not support, please change the setting to one of the supported mode. Please read the "Preset display modes" section from the link "Adjusting the to the monitor, the built-in speakers are automatically muted.) 54 Troubleshooting - BenQ EX2780Q | User Manual - Page 55
is established, make sure the appropriate audio output setting on your laptop has been selected. You may technology on page 34 to check if a supported player, content, and the certified cable are used -C™ connection. Check the cable connections and menu settings in the following order. • Check if the - BenQ EX2780Q | User Manual - Page 56
the OSD controls, press and hold any key on the rear of the monitor for 5 seconds. Need more help? If your problems remain after checking this manual, please contact your place of purchase or visit the local website from www.BenQ.com for more support and local customer service. 56 Troubleshooting
-
 1
1 -
 2
2 -
 3
3 -
 4
4 -
 5
5 -
 6
6 -
 7
7 -
8
-
9
-
10
-
11
-
12
-
13
-
14
-
15
-
16
-
17
-
18
-
19
-
20
-
21
-
22
-
23
-
24
-
25
-
26
-
27
-
28
-
29
-
30
-
31
-
32
-
33
-
34
-
35
-
36
-
37
-
38
-
39
-
40
-
41
-
42
-
43
-
44
-
45
-
46
-
47
-
48
-
49
-
50
-
51
-
52
-
53
-
54
-
55
-
56
 |
 |

LCD Monitor
User Manual
Gaming Monitor
|
EX Series