Beltronics Express 926 Owner's Manual - Page 6
Adjusting the Audio Level, Dim/Dark Button, Audio Mute Button
 |
View all Beltronics Express 926 manuals
Add to My Manuals
Save this manual to your list of manuals |
Page 6 highlights
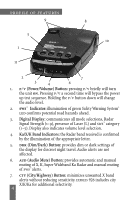
Adjusting the Audio Level Once your unit has completed the power-up test sequence, the audio level can be adjusted by holding the ⁄ button down. As you hear the audio level change, the digits ‒ in the Digital Display provide a visual reference of the audio level. To reverse the direction in which the audio level increases/ decreases, briefly release, then hold down the ⁄ button again. (Dim/Dark) Button The button allows selection of a dim or dark setting for all leds and the Digital Display. To engage dim mode, press the drk button once. A single "beep" confirms your selection. To completely cancel the illumination of all leds, press drk a second time. You'll notice a horizontal bar segment remains dim to indicate your unit is receiving power. To return to a full bright setting, press the drk button a third time; two "beeps" confirm this selection. Use of the drk button does not affect audio alerts. Important-if you press the the button and do not receive audible confirmation, the audio level has been set too low. (Audio Mute) Button Continuous Audio Alert Pattern Your unit has been preset at the factory to provide an X, K, Ka or Laser audio alert and Digital Voice announcement of the signal detected. Digital Voice prompts are provided once after the initial audio alert. This standard setting is often preferred when background noise in a vehicle is loud. Automatic Mute Audio Alert Pattern (Radar) To engage automatic muting, press the button once when the unit is not alarming.A single "beep" and a decimal point in the upper left corner of the Digital Display confirm automatic mute mode has been engaged. The alert pattern when this mode is activated consists of a short X, K or Super Wideband Ka audio alert followed by the Digital Voice announcement of the signal detected (if feature is engaged). After the Digital Voice announcement, a "clicking" tone keeps you quietly informed for as long as the signal is present. This "clicking" becomes
-
 1
1 -
 2
2 -
 3
3 -
 4
4 -
 5
5 -
 6
6 -
 7
7 -
 8
8 -
 9
9 -
 10
10 -
 11
11 -
 12
12 -
13
-
14
-
15
-
16
-
17
-
18
-
19
-
20
-
21
-
22
-
23
-
24
-
25
 |
 |
