Belkin F5D5131-16 User Guide - Page 6
Connecting Networking Devices to your Switch
 |
UPC - 722868510872
View all Belkin F5D5131-16 manuals
Add to My Manuals
Save this manual to your list of manuals |
Page 6 highlights
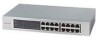
Connecting Networking Devices to your Switch Connecting your Switch to your Computers 1. Power down all your equipment. 2.Connect a Category 5e or 6 Ethernet cable between each computer's network interface card (NIC) and one of the numbered ports on the front of the Switch. 3.All switch ports can automatically negotiate speeds at full- and half-duplex modes to allow users to attach 10Base-T and 100Base-Tx network devices. 4. Connect the power cord into the power socket in the rear of the Switch; now plug the other end of the power cord into a power source (wall jack or power strip). 6
-
 1
1 -
 2
2 -
 3
3 -
 4
4 -
 5
5 -
 6
6 -
 7
7 -
 8
8 -
 9
9 -
 10
10 -
 11
11 -
 12
12 -
13
-
14
-
15
-
16
-
17
-
18
-
19
-
20
-
21
-
22
-
23
-
24
-
25
-
26
-
27
-
28
-
29
-
30
-
31
-
32
-
33
-
34
-
35
-
36
-
37
-
38
-
39
-
40
-
41
-
42
-
43
-
44
-
45
-
46
-
47
-
48
-
49
-
50
-
51
-
52
-
53
-
54
-
55
-
56
-
57
-
58
-
59
-
60
-
61
-
62
-
63
-
64
-
65
-
66
-
67
-
68
-
69
-
70
-
71
-
72
-
73
-
74
-
75
-
76
-
77
-
78
-
79
-
80
-
81
-
82
-
83
-
84
-
85
-
86
-
87
-
88
-
89
-
90
-
91
-
92
-
93
-
94
-
95
-
96
-
97
-
98
-
99
-
100
-
101
-
102
-
103
-
104
-
105
-
106
-
107
-
108
-
109
-
110
-
111
-
112
-
113
-
114
-
115
-
116
-
117
-
118
-
119
-
120
-
121
-
122
-
123
-
124
-
125
-
126
-
127
-
128
-
129
-
130
-
131
-
132
-
133
-
134
-
135
-
136
-
137
-
138
-
139
-
140
-
141
-
142
-
143
-
144
-
145
-
146
-
147
-
148
-
149
-
150
-
151
-
152
-
153
-
154
-
155
-
156
-
157
-
158
-
159
-
160
-
161
-
162
-
163
-
164
-
165
-
166
-
167
-
168
-
169
-
170
-
171
-
172
-
173
-
174
-
175
-
176
-
177
-
178
-
179
-
180
-
181
-
182
-
183
-
184
-
185
-
186
-
187
-
188
-
189
-
190
-
191
-
192
-
193
-
194
-
195
-
196
-
197
-
198
-
199
-
200
-
201
-
202
-
203
-
204
-
205
-
206
-
207
-
208
-
209
-
210
-
211
-
212
-
213
-
214
-
215
-
216
-
217
-
218
-
219
-
220
-
221
-
222
-
223
-
224
-
225
-
226
-
227
-
228
-
229
-
230
-
231
-
232
-
233
-
234
-
235
-
236
-
237
-
238
-
239
-
240
-
241
-
242
-
243
-
244
-
245
-
246
-
247
-
248
-
249
-
250
-
251
-
252
-
253
-
254
-
255
-
256
-
257
-
258
-
259
-
260
-
261
-
262
-
263
-
264
-
265
-
266
-
267
-
268
-
269
-
270
-
271
-
272
-
273
-
274
-
275
-
276
-
277
-
278
-
279
-
280
 |
 |

6
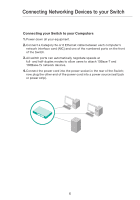
Connecting your Switch to your Computers
1.
Power down all your equipment.
2.
Connect a Category 5e or 6 Ethernet cable between each computer’s
network interface card (NIC) and one of the numbered ports on the front
of the Switch.
3.
All switch ports can automatically negotiate speeds at
full- and half-duplex modes to allow users to attach 10Base-T and
100Base-Tx network devices.
4.
Connect the power cord into the power socket in the rear of the Switch;
now plug the other end of the power cord into a power source (wall jack
or power strip).
Connecting Networking Devices to your Switch