2004 Yamaha Motorsports VMAX Owners Manual - Page 76
2004 Yamaha Motorsports VMAX Manual

Page 76 highlights
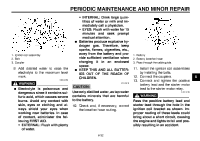
PERIODIC MAINTENANCE AND MINOR REPAIR 4. Install the brake calipers by installing the bolts. NOTE: Make sure that there is enough space between the brake pads before installing the brake calipers onto the brake discs. 5. Take the motorcycle off the centerstand so that the front wheel is on the ground. 6. Tighten the wheel axle, then the front wheel axle pinch bolt and the brake caliper bolts to the specified torques. Tightening torques: Wheel axle: 58 Nm (5.8 m·kgf, 42 ft·lbf) Front wheel axle pinch bolt: 20 Nm (2.0 m·kgf, 14 ft·lbf) Brake caliper bolt: 40 Nm (4.0 m·kgf, 29 ft·lbf) EAU25080 Rear wheel EAU25100 To remove the rear wheel EWA10820 WARNING G G 2. Lift the wheel up between the fork legs. NOTE: Make sure that the slot in the speedometer gear unit fits over the retainer on the fork leg. It is advisable to have a Yamaha dealer service the wheel. Securely support the motorcycle so that there is no danger of it falling over. 1. Remove the axle nut, and then loosen the rear wheel axle pinch bolt. 6 1. Retainer 7. Connect the speedometer cable. 8. Push down hard on the handlebar several times to check for proper fork operation. 1. Axle nut 3. Insert the wheel axle. 6-37
-
 1
1 -
2
-
3
-
4
-
5
-
6
-
7
-
8
-
9
-
10
-
11
-
12
-
13
-
14
-
15
-
16
-
17
-
18
-
19
-
20
-
21
-
22
-
23
-
24
-
25
-
26
-
27
-
28
-
29
-
30
-
31
-
32
-
33
-
34
-
35
-
36
-
37
-
38
-
39
-
40
-
41
-
42
-
43
-
44
-
45
-
46
-
47
-
48
-
49
-
50
-
51
-
52
-
53
-
54
-
55
-
56
-
57
-
58
-
59
-
60
-
61
-
62
-
63
-
64
-
65
-
66
-
67
-
68
-
69
-
70
-
 71
71 -
 72
72 -
 73
73 -
 74
74 -
 75
75 -
 76
76 -
 77
77 -
 78
78 -
 79
79 -
 80
80 -
 81
81 -
82
-
83
-
84
-
85
-
86
-
87
-
88
-
89
-
90
-
91
-
92
-
93
-
94
-
95
-
96
-
97
-
98
-
99
-
100
 |
 |
