Vivitar 285-HV User Guide - Page 5
Attaching, Flash, Camera, Shooting, Automatically
 |
View all Vivitar 285-HV manuals
Add to My Manuals
Save this manual to your list of manuals |
Page 5 highlights
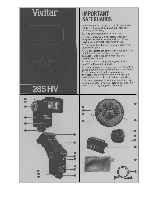
Attaching The Flash To The Camera Move the Mounting Foot Lock Lever (14) all the way to the left (unlock position). Insert the Mounting Foot (15) into the accessory shoe of your camera. Move the lever to the right until it clicks into the "LOCK" position. Your flash has a built-in hot shoe contact. If your camera does not have a hot shoe, connect the Shutter Cord (29) to the flash Shutter Cord Socket (16) and to your camera's "X" sync terminal. (Refer to your camera instructions for specific information regarding your camera's flash synchronization.) Shooting Automatically As you select a wider lens opening (a smaller f/number), you increase the amount of light entering the lens, thereby increasing the flash range and the dumber of flashes per bettery set. You'll also benefit from faster recycling time. Therefore, always try to select the auto mode that provides the greatest flash range. If your subject distance is well within the flash range selected, all the better. For example: your subject distance is 15 feet, your tens is a 50mm f2.0 or faster, and you are using ASA(ISO) 100 film. The flash unit Calculator Dial indicates a 15 foot maximum range in the Purple Mode, which corresponds to f11. You decide to use this mode. While this selection will give you proper exposure with significant depth of field, it will also use most of the energy in the flash capacitor. As a result, the batteries must work harder and longer to reenergize it, which causes long recycle time between flashes and fewer flashes per set of batteries. The best auto mode for fastest recycle time and most flashes (but limited depth of field) is the yellow mode. (The next best is RED, then BLUE, etc.) It provides an enormous auto exposure range to 60 feet (up to 70 feet with the Flash Head in the TELE position). And because you must use a wider lens opening, it takes less light to expose the film. The auto sensor shuts the light off sooner, so a limited amount of energy from the 14 7. Slide the On-Off Switch to the RED "ON" position. Focus the camera. If desired, test the exposure using the Sufficient Light Indicator (see page 13). Take the picture when the green Ready Light glows. Your flash unit will automatically determine correct exposures without further adjustments as long as you remain within the automatic range you have selected. Zoom settings-If you wish to extend or retract the Zoom/Bounce Head to the TELE or WIDE settings, this will not affect the operation of the automatic sensing system of the flash. It will, however, alter your operating range and flash light coverage. (See chart of automatic f-stop settings and corresponding ranges in rear of this manual.) EXAMPLE: Using ISO 100 film and the Zoom/Bounce Head in the TELE position, set the Mode Selector Dial to the Blue position and your camera lens to f8. Your automatic operating range is now from 2 to 18 feet, instead of 2 to 15 feet as in the NORM position of step 6 above. (See photos A and E for comparison.) B. ON-CAMERA BOUNCE FLASH When the flash is set at 45°, 60°, 75° or 90°, the light can be bounced off the ceiling or other reflective surfaces to create a softer lighting. When using color film, keep in mind that the bounced light will take-on the color of the reflective surface. So, unless you are creating a special effect, make sure you' only bounce the light off white or neutral colored surfaces. As a general rule, set the tilt angle of the head so that the light is directed at the midpoint on the ceiling between the flash and the subject. 1. Set your camera to the correct shutter speed for electronic flash. (Refer to your camera instructions.) 2. If you have not already done so, set the Zoom/Bounce Head to the NORM position and set the ISO or DIN film speed on the Calculator Dial. 3. After positioning your subject, tilt the Flash Head to the desired bounce angle. 16 capacitor is used and the thynstor circuit holds the excess energy inside it. The batteries aren't depleted as quickly, so you get faster recycle time and more flashes. Please note that while the f/number changes with the speed of the film, the auto range remains constant. A. ON-CAMERA DIRECT FLASH This method of operation with your 285HV allows you to photograph subjects at maximum distances from the flash while still maintaining automatic flash exposure control. 1. Set your camera to the correct shutter speed for electronic flash. (Refer to your camera instructions.) 2. If you have not already done so, set the Zoom/Bounce Head to the NORM position, and set the ISO or DIN number of the film you are using on the Calculator Dial (see page 11-). The four colored wedges on the Calculator dial now line up below the four automatic 1-stops for the film you are using. 3. Select any one of the four automatic mode color wedges and corresponding f-stops on the Calculator Dial that provides the automatic operating range or depth of field you desire. Generally speaking, the yellow mode will provide the fastest recycle time and most number of flashes. If your lens doesn't have an f-stop that corresponds to the yellow mode, theniuse the red mode. 4. Turn the Mode Selector Dial on the Vari Sensor Module until the color that corresponds to the f-stop you selected in step 3 above appears in the Mode Selector Window (25) on the side of the Module. 5. Set your camera lens to the auto f-stop you selected in step#3. 6. Set the Flash Head to the 0° tilt (straight ahead) position. EXAMPLE OF ON-CAMERA DIRECT FLASH: You wish to photograph a subject 10 feet away and desire moderately great depth of field. Using ASA/ISO 100 film and the Zoom/Bounce Head in the NORM position, set the Mode Selector Dial to the Blue position and set your camera lens to f8. Your automatic operating range is from 2 to 15 feet (0.6-4.5 m). (See photo A.) 15 4. Select any one of the four automatic f-stops on the Calculator Dial that provides the automatic operating range or depth of field you desire. Turn the Mode Selector Dial on the Vari Sensor Module until the color that corresponds to the f-stop you selected above appears in the window on the side of the Vari Sensor Module. Remember that the automatic operating range must be sufficient to include the entire flash-to-bounce surface-tosubject distance. 5. Set your camera lens to the auto f-stop you selected in step 4. EXAMPLE OF ON-CAMERA AUTOMATIC BOUNCE FLASH: Using ISO 100 film, bouncing the light off an 8 foot high ceiling onto a subject at a total flash-to-reflector-to-subject distance of 20 feet (6.1 m) from the flash, and desiring relatively shallow depth of field: a) Set the Flash Head tilt to the appropriate angle; b) Set the Flash Head to the NORM zoom position; c) Set your camera lens to f4.0; d) Set the Mode Selector Dial to RED. NOTE: Bouncing off surfaces such as curtains or acoustical tile ceilings will add to the effective distance between flash, bounce surface and subject because they absorb light. Make sure the auto mode operating distance covers this effective distance. Your flash unit will automatically determine correct exposures without further adjustments as long as you remain within the automatic range you have selected. 6. Slide the On-Off Switch to the RED "ON" position. Focus the camera. If desired, test the exposure using the :Sufficient Light Indicator (see page 13). Take the picture when the green Ready Light glows. 17
-
 1
1 -
 2
2 -
 3
3 -
 4
4 -
 5
5 -
 6
6 -
 7
7 -
 8
8
 |
 |
