URC MRX-8 Owners Manual - Page 7
Installing the MRX-8
 |
View all URC MRX-8 manuals
Add to My Manuals
Save this manual to your list of manuals |
Page 7 highlights
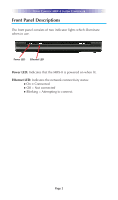
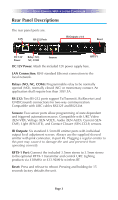
TOTAL CONTROL MRX-8 SYSTEM CONTROLLER Installing the MRX-8 Physical Installation of the MRX-8 and Accessories The MRX-8 System Controller can be installed anywhere in the home or office network. Once installed, program it to operate all local equipment using IP/Network, IR, RS-232, or Relays. As well as query the status of a device using Sensors. All cables are plugged into their respective ports in the rear of the unit. Network Installation 1. Connect an Ethernet cable (RJ45) to the rear of the MRX-8 and onto the network. 2. Plug flashers into any of the six IR outputs on the rear of the MRX-8. (Make sure the 3.5mm pink connector cable is reserved for port #6.) Page 4
-
 1
1 -
 2
2 -
 3
3 -
 4
4 -
 5
5 -
 6
6 -
 7
7 -
 8
8 -
 9
9 -
 10
10 -
 11
11 -
 12
12 -
13
-
14
-
15
-
16
-
17
-
18
-
19
 |
 |

Installing the MRX-8
Physical Installation of the MRX-8 and Accessories
The MRX-8 System Controller can be installed anywhere in the
home or office network. Once installed, program it to operate all
local equipment using IP/Network, IR, RS-232, or Relays. As well as
query the status of a device using Sensors. All cables are plugged
into their respective ports in the rear of the unit.
Network Installation
1.
Connect an
Ethernet cable (RJ45)
to the rear of the MRX-8 and
onto the network.
2. Plug flashers
into any of the six IR outputs on the rear of the MRX-8.
(Make sure the 3.5mm pink connector cable is reserved for port
#6.)
Page 4
T
OTAL
C
ONTROL
MRX-8 S
YSTEM
C
ONTROLLER