Toshiba X21U Owners Manual - Page 47
Operating the menu screen
 |
View all Toshiba X21U manuals
Add to My Manuals
Save this manual to your list of manuals |
Page 47 highlights
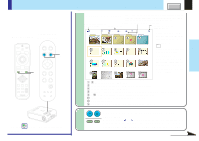
Operating the menu screen MENU Start Press the MENU button to display the QUICK MENU. MENU Selected item (orange) Input source name QUICK MENU Contrast Brightness Phase Picture mode Keystone Analog RGB(1) +6 0 0 Bright 0 True color Adjustment display bar Displayed for adjustable items Setting display buttons Displayed for items set by selection. The setting displayed in yellow is the one currently set. Lamp power Hi Input source setting Language Adjust the contrast of the image. Low [ENTER] [ENTER] ENTER There are also items with sub-menus displayed by pressing the ENTER button. ENTER Some items in the FULL MENU have sub-menus. MENU FULL Item Adjust EXIT Quit In the QUICK MENU screen, simple explanations of the selected items are displayed. The button operation guide is displayed here. The contents of the operation guide differ according to the type of menu and the selected item. MENU INPUT ON/STANDBY LASER AUTO KEYSTONE AUTO SET The FULL MENU appears when the MENU MENU button is pressed. KEYSTONE AUTO SET VOL/ADJ. L-CLICK R-CLICK VOLUME/ADJUST VOL/ADJ Selection ENTER EXIT MENU ENTER EXIT PIP FREEZE CALL RESIZE MUTE ENTER EXIT MENU MENU INPUT ON/STANDBY TEMP LAMP ON BUSY FAN Use the selection buttons ( / ) to select the item to be adjusted or set. Use the VOL/ADJ (+/-) buttons to adjust or set the selected items. EXIT End Press the EXIT button to end the adjustEXIT ments and settings and turn the menu off. Adjustments and settings that have been made here are automatically stored in the memory when the power is turned off by the ON/STANDBY button. CONTENTS Sub-menu (example: input setting) QUICK MENU Analog RGB(1) Input source setting COMPUTER-1 COMPUTER-2 Video S-video Memory card Camera Analog RGB(1) Y/PB/PR Analog RGB(2) Digital RGB 47 MENU FULL Item Change ENTERSet EXIT Back The sub-menus include items that are set by pressing the ENTER button. When a sub-menu is displayed, it will return to the previous menu by pressing the EXIT button. The first menu displayed in the FULL MENU mode is the "Picture" menu. Analog RGB (1) Picture Contrast Brightness Phase Frequency Position Picture mode Screen size Level +6 0 0 0 Bright Full [ENTER] True color Thru [ENTER] MENU QUICK Item Page Adjust EXIT Quit MENU When the MENU button is pressed in the FULL MENU mode, the QUICK MENU MENU reappears. Each press of the selection buttons ( / ) change the menus as shown: [Picture] [Audio] [Keystone] [Display] [Factory reset mode] [Default Settings] Adjustments & Settings
-
 1
1 -
2
-
3
-
4
-
5
-
6
-
7
-
8
-
9
-
10
-
11
-
12
-
13
-
14
-
15
-
16
-
17
-
18
-
19
-
20
-
21
-
22
-
23
-
24
-
25
-
26
-
27
-
28
-
29
-
30
-
31
-
32
-
33
-
34
-
35
-
36
-
37
-
38
-
39
-
40
-
41
-
 42
42 -
 43
43 -
 44
44 -
 45
45 -
 46
46 -
 47
47 -
 48
48 -
 49
49 -
 50
50 -
 51
51 -
 52
52 -
53
-
54
-
55
-
56
-
57
-
58
-
59
-
60
-
61
-
62
-
63
-
64
-
65
-
66
-
67
-
68
-
69
-
70
-
71
-
72
-
73
-
74
-
75
-
76
-
77
-
78
-
79
-
80
-
81
-
82
-
83
-
84
-
85
-
86
-
87
-
88
-
89
-
90
-
91
-
92
-
93
-
94
-
95
-
96
-
97
-
98
-
99
-
100
-
101
-
102
 |
 |
