Toshiba PDR-3310 Instruction Manual - Page 39
Adjusting the Image Size Trimming
 |
View all Toshiba PDR-3310 manuals
Add to My Manuals
Save this manual to your list of manuals |
Page 39 highlights
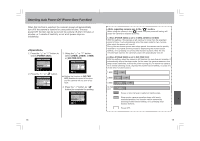
4 Press the "#" button to display the print submenu. 7 Select [RETURN] and press the " " button to complete settings. Select date imprint ON/OFF. Specify number of prints. 5 After completing all settings, select [RETURN] and press the " " button. 6 To print an index sheet, press [INDEX], followed by "#", [SET UP INDEX PRINT], and the " " button. Index print ON/OFF Total number of prints selected ¶ To confirm the number of prints set for each individual picture, use the information screen (page 61). ¶ Since DPOF data is preserved as part of the overall memory of the memory card, setting may not be possible if the memory card has insufficient remaining space. ¶ Do not use a personal computer to delete or modify DPOF image data on a memory card. ¶ When submitting a memory card to a commercial photo printing service for printing, first use the information screen (page 61) to confirm the number of prints desired for each image. ¶ Any pictures taken after setting the DPOF for an index print will not be included on the index print. To include the new pictures, set the index print option once again. 70 Adjusting the Image Size (Trimming) You can change the size of the picture you have taken using this camera. 1 Select the picture you want to change the size using "@" or "#", then press the "MENU" button. Then select " " using the "@" or "#" button and press " ." 4 Select the area to be trimmed by pressing "W" or "T". The area to be trimmed. T The area to be trimmed. 2 Select [EXECUTE TRIMMING]. W Press " ." 3 [SELECT IMAGE AREA] screen will be displayed. Whole area will be trimmed. 5 You can move the area using button. Press the "%" button. The center of the image will be displayed here. The area to be trimmed. ¶ You can not move the area when you are going to trim the whole area. 71
-
 1
1 -
2
-
3
-
4
-
5
-
6
-
7
-
8
-
9
-
10
-
11
-
12
-
13
-
14
-
15
-
16
-
17
-
18
-
19
-
20
-
21
-
22
-
23
-
24
-
25
-
26
-
27
-
28
-
29
-
30
-
31
-
32
-
33
-
 34
34 -
 35
35 -
 36
36 -
 37
37 -
 38
38 -
 39
39 -
 40
40 -
 41
41 -
 42
42 -
 43
43 -
 44
44 -
45
-
46
-
47
-
48
-
49
-
50
-
51
-
52
-
53
-
54
-
55
-
56
-
57
-
58
-
59
-
60
-
61
-
62
 |
 |
