TRENDnet TEW-659BRV User's Guide - Page 59
Enable/disable UPnP on your router, Enable, Enter the DHCP reservation manually, MAC Address
 |
View all TRENDnet TEW-659BRV manuals
Add to My Manuals
Save this manual to your list of manuals |
Page 59 highlights
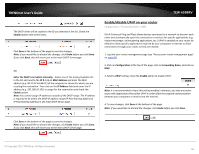
TRENDnet User's Guide The DHCP client will be copied to the ID you selected in the list. Check the Enable option next to the entry. Click Save at the bottom of the page to save the changes. Note: If you would like to discard the changes, click Undo before you click Save. If you click Back, this will return you to the main DHCP Server page. OR Enter the DHCP reservation manually - Select one of the empty/available IDs in the list and next to the ID # click on MAC Address and enter the MAC address (e.g. 00:11:22:AA:BB:CC) of the computer or device for which you are creating the reservation. Then click on the IP Address field and enter the IP address (e.g. 192.168.10.101) to assign for the reservation and check the Enable option. Note: You cannot assign IP addresses outside of the DHCP range. The IP address is required to be within the DHCP IP address range (IP Pool Starting Address & IP Pool Starting Address) in the main DHCP Server page. TEW-659BRV Enable/disable UPnP on your router Configuration > Forwarding Rules > DMZ UPnP (Universal Plug and Play) allows devices connected to a network to discover each other and automatically open the connections or services for specific applications (e.g. instant messenger, online gaming applications, etc.) UPnP is enabled on your router by default to allow specific applications required by your computers or devices to allow connections through your router as they are needed. 1. Log into your router management page (see "Access your router management page" on page 50). 2. Click on Configuration at the top of the page, click on Forwarding Rules, and click on DMZ. 3. Next to UPnP setting, check the Enable option to enable UPnP. Note: It is recommended to leave this setting enabled, otherwise, you may encounter issues with applications that utilize UPnP in order allow the required communication between your computers or devices and the Internet. 4. To save changes, click Save at the bottom of the page. Note: If you would like to discard the changes, click Undo before you click Save. Click Save at the bottom of the page to save the changes. Note: If you would like to discard the changes, click Undo before you click Save. If you click Back, this will return you to the main DHCP Server page. © Copyright 2012 TRENDnet. All Rights Reserved. 56
-
 1
1 -
2
-
3
-
4
-
5
-
6
-
7
-
8
-
9
-
10
-
11
-
12
-
13
-
14
-
15
-
16
-
17
-
18
-
19
-
20
-
21
-
22
-
23
-
24
-
25
-
26
-
27
-
28
-
29
-
30
-
31
-
32
-
33
-
34
-
35
-
36
-
37
-
38
-
39
-
40
-
41
-
42
-
43
-
44
-
45
-
46
-
47
-
48
-
49
-
50
-
51
-
52
-
53
-
 54
54 -
 55
55 -
 56
56 -
 57
57 -
 58
58 -
 59
59 -
 60
60 -
 61
61 -
 62
62 -
 63
63 -
 64
64 -
65
-
66
-
67
-
68
-
69
-
70
-
71
-
72
-
73
-
74
-
75
-
76
-
77
-
78
-
79
-
80
-
81
-
82
-
83
-
84
-
85
-
86
-
87
-
88
-
89
-
90
-
91
-
92
-
93
-
94
-
95
-
96
-
97
 |
 |
