TASCAM Sonicview 24XP TASCAM Sonicview control Users Manual V1.1.0 - Page 10
Snapshot button, FADER LAYER buttons, USER KEY buttons Offline Editor mode only, Channel
 |
View all TASCAM Sonicview 24XP manuals
Add to My Manuals
Save this manual to your list of manuals |
Page 10 highlights
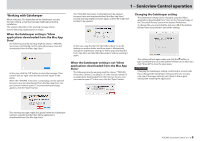
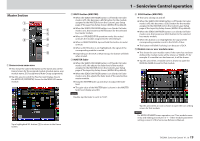
2 Snapshot button o This shows the number and name of the current snapshot. o Tap this button to open the Snapshot List Screen in the Touchscreen Display Area. 1 - Sonicview Control operation 4 USER KEY buttons (Offline Editor mode only) When in OFFLINE EDITOR operation mode, functions and colors can be freely assigned to these buttons. When functions that have different statuses are assigned to these buttons, they will be highlighted according to the status. To set USER KEY button settings, see "USER DEFINED CONTROLS Screen" in "4 - Mixer configuration and other settings" of the Sonicview Reference Manual. 5 Channel Section This shows MUTE, SOLO and SEL buttons and the channel faders of the Sonicview Channel Section. (See "Channel Section" on page 13.) 6 button Tap this button to open the application Menu Screen. (See "Application Menu Screen" on page 17.) c This shows the operation mode. (REMOTE MODE/OFFLINE EDITOR) NOTE When 2 or fewer b indicators are lit, operation of the app could be impeded. For further information, please contact your network administrator. 8 MENU button Tap this button to open the Menu Screen in the Touchscreen Display Area. For operation of the Snapshot List Screen, see "Snapshot List Screen" in "8 - Saving and recalling setting data" of the Sonicview Reference Manual. NOTE If a snapshot is recalled from the Sonicview unit itself when the operation mode is "REMOTE MODE", it might not match the current snapshot (last stored/recalled Snapshot) in Sonicview Control, and the snapshot number and name might be shown blinking. 3 FADER LAYER buttons o Tap these buttons to switch the FADER LAYER in 8-channel groups. The last tapped button will be highlighted, showing that it is selected. Switching the FADER LAYER will change the display to correspond to the current layer, including the module faders, the MUTE/SEL buttons and the Touchscreen Display Area. o The FADER LAYER assigned to each button and its highlighted color can be set freely by opening Menu Screen > Front Panel Setup menu > Layer/Master Fader Setup. To set FADER LAYER button settings, see "Layer Key SETUP page" in "4 - Mixer configuration and other settings" of the Sonicview Reference Manual. o The Custom 1-7 buttons will show the custom layer names set on the Custom Layer Name Screen. (See "Application Menu Screen" on page 17.) 7 Information display area This shows the following information. a This is the Machine Name on the network. b When operating in REMOTE MODE, this shows the transmission speed between the logged-in Sonicview and Sonicview Control. For menu operation, see "Menu Screen" in "2 - Names and Functions of Parts" of the Sonicview Reference Manual. NOTE The menu items that can be used depend on the application operation mode. Menu items that cannot be selected will appear dark gray. 9 HOME button When the Menu Screen or a settings screen is open, tap this to reopen the Home Screen on the touchscreen. 0 SOLO CLEAR button o The SOLO CLEAR button lights when any module is being soloed. o Tap the SOLO CLEAR button when it is lit to end soloing of all channels. TASCAM Sonicview Control V1.1.0 10
-
 1
1 -
2
-
3
-
4
-
 5
5 -
 6
6 -
 7
7 -
 8
8 -
 9
9 -
 10
10 -
 11
11 -
 12
12 -
 13
13 -
 14
14 -
 15
15 -
16
-
17
-
18
-
19
-
20
-
21
 |
 |
