Sony SDM-HX73 Operating Instructions - Page 5
Identifying parts and controls - lcd
 |
View all Sony SDM-HX73 manuals
Add to My Manuals
Save this manual to your list of manuals |
Page 5 highlights
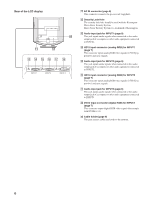
Identifying parts and controls See the pages in parentheses for further details. Front of the LCD display MENU MENU OK INPUT 3 Side view of the LCD display 4 5 6 7 8 OK INPUT 1 2 9 q; A 1 (Power) switch and 1 (power) indicator (pages 9, 19, 24) To turn the display on or off, press the 1 (power) switch. The power indicator lights up in green when the display is turned on, and lights up in orange when the display is in the power saving mode. B Light sensor (page 20) This sensor measures the brightness of the surrounding area. Be sure not to cover the sensor with papers, etc. C Stereo speakers (page 19) These speakers output the audio signals as sound. D MENU button (page 12) This button turns the menu screen on and off. E m/M and 2 (volume control) buttons (pages 12, 19) These buttons are used to select the menu items and make adjustments, and also display the "Volume" menu to control the volume. F OK button (page 12) This button activates the selected menu item and adjustments made using the m/M buttons (5). G INPUT button (page 11) This button switches the video input signal between INPUT1, INPUT2 and INPUT3 when two computers are connected to the monitor. GB H button (page 20) This button changes the MODE (PICTURE/AUDIO). I Back cover (page 7) Slide up this cover when you connect cables or cords. J Headphones jack (page 19) This jack outputs audio signals to the headphones. (continued) 5
-
 1
1 -
 2
2 -
 3
3 -
 4
4 -
 5
5 -
 6
6 -
 7
7 -
 8
8 -
 9
9 -
 10
10 -
 11
11 -
12
-
13
-
14
-
15
-
16
-
17
-
18
-
19
-
20
-
21
-
22
-
23
-
24
-
25
 |
 |
