Sharp XV-Z10000U XV-Z10000 Operation Manual - Page 23
Connecting the thumbscrew cables, Plug and Play function
 |
UPC - 074000358836
View all Sharp XV-Z10000U manuals
Add to My Manuals
Save this manual to your list of manuals |
Page 23 highlights
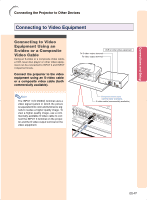
Connecting to a Computer Using a DVI Cable (Sold Separately) Connect the projector to the computer using the DVI cable. Optional accessory DVI cable Type:AN-C3DV (9'10'' (3.0m)) To DVI Digital output terminal Desktop computer Note • Select the input signal type of the video equipment. See page 64. DVI cable (sold separately) Connecting the thumbscrew cables I Connect the thumbscrew cable making sure that it fits correctly into the terminal. Then, firmly secure the connectors by tightening the screws on both sides of the plug. I Do not remove the ferrite core attached to the RGB cable. Ferrite core "Plug and Play" function I This projector is compatible with VESA-standard DDC 1/DDC 2B. The projector and a VESA DDC compatible computer will communicate their setting requirements, allowing for quick and easy setup. I Before using the "Plug and Play" function, be sure to turn on the projector first and the connected computer last. Note • The DDC "Plug and Play" function of this projector operates only when used in conjunction with a VESA DDC compatible computer. -22
-
 1
1 -
2
-
3
-
4
-
5
-
6
-
7
-
8
-
9
-
10
-
11
-
12
-
13
-
14
-
15
-
16
-
17
-
 18
18 -
 19
19 -
 20
20 -
 21
21 -
 22
22 -
 23
23 -
 24
24 -
 25
25 -
 26
26 -
 27
27 -
 28
28 -
29
-
30
-
31
-
32
-
33
-
34
-
35
-
36
-
37
-
38
-
39
-
40
-
41
-
42
-
43
-
44
-
45
-
46
-
47
-
48
-
49
-
50
-
51
-
52
-
53
-
54
-
55
-
56
-
57
-
58
-
59
-
60
-
61
-
62
-
63
-
64
-
65
-
66
-
67
-
68
-
69
-
70
-
71
-
72
-
73
-
74
-
75
-
76
-
77
-
78
-
79
-
80
-
81
-
82
-
83
-
84
-
85
-
86
-
87
-
88
-
89
-
90
-
91
-
92
-
93
 |
 |
