Sharp XG-V10WU XG-V10WU Operation Manual - Page 73
Removing and installing the lamp unit, Press POWER ON on projector. LAMP
 |
View all Sharp XG-V10WU manuals
Add to My Manuals
Save this manual to your list of manuals |
Page 73 highlights
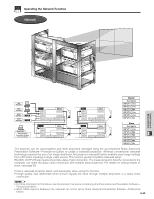
Replacing the Lamp Removing and installing the lamp unit CAUTION • Be sure to remove the lamp cage by the handle. Be sure not to touch the glass surface of the lamp cage or the inside of the projector. • To avoid injury to yourself and damage to the lamp, be sure to carefully follow the steps below. • Replace the lamp more safely by unplugging the power cord after turning off the main power. Lamp 1 Lamp 2 High angle view 1 Turn off the power. 2 Turn off the main power. 3 Remove the lamp cage cover. Press POWER OFF. Wait until the cooling fan stops. or Turn off the MAIN POWER switch. (Unplug the power cord) Loosen the user service screw that secures the lamp cage cover on the back of the projector. Then slide the cover in the direction of the arrow (to the open mark). 4 Remove the lamp cage. Remove the securing screws from the lamp cage. Hold the lamp cage by the handle and pull it horizontally towards you. Securing screws 5 Attach the lamp cage cover and turn on the main power. Slide the lamp cage cover in the direction of the arrow (to the close mark) on the back of the projector. Then turn on the MAIN POWER switch. 6 Press POWER ON on projector. LAMP REPLACEMENT indicator flashes red. Then press ENTER to reset lamp timer. Press POWER ON, and then press ENTER on the projector. ON Securing screw 7 8 Turn off the main power again and remove the lamp cage cover. Insert the new lamp cage. Turn off the main power switch and slide the lamp cage cover in the direction of the arrow (to the open mark) on the back of the projector. Press the lamp cage firmly into the lamp cage compartment. Fasten the securing screws. ENTER 9 Attach the lamp cage cover. Slide the lamp cage cover in the direction of the arrow (to the close mark) on the back of the projector. Then tighten the user service screw. Maintenance & Troubleshooting • You need to reset lamp timer every time when replacing the lamp and confirm it to be reset on "Lamp Timer" menu. E-72
-
 1
1 -
2
-
3
-
4
-
5
-
6
-
7
-
8
-
9
-
10
-
11
-
12
-
13
-
14
-
15
-
16
-
17
-
18
-
19
-
20
-
21
-
22
-
23
-
24
-
25
-
26
-
27
-
28
-
29
-
30
-
31
-
32
-
33
-
34
-
35
-
36
-
37
-
38
-
39
-
40
-
41
-
42
-
43
-
44
-
45
-
46
-
47
-
48
-
49
-
50
-
51
-
52
-
53
-
54
-
55
-
56
-
57
-
58
-
59
-
60
-
61
-
62
-
63
-
64
-
65
-
66
-
67
-
 68
68 -
 69
69 -
 70
70 -
 71
71 -
 72
72 -
 73
73 -
 74
74 -
 75
75 -
 76
76 -
 77
77 -
 78
78 -
79
-
80
-
81
-
82
-
83
-
84
-
85
-
86
-
87
-
88
-
89
-
90
 |
 |
