Sharp XG-NV5XB Operation Manual - Page 21
Using the, Graphical User Interface Menu Screens
 |
View all Sharp XG-NV5XB manuals
Add to My Manuals
Save this manual to your list of manuals |
Page 21 highlights
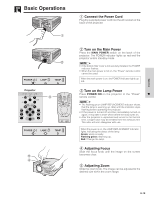
Using the GUI (Graphical User Interface) Menu Screens MOUSE ADJ. Projector 1, 7 2, 3, 5 4 (GUI) On-screen Display Menu bar in COMPUTER mode 1 4 ON VOL MUTE OFF BLACK SCREEN LASER TOOLS MENU R/C OFF 6 R-CLICK ENTER INPUT IrCOM FREEZE AUTO SYNC This projector has two sets of menu screens (Computer/ Video) that allow you to adjust the image and various projector settings. These menu screens can be operated from the projector or the "Power" remote control with the following buttons. (For use with the "Power" remote control, slide the MOUSE/ADJUSTMENT switch to the ADJ. position.) 1 Press MENU to display the COMPUTER or VIDEO mode menu bar. 2 Press ß/© to select an adjustment menu on the menu bar. 3 Press ∂/ƒ to select a specific adjustment item. 4 To display only the adjustment item, press ENTER after selecting the item. Only the menu bar and the selected adjustment item will appear. 5 Press ß/© to adjust the item. 6 Press LEFT-CLICK to return to the previous screen. 7 Press MENU to exit from the GUI. ON Menu bar in VIDEO mode 1 • For details on items on the menu screen, see the tree charts on the next page. Operation E-20
-
 1
1 -
2
-
3
-
4
-
5
-
6
-
7
-
8
-
9
-
10
-
11
-
12
-
13
-
14
-
15
-
 16
16 -
 17
17 -
 18
18 -
 19
19 -
 20
20 -
 21
21 -
 22
22 -
 23
23 -
 24
24 -
 25
25 -
 26
26 -
27
-
28
-
29
-
30
-
31
-
32
-
33
-
34
-
35
-
36
-
37
-
38
-
39
-
40
-
41
-
42
-
43
-
44
-
45
-
46
-
47
-
48
-
49
-
50
-
51
-
52
-
53
-
54
 |
 |
