Sharp PN-HB651 PN-HB Series PN-HM Series Software Guide - Page 21
Auto startup application setting], Network settings], Media Player settings]
 |
View all Sharp PN-HB651 manuals
Add to My Manuals
Save this manual to your list of manuals |
Page 21 highlights
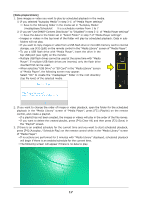
[Auto startup application setting] 1. Press [CONTENT MENU] on the remote control to display the "CONTENT MENU" screen. 2. Select [Startup]. 3. Select "Media Player" and press [RETURN] on the remote control. [Network settings] 1. In the "CONTENT MENU" screen, select "Setup". 2. Select "Telnet Server". 3. Set "Telnet Server" to "ON". 4. Set a "User name" and "Password" if needed. By default, a "User name" and "Password" are not set. 5. Press "RETURN" on the remote control until the "Setup" screen appears. 6. Select "FTP Server". 7. Set "FTP Server" to "ON". 8. Set a "User name" and "Password" if needed. The default settings are user name: admin, password: admin. 9. Press [CONTENT MENU] on the remote control to return to the "CONTENT MENU" screen. MENU 10. Press on the center right side of the remote control to display the OSD menu, and set "SETUP" - "COMMUNICATION SETTING" - "MONITOR CONTROL SELECT" to "LAN". MENU 11. Press on the center right side of the remote control to close the OSD menu. [Media Player settings] 1. In the "CONTENT MENU" screen, select "Media Player". 2. Press MENU (Settings) on the lower right of the remote control. 3. Set the save location of the images or videos that you want to auto play in "Autoplay Media". ("Internal Storage", "USB Drive", "SD Card".) 4. Make sure that "Use SHARP Content Distributor" is set to "Enabled". 5. If you want to set the playback method for images, select "Slideshow". Slideshow Duration (3 - 999 seconds, 6 seconds by default) * The default setting is underlined. Picture transition (None, Wipe Left, Wipe Right, Wipe Up, Wipe Down, Fade In/Out) * The "Shuffle" and "Folder Repeat" settings cannot be used with scheduled playback. * "Reset" initializes the "Slideshow" settings. 6. Press [RETURN] on the remote control until you return to the "Media Library" screen. 19
-
 1
1 -
2
-
3
-
4
-
5
-
6
-
7
-
8
-
9
-
10
-
11
-
12
-
13
-
14
-
15
-
 16
16 -
 17
17 -
 18
18 -
 19
19 -
 20
20 -
 21
21 -
 22
22 -
 23
23 -
 24
24 -
 25
25 -
 26
26 -
27
-
28
-
29
-
30
-
31
-
32
-
33
-
34
-
35
-
36
-
37
-
38
-
39
-
40
 |
 |
