Sharp PG-M10XL PG-M10SU , PG-M10XU Operation Manual - Page 31
Resetting
 |
View all Sharp PG-M10XL manuals
Add to My Manuals
Save this manual to your list of manuals |
Page 31 highlights
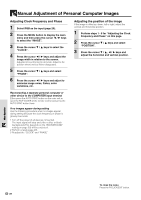
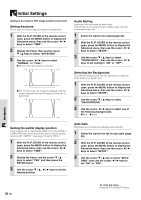
Resetting Resetting the factory defaults All items can be reset to the standard settings with the exception of the followings. • Lamp usage timer • "KEYSTONE" adjustment values (including the "KEYSTONE" setting value on page 32). 1 Press the remote control MENU button to display the normal menu and then press the cursor ǡ / Ǡ keys to select "INFORMATION". 2 When the "INFORMATION" menu appears, press the cursor / keys select "RESET", then press the ENTER button. 3 If the ENTER button is not used during reset, press the R-CLICK/EXIT button. Resetting the Lamp Usage Timer When the lamp is replaced (page 37), it is necessary to set the lamp hours of usage from the menu. 1 Press the remote control MENU button, use the cursor ǡ / Ǡ keys to display the "INFORMATION" menu and set the lamp hours of usage. 2 Display the "INFORMATION" menu, use the cursor / keys to select "LAMP USAGE HOURS RESET" and then press the ENTER button. 3 If the ENTER button is not used during reset, press the R-CLICK/EXIT button. When the lamp usage timer has exceeded 1100 hours and the unit will not turn on The power will not turn on when the lamp hours of usage has exceeded 1100 hours. The STATUS indicator will be on continually (page 36). Thus, the menu cannot be displayed. In such case, replace the lamp housing, then use the following procedure to reset. 1 Connect the power cord (page 18). Standby status will be activated. 2 Press the INPUT SELECT and AUTO SYNC buttons of the main unit at the same time for 5 sec. or more. The lamp usage timer will be reset. After resetting, the STATUS indicator (page 36) that turned on because 1100 hours had been exceeded will turn off. The lamp hours of usage will be displayed on the screen when it has exceeded 1000 hours. Menu Operation To close the menu Press the R-CLICK/EXIT button. 29
-
 1
1 -
2
-
3
-
4
-
5
-
6
-
7
-
8
-
9
-
10
-
11
-
12
-
13
-
14
-
15
-
16
-
17
-
18
-
19
-
20
-
21
-
22
-
23
-
24
-
25
-
 26
26 -
 27
27 -
 28
28 -
 29
29 -
 30
30 -
 31
31 -
 32
32 -
 33
33 -
 34
34 -
 35
35 -
 36
36 -
37
-
38
-
39
-
40
-
41
-
42
-
43
-
44
-
45
-
46
-
47
-
48
-
49
 |
 |
