Rane SM26S Operation Manual - Page 1
Rane SM26S Manual
 |
View all Rane SM26S manuals
Add to My Manuals
Save this manual to your list of manuals |
Page 1 highlights
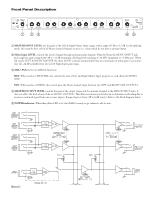
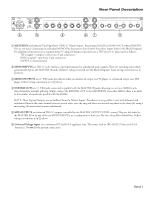
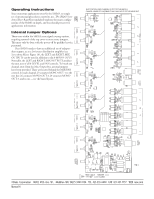
OPERATORS MANUAL SM26S SPLITTER MIXER MASTER INPUT 4 6 2 8 0 10 LEVEL 1 4 6 2 2 2 86 6 0 10 LEVEL 10 10 MIX / PAN 2 4 6 2 2 2 86 6 0 10 LEVEL 10 10 MIX / PAN 3 4 6 2 2 2 86 6 0 10 LEVEL 10 10 MIX / PAN 4 4 6 2 2 2 86 6 0 10 LEVEL 10 10 MIX / PAN 5 4 6 2 2 2 86 6 0 10 LEVEL 10 10 MIX / PAN 6 4 6 2 2 2 86 6 0 10 LEVEL 10 10 MIX / PAN MASTER OUTPUT 4 6 2 8 0 10 LEVEL SM26S SPLITTER MIXER POWER Quick Start Realizing that in most areas there are laws against reading owners manuals, and that reading them under the blankets at night with a flashlight makes you feel stupid, we therefore provide this brief, yet legal description of how to use the SM26S just in case your batteries are low and your mother is about to come in the room. To achieve a quick understanding of the SM26S, think of it as a six channel mixer with faders and pans only. Or think of it as a 2-to-6 channel splitter with output level controls and a mix knob (to control how much of which input goes to which output). If you get that, you may stop here as long as you know what a TRS plug is. As a six channel mixer, MONO INPUT 1 through 6 may be placed on the Right or Left bus or both, in any amount. The respective LEVEL controls on the front serve as the mixer's faders, the adjacent PAN controls place the channel's signal into the stereo field. As an effects mixer or line level expander for a larger mixer, set up the LEVELS then adjust the PANS. The MASTER OUTPUT LEVEL adjusts the overall level of the mix at the Master Outputs. As a splitter, place one or both input signals into the LEFT and/or RIGHT MASTER INs. Select the Input(s) to be placed at each of the six MONO OUTPUTS by rotating the MIX / PAN control to the proper position. Set the individual channel LEVEL controls for proper output level. The MASTER INPUT LEVEL control adjusts both Right and Left Input signal levels together. SM26S Connection When connecting the SM26S to other components in your system for the first time, leave the power cord for last. This gives you a chance to make mistakes and correct them before damage is done to anything fragile. As you have no doubt noticed, all Inputs and Outputs on the SM26S's rear panel are ¼" connectors. The Inputs and Outputs are active balanced on Tip-Ring-Sleeve (TRS) jacks which allow the flexibility of connecting in either a balanced or unbalanced fashion. If unbalanced operation is your preference, the simplest way to accomplish this is through the use of tip-sleeve ¼" connectors. The ring is not essential unless balanced operation is required. Be aware that if you are running unbalanced and using TRS connectors with both tip and ring, the ring and sleeve must be shorted together. Failure to do so on the inputs results in a gain loss of 6 dB. Balanced operation requires that TRS plugs be used. The tip is hot (+), the ring is return (-) and the sleeve is ground. RaneNote, "Sound System Interconnection" (included here) contains some great pictures to aid your interconnect ventures. WEAR PARTS: This product contains no wear parts. Manual-1
-
 1
1 -
 2
2 -
 3
3 -
 4
4
 |
 |
