Rane MLM82S MLM82S Manual - Page 7
Operating Instructions - mic and line mixer
 |
View all Rane MLM82S manuals
Add to My Manuals
Save this manual to your list of manuals |
Page 7 highlights
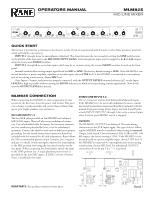
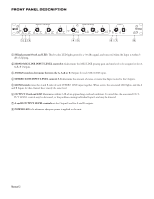
OPERATING INSTRUCTIONS MONO MICROPHONE/LINE LEVEL INPUTS 1-4 The microphone preamps in the MLM82S have a combination gain trim and Level control. The LEVEL control adjusts both the input dynamic range and mix level. There is no need for the typical independent gain trim control found on most mixers. The PHANTOM POWER switch activates 15 volt Phantom Power for all Inputs selected for microphone use. With LINE selected, Phantom Power is defeated only in that Input. 15 volts is sufficient power for all but the most esoteric condenser microphones. If in doubt, check the manufacturer's microphone specs. SIGNAL PRESENT/OVERLOAD INDICATORS The MLM82S has four bi-color indicators for Signal Present/ Overload (green/red). Green indication occurs when there is a signal present above -30 dBu. This lamp should be glowing green when signal is present. If this lamp is off, check these possibilities: A. The Input may not be connected. B. There is little or no signal present at the moment. C. There is a Mic connected to a channel switched to LINE. D. The Mic needs Phantom Power (See Rear Panel, 2). E. The LEVEL control needs to be increased (clockwise). F. The cable is not wired properly (See the Sound System Inter- connection RaneNote). STEREO LINE LEVEL INPUTS 5-8 The STEREO LINE INPUT LEVEL controls adjust both A and B Inputs equally. Use the OUTPUT LEVEL controls together for overall output adjustment, or separately to control balance. A single mono input may be used for the A and/or B inputs. Any mono source connected to A will go to the A output. Any mono source connected to the B input will go to the B output. If you wish one or two mono sources to go to both A and B outputs, press the MONO switch. If you wish to mono a single stereo source and have it present in A and B outputs, press the mono switch. STEREO LINE INPUTS 5-8 may each be independently set for mono operation. HOLE PLUGS To protect the setting of any rotary control, remove the knob by simply pulling it off, and snap in one of the hole plugs included with your unit. To protect the entire front panel, use a Rane SC 1.7 Security Cover. A red glowing LED indicates that the levels are so high that distortion due to clipping is occurring or imminent. Check these conditions: A. The LEVEL control may be turned too high. B. The Output of the preceding device may need to be reduced. C. The Input may be switched to MIC with a line-level source. Switch the Input to LINE. STEREO LINE INPUTS 5 through 8 do not have overload indicators. Because 12 dB of gain is added after the STEREO LINE INPUT LEVEL controls, it is possible to overload a line input without an overload indication. The A and B OUTPUT OL indicators can overload from the Line Inputs if the OUTPUT LEVEL controls are set to 10. Although a single Input may be at unity gain, multiple active Inputs mixed together can cause an overload. If the OL indicators illuminate, just turn down the OUTPUT LEVELS until the overload stops-mix ratios will not change. ©Rane Corporation 10802 47th Ave. W., Mukilteo WA 98275-5000 TEL 425-355-6000 FAX 425-347-7757 WEB rane.com Manual-4
-
 1
1 -
 2
2 -
 3
3 -
 4
4 -
 5
5 -
 6
6 -
 7
7
 |
 |
