Pioneer HTZ-BD91HW Owner's Manual - Page 16
Wall mounting the speaker
 |
View all Pioneer HTZ-BD91HW manuals
Add to My Manuals
Save this manual to your list of manuals |
Page 16 highlights
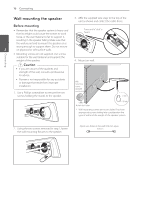
Connecting 16 Connecting Red (+) WOaralnlgem(+)ounting the speakWehitre (+) 3. Affix the supplied wire stays to the top of the unit as shown and collect the cable there. Before mounting yy Remember that the speaker system is heavy and that its weight could cause the screws to work loose, or the wall material to fail to support it, resulting in the speakerBfalalclikng(-.)Make sure that the wall you intend to mount the speaker on is strong enough to support them. Do not mount 2 on plywood or soft surface walls. Press until a "click" is heard. yy Mounting screws are not supplied. Use screws suitable for the wall material and support the weight of the speaker. >>Caution yy If you are unsure of the qualities and strength of the wall, consult a professional for advice. 4. Mount on wall. yy Pioneer is not responsible for any accidents or damage that result from improper installation. 1. Use a Phillips screwdriver to remove the two screws holding the stands to the speaker. Wall mounting screws (available commercially)* Red (+) 2. Using the two screws removed in step 1, fasten the wall mounting fixtures to the speakWehr.ite (+) Orange (+) 6 mm to 8 mm * Wall mounting screws are not included. Purchase appropriate screws taking into consideration the type of wall and the weight of the speaker system. Open two holes in the wall 818 mm apart. Black (-)
-
 1
1 -
2
-
3
-
4
-
5
-
6
-
7
-
8
-
9
-
10
-
 11
11 -
 12
12 -
 13
13 -
 14
14 -
 15
15 -
 16
16 -
 17
17 -
 18
18 -
 19
19 -
 20
20 -
 21
21 -
22
-
23
-
24
-
25
-
26
-
27
-
28
-
29
-
30
-
31
-
32
-
33
-
34
-
35
-
36
-
37
-
38
-
39
-
40
-
41
-
42
-
43
-
44
-
45
-
46
-
47
-
48
-
49
-
50
-
51
-
52
-
53
-
54
-
55
-
56
-
57
-
58
-
59
-
60
-
61
-
62
-
63
-
64
-
65
-
66
-
67
-
68
-
69
-
70
-
71
-
72
-
73
-
74
-
75
-
76
-
77
-
78
-
79
-
80
-
81
-
82
-
83
-
84
-
85
-
86
-
87
-
88
-
89
-
90
-
91
-
92
-
93
-
94
-
95
-
96
-
97
-
98
-
99
-
100
-
101
-
102
-
103
-
104
-
105
-
106
-
107
-
108
-
109
-
110
-
111
-
112
-
113
-
114
-
115
-
116
-
117
-
118
-
119
-
120
-
121
-
122
-
123
-
124
-
125
-
126
-
127
-
128
-
129
-
130
-
131
-
132
-
133
-
134
-
135
-
136
-
137
-
138
-
139
-
140
-
141
-
142
-
143
-
144
-
145
-
146
-
147
-
148
-
149
-
150
-
151
-
152
-
153
-
154
-
155
-
156
-
157
-
158
-
159
-
160
-
161
-
162
-
163
-
164
-
165
-
166
-
167
-
168
-
169
-
170
-
171
-
172
-
173
-
174
-
175
-
176
-
177
-
178
-
179
-
180
-
181
-
182
-
183
-
184
-
185
-
186
-
187
-
188
-
189
-
190
-
191
-
192
-
193
-
194
-
195
-
196
-
197
-
198
-
199
-
200
-
201
-
202
-
203
-
204
-
205
-
206
-
207
-
208
-
209
-
210
-
211
-
212
-
213
-
214
-
215
-
216
-
217
-
218
-
219
-
220
 |
 |
