Panasonic WVSP302 WVSP302 User Guide - Page 84
Con the schedule settings of the FTP periodic image transmission, FTP img. trans.]
 |
View all Panasonic WVSP302 manuals
Add to My Manuals
Save this manual to your list of manuals |
Page 84 highlights
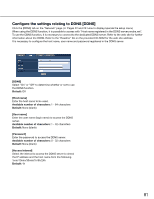
[Image capture size] Select the capture size of images to be transmitted from the following. When "4:3" is selected for "Aspect ratio" QVGA/VGA/1280 x 960 *1 QVGA/VGA/800 x 600 *2 When "16:9" is selected for "Aspect ratio" 320 x 180/640 x 360/1280 x 720 *1 320 x 180/640 x 360 *2 Default: VGA *1 SP306 *2 SP302 SP305 SF332 SF336 SF335 Configure the schedule settings of the FTP periodic image transmission [FTP img. trans.] Click the [FTP img. trans.] tab on the "Network" page. (☞ Pages 22 and 23: How to display/operate the setup menu) The schedule settings of the FTP periodic image transmission can be configured in this section. Refer to page 83 for further information about the settings relating to the FTP periodic image transmission. How to set the schedules Step 3 Click the [Set] button after completing the settings. → The result will be displayed at the bottom of the window. Step 1 Check the check box of the desired day of the week of "FTP image transmission schedle". → The selected day of the week will be validated for the schedule. Step 2 To designate time, click [C] and select the desired "hour" and "minute". When not designating time, check the checkbox of "24h". 84
-
 1
1 -
2
-
3
-
4
-
5
-
6
-
7
-
8
-
9
-
10
-
11
-
12
-
13
-
14
-
15
-
16
-
17
-
18
-
19
-
20
-
21
-
22
-
23
-
24
-
25
-
26
-
27
-
28
-
29
-
30
-
31
-
32
-
33
-
34
-
35
-
36
-
37
-
38
-
39
-
40
-
41
-
42
-
43
-
44
-
45
-
46
-
47
-
48
-
49
-
50
-
51
-
52
-
53
-
54
-
55
-
56
-
57
-
58
-
59
-
60
-
61
-
62
-
63
-
64
-
65
-
66
-
67
-
68
-
69
-
70
-
71
-
72
-
73
-
74
-
75
-
76
-
77
-
78
-
 79
79 -
 80
80 -
 81
81 -
 82
82 -
 83
83 -
 84
84 -
 85
85 -
 86
86 -
 87
87 -
 88
88 -
 89
89 -
90
-
91
-
92
-
93
-
94
-
95
-
96
-
97
-
98
-
99
-
100
-
101
-
102
 |
 |
