Nikon Z 7 Technical Guide Images Edition
Nikon Z 7 Manual
 |
View all Nikon Z 7 manuals
Add to My Manuals
Save this manual to your list of manuals |
Nikon Z 7 manual content summary:
- Nikon Z 7 | Technical Guide Images Edition - Page 1
Professional Technical Guide -Images- - Nikon Z 7 | Technical Guide Images Edition - Page 2
Table of Contents Sharpening and Softening Images 3 Step 1: Make Quick Edits Using "Quick Sharp 3 Step 2: Fine-Tune "Sharpening", "Mid-Range Sharpening", and "Clarity 4 "Sharpening", "Mid-Range Sharpening", and "Clarity 7 Capture NX‑D...9 Keeping Pictures Sharp at Small Apertures 10 Diffraction - Nikon Z 7 | Technical Guide Images Edition - Page 3
and +2 (Sharper in the i menu) are automatically matched by balanced adjustments to Sharpening, Mid-range sharpening, and Clarity. Select A to let the camera automatically choose the optimal values for the scene. For images that are softer overall, select a negative (softer) value. This can be used - Nikon Z 7 | Technical Guide Images Edition - Page 4
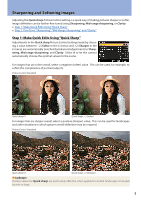
Sharpening and Softening Images, Continued Step 2: Fine-Tune "Sharpening", "Mid-Range Sharpening", and "Clarity" After using Quick sharp to obtain the desired overall look, you can finetune the results using Sharpening and its sisters. The examples below show how to soften the complexions of - Nikon Z 7 | Technical Guide Images Edition - Page 5
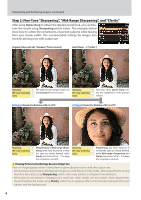
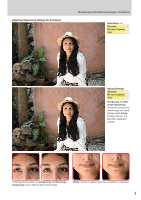
Adjusting Sharpening Settings for A3 Output Sharpening and Softening Images, Continued Quick Sharp: −2 Sharpening −0.5 Mid-range sharpening −1 Clarity −1 Adjusted Settings Sharpening 2 Mid-range sharpening 1 Clarity −1 Sharpening and Midrange sharpening have been increased so that the - Nikon Z 7 | Technical Guide Images Edition - Page 6
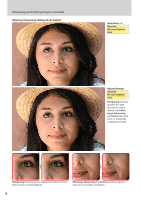
Sharpening and Softening Images, Continued Adjusting Sharpening Settings for A1 Output Quick Sharp: −2 Sharpening −0.5 Mid-range sharpening −1 Clarity −1 Adjusted Settings Sharpening 3 Mid-range sharpening −1 Clarity −1 Sharpening has been raised to 3 so that the eyes are clearly - Nikon Z 7 | Technical Guide Images Edition - Page 7
Sharpening and Softening Images, Continued "Sharpening", "Mid-Range Sharpening", and "Clarity" Sharpening, Mid-range sharpening, and Clarity each apply to different areas of the image. In the picture shown here, for example, Sharpening can be employed in fine-tuning the appearance of eyelashes and - Nikon Z 7 | Technical Guide Images Edition - Page 8
other settings for pictures shot in NEF (RAW) format can be adjusted after shooting us‑ ing Capture NX‑D or the NEF (RAW) processing option in camera's retouch menu, whether or not they have previously been altered on the - Nikon Z 7 | Technical Guide Images Edition - Page 9
Control icon (q) in the edit palette and select Camera compatible > Latest Picture Control from the Picture Control menu (w). q w * Digital SLR and Nikon 1 cameras. Capture NX‑D can be downloaded free-of-charge from the Nikon Download Center at the URL below: https://downloadcenter.nikonimglib - Nikon Z 7 | Technical Guide Images Edition - Page 10
well as with CPU-equipped F mount lenses connected via an FTZ mount adapter (non-CPU lenses are not supported). Capture NX‑D The Diffraction compensation option in the Capture NX‑D Camera and Lens Corrections tool can be used to turn diffraction compensation on or off when NEF (RAW) pictures taken
-
 1
1 -
 2
2 -
 3
3 -
 4
4 -
 5
5 -
 6
6 -
 7
7 -
8
-
9
-
10
 |
 |
Professional
Technical Guide
—Images—