NEC NP-P547UL User Manual English - Page 39
Turning on the Projector, Remove the lens cap., Press the, POWER button on the projec
 |
View all NEC NP-P547UL manuals
Add to My Manuals
Save this manual to your list of manuals |
Page 39 highlights
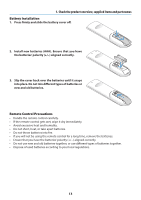
2-3. Turning on the Projector 2. Projecting an Image (Basic Operation) WARNING The projector produces a strong light. When turning on the power, make sure no one within projection range is looking at the lens. 1. Remove the lens cap. With the lens cap's stopper pressed up, pull forward and off. 2. Press the (POWER) button on the projector cabinet or the POWER ON button on the remote control. The POWER indicator lights blue and the image is projected on the screen. TIP: • When the message "PROJECTOR IS LOCKED ! ENTER YOUR KEYWORD."is displayed, it means that the [SECURITY] feature is turned on. (→ page 46) After you turn on your projector, ensure that the computer or video source is turned on. NOTE: • When no input signal is present, the no-signal guidance is dis- played (factory menu setting). Stopper Standby Blinking Power On Blinking orange light Blinking blue Steady blue light light 18
-
 1
1 -
2
-
3
-
4
-
5
-
6
-
7
-
8
-
9
-
10
-
11
-
12
-
13
-
14
-
15
-
16
-
17
-
18
-
19
-
20
-
21
-
22
-
23
-
24
-
25
-
26
-
27
-
28
-
29
-
30
-
31
-
32
-
33
-
 34
34 -
 35
35 -
 36
36 -
 37
37 -
 38
38 -
 39
39 -
 40
40 -
 41
41 -
 42
42 -
 43
43 -
 44
44 -
45
-
46
-
47
-
48
-
49
-
50
-
51
-
52
-
53
-
54
-
55
-
56
-
57
-
58
-
59
-
60
-
61
-
62
-
63
-
64
-
65
-
66
-
67
-
68
-
69
-
70
-
71
-
72
-
73
-
74
-
75
-
76
-
77
-
78
-
79
-
80
-
81
-
82
-
83
-
84
-
85
-
86
-
87
-
88
-
89
-
90
-
91
-
92
-
93
-
94
-
95
-
96
-
97
-
98
-
99
-
100
-
101
-
102
-
103
-
104
-
105
-
106
-
107
-
108
-
109
-
110
-
111
-
112
-
113
-
114
-
115
-
116
-
117
-
118
-
119
-
120
-
121
-
122
-
123
-
124
-
125
-
126
-
127
-
128
-
129
-
130
-
131
-
132
-
133
-
134
-
135
-
136
-
137
-
138
-
139
-
140
-
141
-
142
-
143
-
144
-
145
-
146
-
147
-
148
-
149
-
150
-
151
-
152
-
153
-
154
-
155
-
156
-
157
-
158
-
159
-
160
-
161
-
162
-
163
-
164
-
165
-
166
-
167
-
168
-
169
-
170
-
171
-
172
-
173
-
174
 |
 |
