NEC NP-P547UL User Manual English - Page 19
Clearance for Installing the Projector, Precautions for Ceiling Installation, xviii
 |
View all NEC NP-P547UL manuals
Add to My Manuals
Save this manual to your list of manuals |
Page 19 highlights
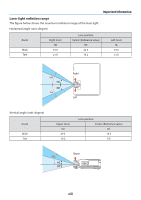
Important Information • Take measures to prevent external light from shining on the screen. Make sure only the light from the projector shines on the screen. The less external light on the screen, the higher the contrast and the more beautiful the images. • About screens Images will not be clear if there is dirt, scratches, discoloration, etc. on your screen. Handle the screen with care, protecting it from volatile substances, scratches and dirt. Clearance for Installing the Projector When installing the projector, keep sufficient space around it, as described below. If not, the hot exhaust emitted from the projector may be taken back in. Also, make sure no wind from an air-conditioner hits the projector. The projector's heat control system may detect an abnormality (temperature error) and automatically shut off the power. 20 cm/8" or greater Wall Exhaust vent NOTE: • In the above figure, it is assumed that there is sufficient space above the projector. There is also an intake vent on the back. Leave about 10 cm or more space behind, and even more space for installing the cables. Precautions for Ceiling Installation Do not install the projector in the following places. Attached substances such as oil, chemicals and moisture may cause deformation or cracks of the cabinet, corrosion of the metal parts, or malfunction. • Outdoors and places with humid or dust • Places exposed to oil smoke or steam • Places where corrosive gases are generated xviii
-
 1
1 -
2
-
3
-
4
-
5
-
6
-
7
-
8
-
9
-
10
-
11
-
12
-
13
-
 14
14 -
 15
15 -
 16
16 -
 17
17 -
 18
18 -
 19
19 -
 20
20 -
 21
21 -
 22
22 -
 23
23 -
 24
24 -
25
-
26
-
27
-
28
-
29
-
30
-
31
-
32
-
33
-
34
-
35
-
36
-
37
-
38
-
39
-
40
-
41
-
42
-
43
-
44
-
45
-
46
-
47
-
48
-
49
-
50
-
51
-
52
-
53
-
54
-
55
-
56
-
57
-
58
-
59
-
60
-
61
-
62
-
63
-
64
-
65
-
66
-
67
-
68
-
69
-
70
-
71
-
72
-
73
-
74
-
75
-
76
-
77
-
78
-
79
-
80
-
81
-
82
-
83
-
84
-
85
-
86
-
87
-
88
-
89
-
90
-
91
-
92
-
93
-
94
-
95
-
96
-
97
-
98
-
99
-
100
-
101
-
102
-
103
-
104
-
105
-
106
-
107
-
108
-
109
-
110
-
111
-
112
-
113
-
114
-
115
-
116
-
117
-
118
-
119
-
120
-
121
-
122
-
123
-
124
-
125
-
126
-
127
-
128
-
129
-
130
-
131
-
132
-
133
-
134
-
135
-
136
-
137
-
138
-
139
-
140
-
141
-
142
-
143
-
144
-
145
-
146
-
147
-
148
-
149
-
150
-
151
-
152
-
153
-
154
-
155
-
156
-
157
-
158
-
159
-
160
-
161
-
162
-
163
-
164
-
165
-
166
-
167
-
168
-
169
-
170
-
171
-
172
-
173
-
174
 |
 |
