NEC NP-P502HL APP User Manual - Page 21
Projector Control, Web Server, Start The Projector Control
 |
View all NEC NP-P502HL manuals
Add to My Manuals
Save this manual to your list of manuals |
Page 21 highlights
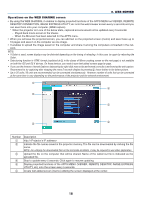
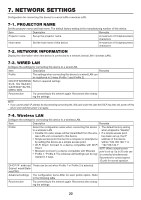
6. WEB SERVER ⑧ Terminal list • List of terminals that are connecting with the projector via Image Express Utility Lite or Wireless Image Utility. • The terminal names currently shown on the display are listed in gray . • Able to switch the position to display by the drag and drop terminal names. • Terminal names can be sorted by clicking the SORT BY NAME. NOTE: • For utilizing this function, images transmitted from the computer and other terminals must be projected on. For more detailed information for utilizing the Image Express Utility Lite and the Wireless Image Utility, please see the HELP for each application. • This is the function for exclusive one person. You cannot share to use this function while it has been utilized on other comput- ers. 6-3. PROJECTOR CONTROL There are 2 types of screen available, a "PROJECTOR ADJUSTMENTS" screen to control the projector and a "NETWORK SETTINGS" to configure the network settings. You can switch between these 2 screens using the tabs. Start the PROJECTOR CONTROL 1. Connect the projector and the computer in a network. 2. Boot up a browser on the computer and access to the WEB SERVER. • Please refer to "How to access the WEB SERVER" on page 16. The screen of the WEB SHARING will be displayed. • Click the [PROJECTOR CONTROL] tab for switching it to the PROJECTOR CONTROL. Controlling the projector (PROJECTOR ADJUSTMENTS) Enable to control image and volume and switch the input terminal. At the same time, it can be used for checking the light hours used. Configure network settings (NETWORK SETTINGS) See "7. NETWORK SETTINGS" for details on the wired LAN and wireless LAN settings. (→ page 22) • Set the alert mail (ALERT MAIL) Refer to Page 29 for the functional description. • NETWORK SERVICE Set each login password for the HTTP server and PJLink, and validity of AMX BEACON. • CRESTRON setting Refer to Page 30 for the functional description. • Network information (INFORMATION) Display the information of the network set in this device. 21
-
 1
1 -
2
-
3
-
4
-
5
-
6
-
7
-
8
-
9
-
10
-
11
-
12
-
13
-
14
-
15
-
 16
16 -
 17
17 -
 18
18 -
 19
19 -
 20
20 -
 21
21 -
 22
22 -
 23
23 -
 24
24 -
 25
25 -
 26
26 -
27
-
28
-
29
-
30
-
31
-
32
-
33
-
34
-
35
 |
 |
