NEC NP-P502HL APP User Manual - Page 12
REMOTE DESKTOP CONNECTION, Checking the IP address on Windows 7, Click [Control Panel].
 |
View all NEC NP-P502HL manuals
Add to My Manuals
Save this manual to your list of manuals |
Page 12 highlights
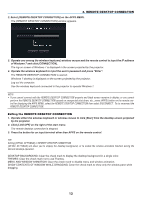
3. REMOTE DESKTOP CONNECTION Checking the IP address on Windows 7 1. Click [Start] from the desktop of Windows 7. 2. Click [Control Panel]. 3. Click [View network status and tasks] displayed under [Network and Internet]. 4. Click [View status] displayed in blue on the right of [Local Area Connection] in the window. The [Local Area Connection Status] window appears. 5. Click [Details...]. Write down the value for "IPv4 IP Address" (xxx.xxx.xxx.xxx) displayed. 6. Click [Close]. 7. Click [X] at the upper right of the window. The system goes back to the desktop. Starting REMOTE DESKTOP CONNECTION 1. Press the APPS button on the remote control when the projector is in the state of powered ON. The APPS MENU screen will be displayed. 12
-
 1
1 -
2
-
3
-
4
-
5
-
6
-
 7
7 -
 8
8 -
 9
9 -
 10
10 -
 11
11 -
 12
12 -
 13
13 -
 14
14 -
 15
15 -
 16
16 -
 17
17 -
18
-
19
-
20
-
21
-
22
-
23
-
24
-
25
-
26
-
27
-
28
-
29
-
30
-
31
-
32
-
33
-
34
-
35
 |
 |

12
3. REMOTE DESKTOP CONNECTION
Checking the IP address on Windows 7
1. Click [Start] from the desktop of Windows 7.
2. Click [Control Panel].
3. Click [View network status and tasks] displayed under [Network and Internet].
4. Click [View status] displayed in blue on the right of [Local Area Connection] in the window.
The [Local Area Connection Status] window appears.
5. Click [Details...].
Write down the value for “IPv4 IP Address” (xxx.xxx.xxx.xxx) displayed.
6. Click [Close].
7. Click [X] at the upper right of the window.
The system goes back to the desktop.
Starting REMOTE DESKTOP CONNECTION
1. Press the APPS button on the remote control when the projector is in the state of powered ON.
The APPS MENU screen will be displayed.