NEC N500i User Guide - Page 78
Adding a frame to the image, Saving the edited image, Printing an image using a printer, My data M6
 |
View all NEC N500i manuals
Add to My Manuals
Save this manual to your list of manuals |
Page 78 highlights
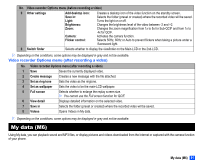
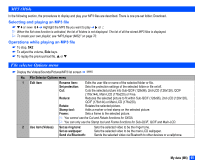
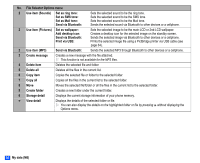
☛ SK1 when finished applying the stamp (the stamp preview will not be applied this time) Adding a frame to the image ☛ Highlight or display the image file you wish to edit ➔ various frames by ▲ and ▼ ➔ to confirm. 1 7 ➔ Highlight a frame ➔ to preview the resulting image ➔ Scroll through the Saving the edited image ☛ After any edition, SK1 or to save the edited image ➔ Select the Save Quality 2 SK1 to check the expected size of the image. ☛ Edit the name (if required) ➔ Printing an image using a printer You can print an Exif format image file by connecting your phone to a PictBridge compatible printer using a USB cable. 2 There may be PictBridge compatible printers that cannot be connected to your phone. 2 Refer to the operation manual of the printer for details on the printing. ☛ ▼ 3 or ▼ 2 3 ➔ Highlight a folder ➔ or ➔ Highlight an image file you wish to print ➔ 2 4 2 "Print via USB" may be displayed in gray and unavailable, depending on the image file. ☛ Connect your phone and the printer with the USB cable ➔ Prepare the printer ready for printing, referring to its manual ☛ Check the print detail screen displayed ☛ To print as seen on the detail screen, SK1 ☛ To edit the print detail and then print, on the print detail screen to display the Options menu ➔ Edit the detail using the Options menu ➔ SK1 2 The Options menu may change depending on the connected printer. 2 If any interruption or error occurs, or the printing is not completed normally, pull out the USB cable and start again from the first step. No. Print via USB Options menu 1 Number of prints Sets the number of prints to output. 2 Layout detail Selects the paper size, paper type and layout to print the image file. 3 Print quality Selects the required quality of printing. 4 File name Selects whether or not to print the file name on the paper. 5 Date Selects whether or not to print the date on the paper. 2 If you want to print multiple images on one sheet, set both the settings for Number of prints and N-up on Layout screen under Layout detail. For example, 4 for Number of prints and 2 for N-up will print 2 sheets with 2 half-sized images per sheet. 64 My data (M6)
-
 1
1 -
2
-
3
-
4
-
5
-
6
-
7
-
8
-
9
-
10
-
11
-
12
-
13
-
14
-
15
-
16
-
17
-
18
-
19
-
20
-
21
-
22
-
23
-
24
-
25
-
26
-
27
-
28
-
29
-
30
-
31
-
32
-
33
-
34
-
35
-
36
-
37
-
38
-
39
-
40
-
41
-
42
-
43
-
44
-
45
-
46
-
47
-
48
-
49
-
50
-
51
-
52
-
53
-
54
-
55
-
56
-
57
-
58
-
59
-
60
-
61
-
62
-
63
-
64
-
65
-
66
-
67
-
68
-
69
-
70
-
71
-
72
-
 73
73 -
 74
74 -
 75
75 -
 76
76 -
 77
77 -
 78
78 -
 79
79 -
 80
80 -
 81
81 -
 82
82 -
 83
83 -
84
-
85
-
86
-
87
-
88
-
89
-
90
-
91
-
92
-
93
-
94
-
95
-
96
-
97
-
98
-
99
 |
 |
