Marantz SR6003 SR6003 User Manual - English - Page 80
Xm Satellite Radio, Sirius Satellite Radio - problems
 |
View all Marantz SR6003 manuals
Add to My Manuals
Save this manual to your list of manuals |
Page 80 highlights
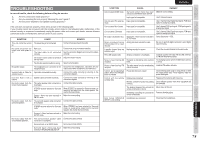
NAMES AND FUNCTION BASIC CONNECTIONS BASIC OPERATION ADVANCED CONNECTIONS XM SATELLITE RADIO If a problem should arise, first check the following. 1. Are the connections correct? 2. Have you operated the receiver according to the operating instructions? 3. Are the speakers and other components operating properIy? If this unit is not operating properly, Check the items listed in the table beIow. Should the problem persist, there may be a malfunction. Disconnect the power immediately and contact your store of purchase. SYMPTOM "TUNER" is displayed. "ANTENNA" is displayed. "NO SIGNAL" is displayed. Receiving only channels 0 and 1. "UPGRADE TUNER" is displayed. CAUSE REMEDY The XM Mini-Tuner and this unit are not Check that the units are properly properly connected. connected. The XM antenna is not properly connected Check that the antenna is properly to the Mini-Tuner Dock. connected. Also, check the antenna cable for damage. The Signal cannot be received. Reposition your XM antenna. The XM Mini-Tuner is not activated. Contact XM Satellite Radio. (See page 53) The connected XM CNP-1000 is Upgrade the XM CNP-1000 to the XM incompatible. Mini-Tuner. Report the model of the AV receiver and the ID number of the CNP-1000 to XM Listener Care. (See page 53) SIRIUS SATELLITE RADIO SYMPTOM "TUNER ERR" is displayed. "ANTENNA" is displayed "ACQUIRING" is displayed. "CALL SIRIUS" is displayed "FIRM UPDT" is displayed CAUSE REMEDY SiriusConnectTM tuner is not properly Check the 8pin mini DIN cable and AC connected. adapter connection are correct. Antenna is not properly connected. Check the antenna cable connection is correct. The signal cannot be received. Reposition your SiriusConnectTM tuner and antenna. You have not subscribed for the selected Call SIRIUS if you want to subscribe. channel. (See page 58) SiriusConnectTM is updating software. Wait until the updating is complete. PROTECTIVE FEATURE In some cases, the STANDBY indicator may blink slowly, twice per second. In this case, turn off the unit, unplug the power cord, and check the following points. • Make sure the speaker cables are not reversed and connected to the wrong sides (+ and -) on the unit. • Make sure the speaker cables connected to the unit are not shorted. (Check both the unit end and the speaker end.) • Make sure the volume does not exceed the level that the unit is capable of producing. • When using the unit in a rack or other enclosed space, heat may build up inside the unit and cause a fire. When installing the unit, be sure to leave sufficient space between the top, back and both sides of the unit and walls or other AV components to prevent the internal temperature from rising. After checking these points, plug in the power cord and use the remote controller to turn on the unit. Turn down the volume before resuming playback. Confirm that there are no problems with the speaker connections and playback performance. If this symptom recurs, request service at your nearest service center. In rare instances, the unit may enter standby mode and the STANDBY indicator may blink rapidly, 8 times per second. In this case, unplug the power cord and request service at your nearest service center. ENGLISH SURROUND PURE EXIT MODE DIRECT CLEAR FRONT KEY (BUTTON) LOCK OF THE UNIT To lock all front panel buttons (except the POWER ON/OFF button) and the INPUT SELECTER and VOLUME knobs, hold the PURE DIRECT and EXIT buttons on the front panel simultaneously for at least 3 seconds. At this time, "F-KEY LOCK!" is displayed. To unlock the controls, press the same buttons again simultaneously for at least 3 seconds. At this time, "F-KEY UNLOCK" is displayed, and the buttons are released. GENERAL MALFUNCTION If the equipment malfunctions, this may be because an electrostatic discharge or AC line interference has corrupted the information in the equipment memory circuits. Therefore: - disconnect the plug from the AC line supply - after waiting at least three minutes, reconnect the plug to the AC line supply - re-attempt to operate the equipment Memory backup • In case a power outage occurs or the power cord is accidentally unplugged, this unit is equipped with a backup function to prevent memory data such as the preset memory from being erased. HOW TO RESET THE UNIT Should the operation or display seem to be abnormal, reset the unit with the following procedure. This unit is turned on, press and hold the SURROUND MODE + CLEAR buttons simultaneously for 3 seconds or more. Remember that the procedure will reset the settings of the function selector, Surround mode, delay time, TUNER PRESET etc., to their initial settings. SETUP ADVANCED OPERATION TROUBLESHOOTING OTHERS 77
-
 1
1 -
2
-
3
-
4
-
5
-
6
-
7
-
8
-
9
-
10
-
11
-
12
-
13
-
14
-
15
-
16
-
17
-
18
-
19
-
20
-
21
-
22
-
23
-
24
-
25
-
26
-
27
-
28
-
29
-
30
-
31
-
32
-
33
-
34
-
35
-
36
-
37
-
38
-
39
-
40
-
41
-
42
-
43
-
44
-
45
-
46
-
47
-
48
-
49
-
50
-
51
-
52
-
53
-
54
-
55
-
56
-
57
-
58
-
59
-
60
-
61
-
62
-
63
-
64
-
65
-
66
-
67
-
68
-
69
-
70
-
71
-
72
-
73
-
74
-
 75
75 -
 76
76 -
 77
77 -
 78
78 -
 79
79 -
 80
80 -
 81
81 -
 82
82 -
 83
83 -
 84
84 -
 85
85 -
86
-
87
-
88
-
89
-
90
 |
 |
