Marantz SR6003 SR6003 User Manual - English - Page 36
Manual Setup, <speaker Size>, <speaker Distance>
 |
View all Marantz SR6003 manuals
Add to My Manuals
Save this manual to your list of manuals |
Page 36 highlights
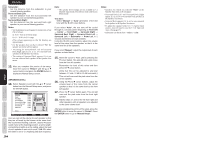
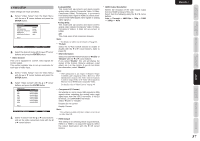
NAMES AND FUNCTION BASIC CONNECTIONS BASIC OPERATION ADVANCED CONNECTIONS ENGLISH 2-2 MANUAL SETUP 1. Select "Speaker Setup" from the Main Menu. 2. Select "Manual Setup" with the 3 or 4 cursor buttons. 3. Press the ENTER button to enter the selection. Manual Setup Speakers Size Speakers Distance Speakers Level Return : Up / Down : Enter : Select Exit : Exit 4. Select the sub-menu with the 3 or 4 cursor button, and press the ENTER button. 5. Select Speaker Size with the 3 or 4 cursor button from the Manual Setup menu, and press the ENTER button. Speakers Size Subwoofer Front Center Surround Surround Back Surround Back Size LPF / HPF Bass Mix : Yes : Small : Small : Small : 2ch : Small : 80Hz : * * * Return : Up / Down : Change Enter : Exit : Exit When setting the speaker size in the Speaker Size menu, use the guidelines below. Large: The complete frequency range for the channel you are setting will be output from the speaker. Small: Frequencies of the channel you are setting that are lower than approx. 80 Hz will be output from the subwoofer. If the Subwoofer is set to "No" and the front speakers are set to "Large," then the sound will be output from both the left and right speakers. 6. Select each speaker with the 3 or 4 cursor buttons. 7. Set the size of each speaker with the 1 or 2 cursor buttons. Subwoofer Yes: Select when a subwoofer is connected. No: Select when a subwoofer is not connected. Front Large: Select if the front speakers are large. Small: Select if the front speakers are small. • If "No" is selected for the subwoofer setting, then this setting is fixed at "Large". Center None: Select if no center speaker is connected. Large: Select if the center speaker is large. Small: Select if the center speaker is small. Surround None: Select if no surround left and right speakers are connected. Large: Select if the surround left and right speakers are large. Small: Select if the surround left and right speakers are small. Surround Back None: Select if no surround back left and right speakers are connected. 1ch: Select if one surround back speaker is connected. In this case, the audio signal is emitted from the SURR BACK LEFT SPEAKER terminal. 2ch: Select if the surround back left and right speakers are connected. Zone SPKR: Select if using the SURROUND BACK SPEAKER terminal as ZONE SPEAKER A. Notes: • If "No" is selected for the Surround setting, then this setting is fixed to "No." Surround Back Size Large: Select if the surround back speakers are large. Small: Select if the surround back speakers are small. Note: • If "None" is selected for the Surround setting, then this setting is not available. LPF/HPF When you use a subwoofer, you can select the cutoff frequency for the small speakers used. Select one of the crossover frequency levels according to the size of the small speakers connected. 60Hz → 80Hz → 100Hz → 120Hz → 140Hz → 160Hz → 180Hz Note: • If using small front speakers, set a slightly higher frequency. If using large front speakers, set a slightly lower frequency. Bass Mix • The bass mix setting is only valid when "Large" is set for the front speakers and "Yes" is set for the subwoofer during stereo playback. This setting has effect only during playback of PCM or analog stereo sources. • When "Both" is selected, the low frequencies will be played through the main L&R speakers and the subwoofer. In this playback mode, the low frequency range expands more uniformly throughout the room, but depending on the size and shape of the room, interference may result in a decrease of the actual volume of the low frequency range. • By selecting "Mix", the low frequencies will play through the main L&R only. Note: • LFE signals during playback of Dolby Digital or DTS will be played through the subwoofer. 8. After you complete this portion of the setup, move the cursor to "Return" with the 3 or 4 cursor buttons and press the ENTER button to display the Manual Setup screen. 9. Select Speaker Distance with the 3 or 4 cursor button from the Manual Setup menu, and press the ENTER button. Speakers Distance Unit Front Left Center Front Right Surround Right Surround Back Right Surround Back Left Surround Left Subwoofer : Feet : 10.0 ft : 10.0 ft : 10.0 ft : 10.0 ft : 10.0 ft : 10.0 ft : 10.0 ft : 10.0 ft Return : Up / Down : Change Enter : Exit : Exit Use this menu to specify the distance of each speaker's position from the listening position. The delay time is automatically calculated according to these distances. Begin by determining the ideal or most commonly used seating position in the room. This is important for the timing of the acoustics to create the proper sound space that the unit and today's sound systems are able to produce. Note: • For speakers for which you have selected "None", the speaker configuration sub-menu will not appear here. 10. Select either Meters or Feet for Unit with the 1 or 2 cursor buttons. 11. Select each speaker with the 3 or 4 cursor buttons. 12. Set the distance for each speaker , press the 1 or 2 cursor buttons. Front Left: Set the distance from the front left speaker to your normal listening position. Center: Set the distance from the center speaker to your normal listening position. Front Right: Set the distance from the front right speaker to your normal listening position. Surround Left: Set the distance from the surround left speaker to your normal listening position. Surround Right: Set the distance from the surround right speaker to your normal listening position. SETUP ADVANCED OPERATION TROUBLESHOOTING OTHERS 33
-
 1
1 -
2
-
3
-
4
-
5
-
6
-
7
-
8
-
9
-
10
-
11
-
12
-
13
-
14
-
15
-
16
-
17
-
18
-
19
-
20
-
21
-
22
-
23
-
24
-
25
-
26
-
27
-
28
-
29
-
30
-
 31
31 -
 32
32 -
 33
33 -
 34
34 -
 35
35 -
 36
36 -
 37
37 -
 38
38 -
 39
39 -
 40
40 -
 41
41 -
42
-
43
-
44
-
45
-
46
-
47
-
48
-
49
-
50
-
51
-
52
-
53
-
54
-
55
-
56
-
57
-
58
-
59
-
60
-
61
-
62
-
63
-
64
-
65
-
66
-
67
-
68
-
69
-
70
-
71
-
72
-
73
-
74
-
75
-
76
-
77
-
78
-
79
-
80
-
81
-
82
-
83
-
84
-
85
-
86
-
87
-
88
-
89
-
90
 |
 |
