Lexmark MX331 Quick Reference - Page 4
Cleaning the scanner, Loading trays
 |
View all Lexmark MX331 manuals
Add to My Manuals
Save this manual to your list of manuals |
Page 4 highlights
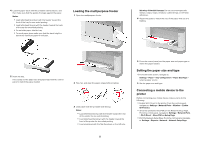
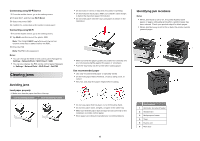
7 Insert the imaging unit. • Scanner glass pad 8 Close the door. Cleaning the scanner 1 Open the scanner cover. • ADF glass 2 Using a damp, soft, lint-free cloth, wipe the following areas: • ADF glass pad Note: In some printer models, this location has an ADF glass instead of a pad. • Scanner glass 4 3 Close the scanner cover. Loading trays 1 Remove the tray. Note: To avoid paper jams, do not remove the tray while the printer is busy. 2 Adjust the guides to match the size of the paper that you are loading. 3 Flex, fan, and align the paper edges before loading.
-
 1
1 -
 2
2 -
 3
3 -
 4
4 -
 5
5 -
 6
6 -
 7
7 -
 8
8 -
 9
9 -
 10
10 -
11
-
12
 |
 |

7
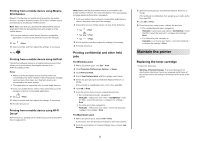
Insert the imaging unit.
8
Close the door.
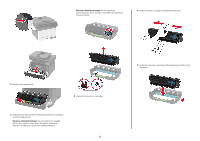
Cleaning the scanner
1
Open the scanner cover.
2
Using a damp, soft, lint-free cloth, wipe the following areas:
•
ADF glass pad
Note:
In some printer models, this location has an ADF
glass instead of a pad.
•
Scanner glass pad
•
ADF glass
•
Scanner glass
3
Close the scanner cover.
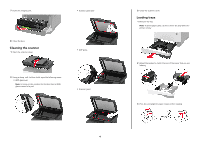
Loading trays
1
Remove the tray.
Note:
To avoid paper jams, do not remove the tray while the
printer is busy.
2
Adjust the guides to match the size of the paper that you are
loading.
3
Flex, fan, and align the paper edges before loading.
4